

What Is DataDive
Before we begin, let’s take a look at DataDive Tool for Amazon Sellers. DataDive is positioned as a tool to research products on Amazon. It lets you select a range of competitors in your product niche, and then takes all their data – from keywords they’re using, which ones they rank for, and the quality of their listings – and turns it into a super spreadsheet. DataDive calls this a Master Keyword List. The good thing about DataDive is that it’s compatible with the major Amazon marketplaces including North America, Europe, Japan and Australia.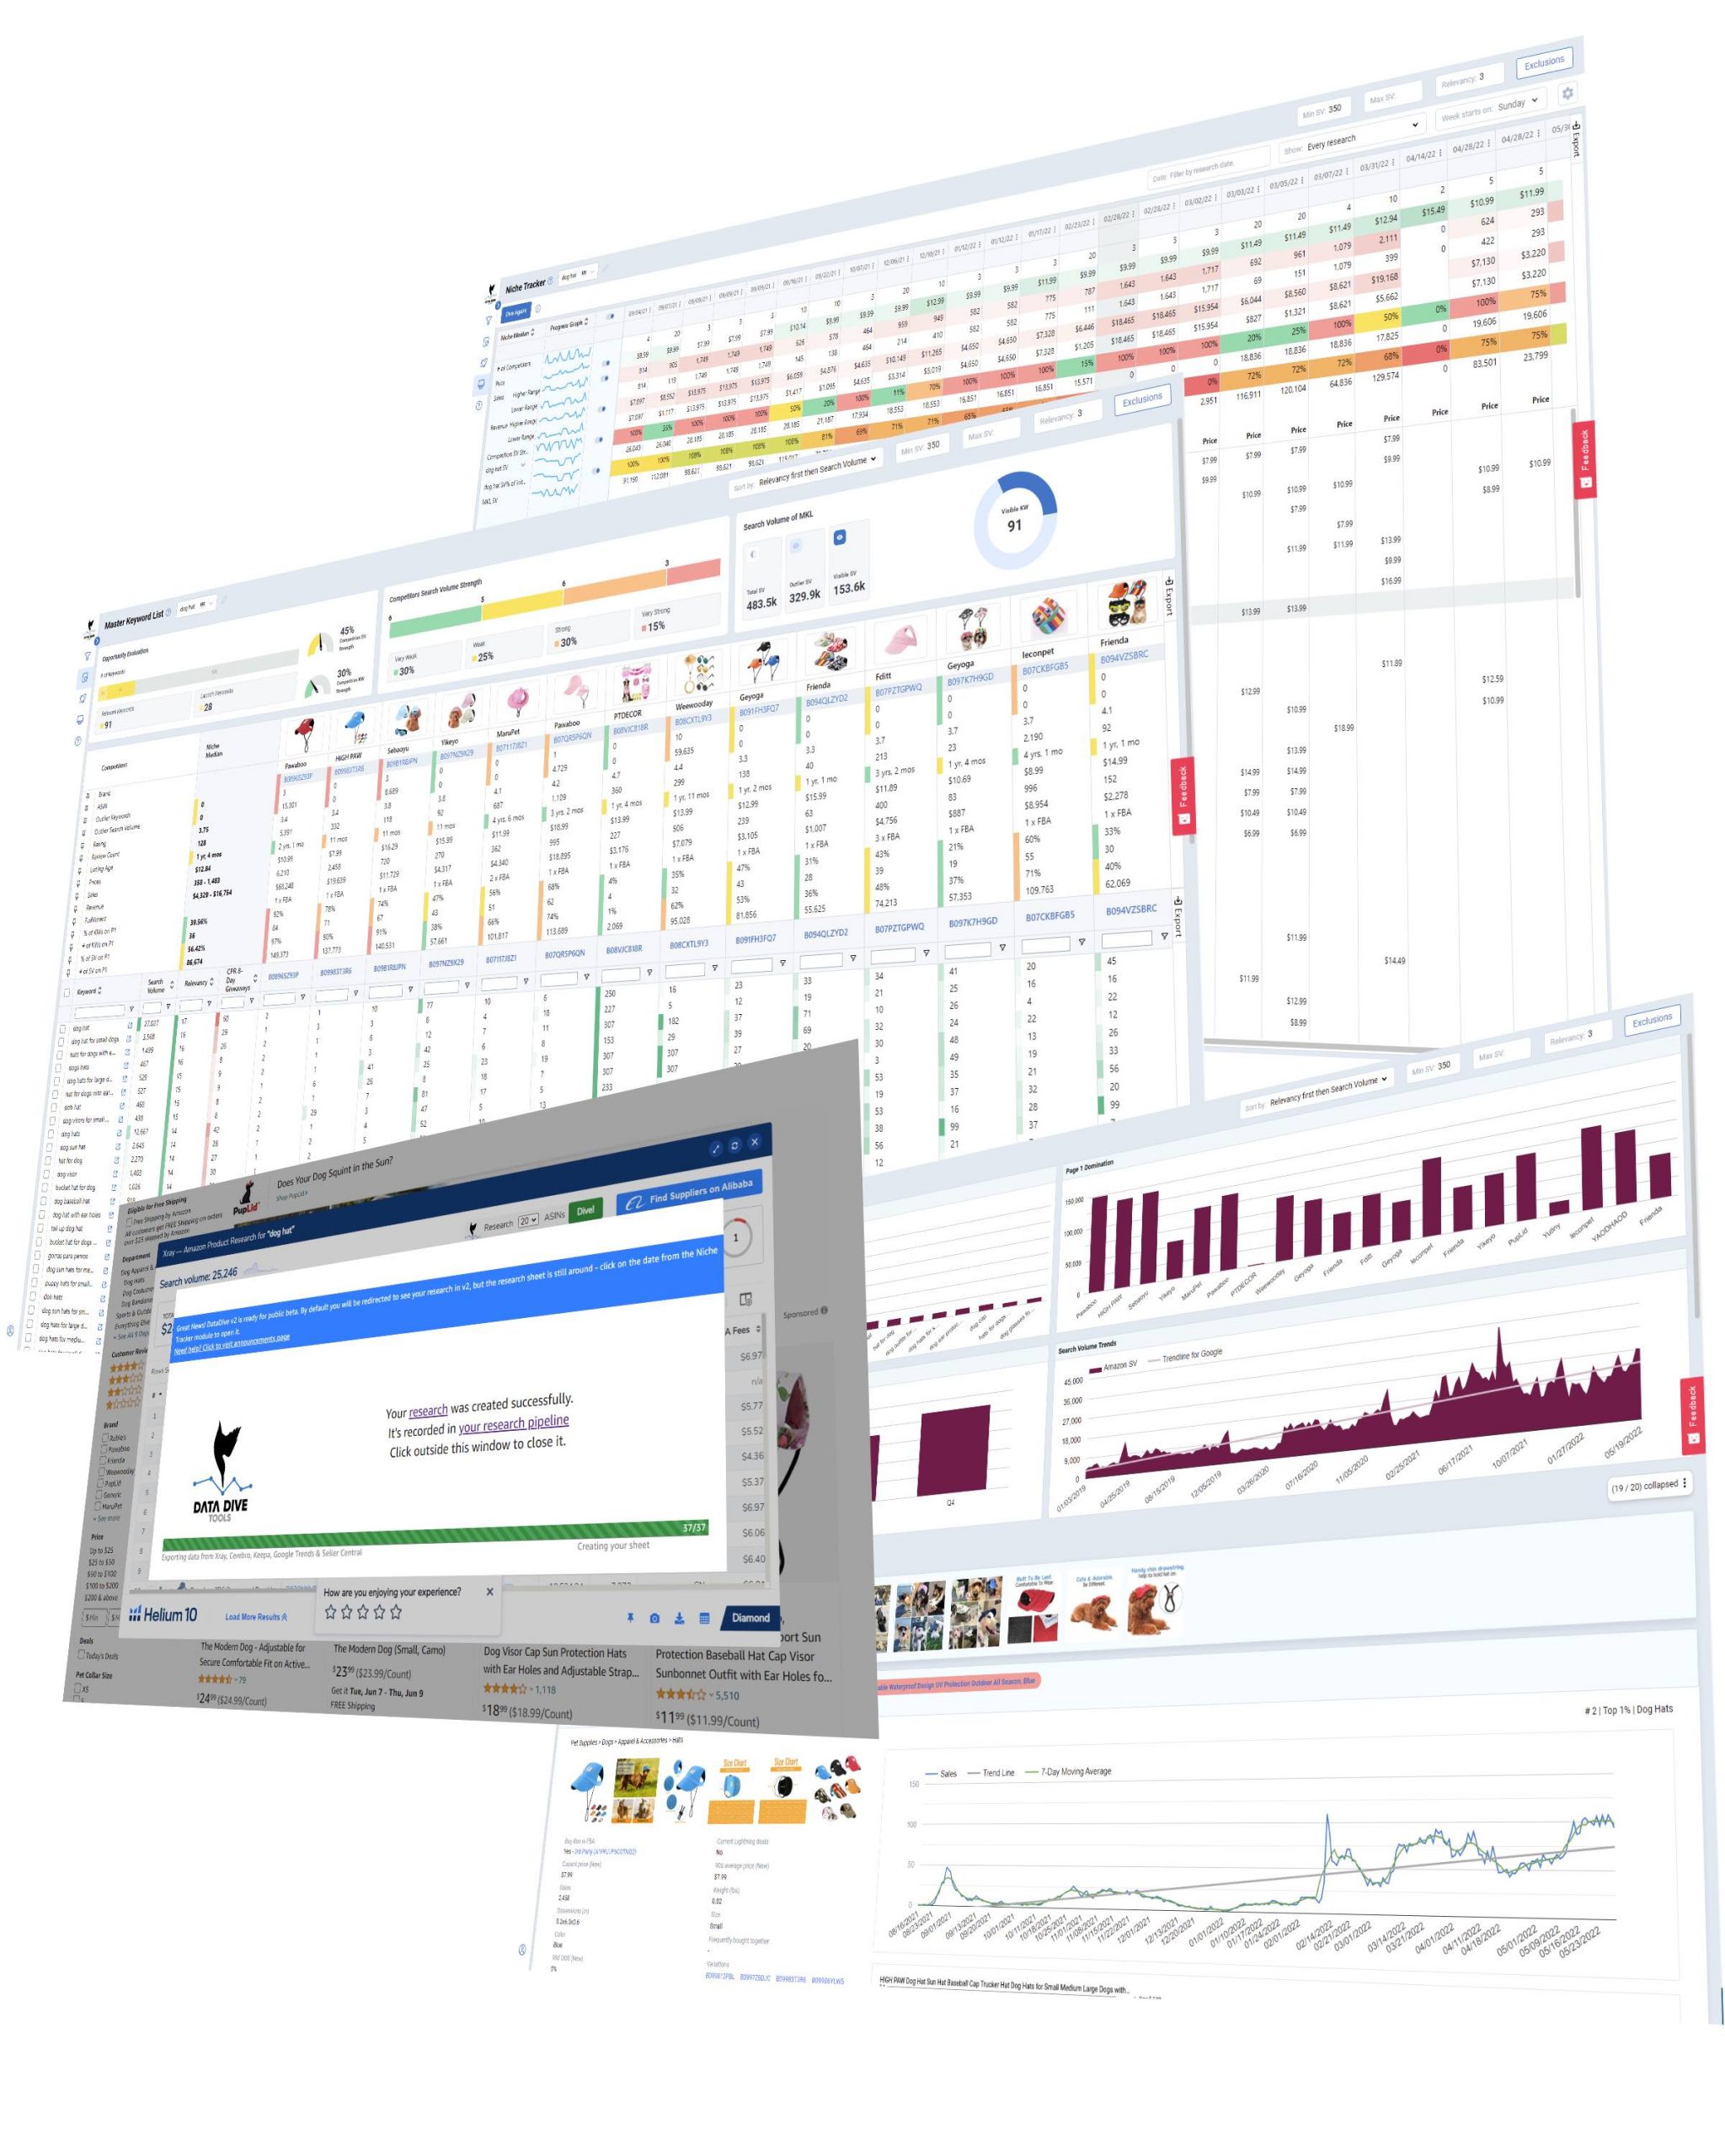

1. Getting Started with Data Dive Tools for Amazon Sellers
For the purposes of this article, we’re going to assume you’re already a member of Helium 10 and have signed up for DataDive. If not, this article will be waiting for you. For everyone else, let’s continue by making a basic search on Amazon. We’ll be using the main Amazon desktop site version for this article. When using DataDive to build your perfect listing, the first thing you’ll need to do is look at your competitors. Fortunately this step is very easy. Rather than search for individual competitors, you search for your product and find competitors that also sell it. As a general rule of thumb, the more niche your search, the lower the search volume. Since we want to cover only the very best competitors, we’re going to make our search as general as possible. Here we will search for an essential household item: a kettle.
JOIN DATA DIVE TOOLS FOR AMAZON SELLERS HERE
2. Start from the Amazon Search Page
Amazon is giving us over 2000 results for “kettle”. The good news is that we don’t need to dive that deep. Why? It goes without saying that the majority of sales happen on the first page. That’s why we want to start our research from there. For the purpose of this quick guide, we will keep it simple. The longer tail your search, the more relevant will be the competitors you will find on Amazon.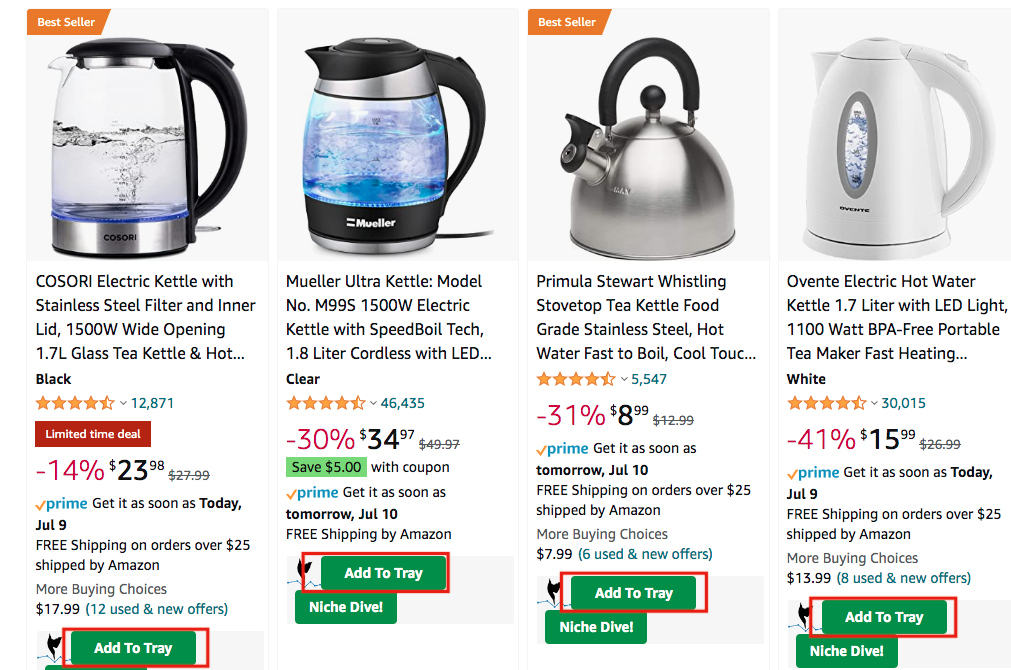
Editors note: As we say on DataDive your results are as good as your competitors list – since the tool. will get it’s keywords from the competitors you will select. Anyway, even from a broad / generic research from a short tail keyword such as “kettle” you can get great results by choosing the right competitors.
If you’ve set up everything, we can begin adding products instantly. Next to each product will be the green button Add To Tray. Click it. You will want to search for a variety of products RELEVANT to your future listing. Example: if the kettle you will write about is electric, don’t populate your list with stove top kettles. However, sometimes it can be beneficial to add a few similar but different (substitutes) items in your research. In the case of kettles, we might want to add one stovetop kettle or maybe add a kettle and teapot set. That way we expand the type of keywords we will eventually get. What this does is add it to your DataDive ASIN Tray where all the individual products you want to research are collected. We’ll take a look at it later. The other option, Niche Dive, will draw up a list of closest competitors, hero keywords and recommended keywords. Not a bad option to quickly assess the competition. What we’ll typically do is add a selection of products from the first page (while ignoring sponsored products). For the most part, these products will typically have the best Amazon SEO which also means they’ll have a quality listing we can study and improve upon. Of course a product might rank on the first page on Amazon because of a great PPC campaign or a change in pricing or another reason. To ensure we’re only adding products that consistently perform well and not a flash in a pan, we need to add products from somewhere else. And no, not from the second page!3. Take a Look at the Amazon Best Sellers Page / Browse Node
We want to add products from Amazon’s BSR (Best Seller Rank) Page. Remember that for products with a lot of competition, they can still be a bestseller despite not being on the first page. For a popular product like a kettle, if you rank in the first 400 and there’s 40000 competitors, a product can still be in the top 1% even if it doesn’t appear on page 1 at the moment of your search. We want to cover these products too. Like before, click Add To Tray.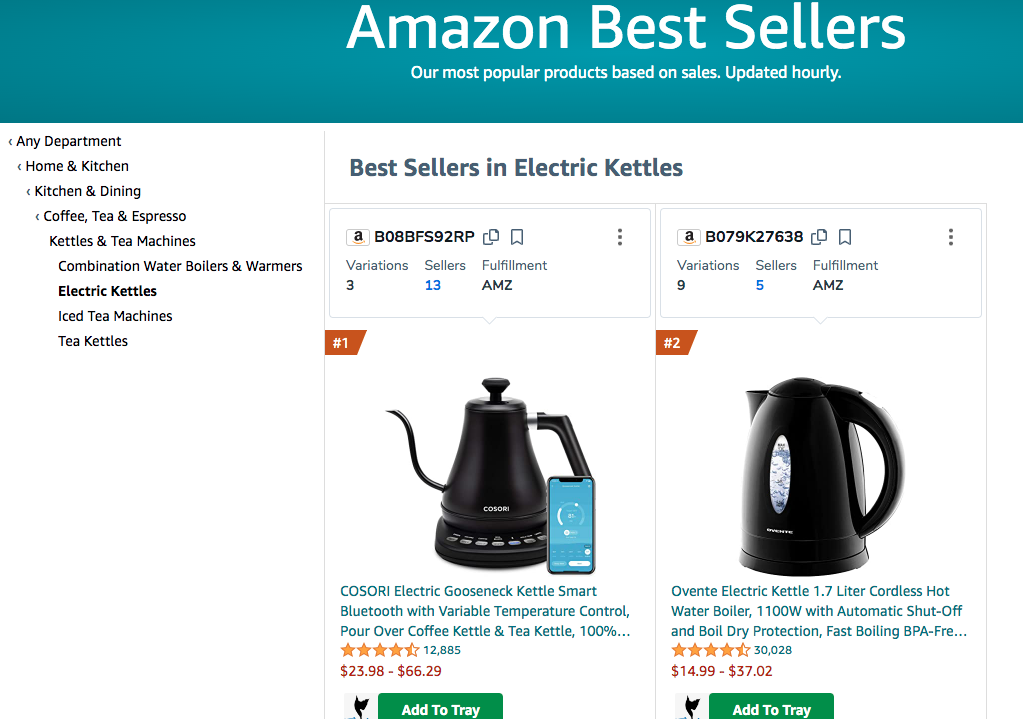 Why do we add products from the best seller’s page? Because generally, it’s exactly the best sellers who have the best SEO… it doesn’t happen yet 100% of the times (in the case of strong brands) but it’s a good rule to check the page as well for your product sub-category / browse node.
READ MORE: AMAZON SELLERS TRENDS FOR 2022
Why do we add products from the best seller’s page? Because generally, it’s exactly the best sellers who have the best SEO… it doesn’t happen yet 100% of the times (in the case of strong brands) but it’s a good rule to check the page as well for your product sub-category / browse node.
READ MORE: AMAZON SELLERS TRENDS FOR 2022
4. DataDive Tool ASIN Tray
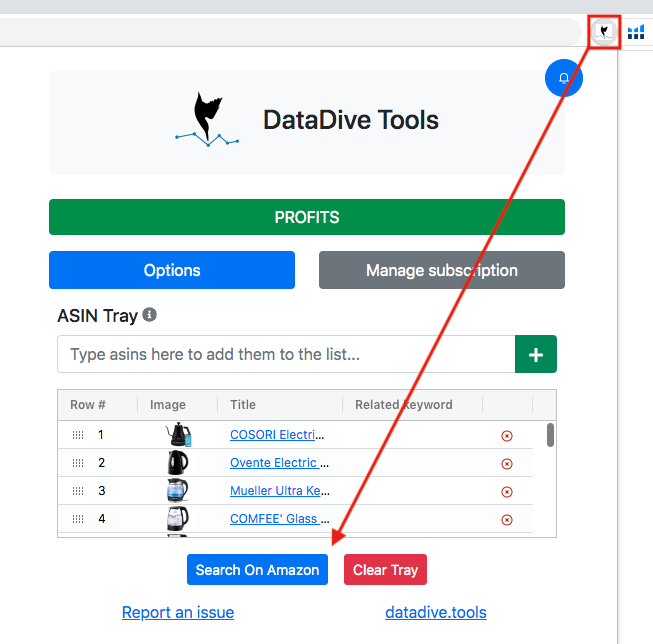 You’ve been adding products but where have they been going? Click the DataDive icon on the top right of the Chrome browser and your tray will pop up where you can see everything you’ve added. There’s a range of options to pick from here but for the purpose of this article you will want to click “Search On Amazon”. It will take you to an Amazon page where every product you added will have been collectively searched. This page isn’t important for us but it does have product ranking statistics that might be of use to you. What we want to do is click the Helium 10 extension, then Xray — Amazon Product Search.
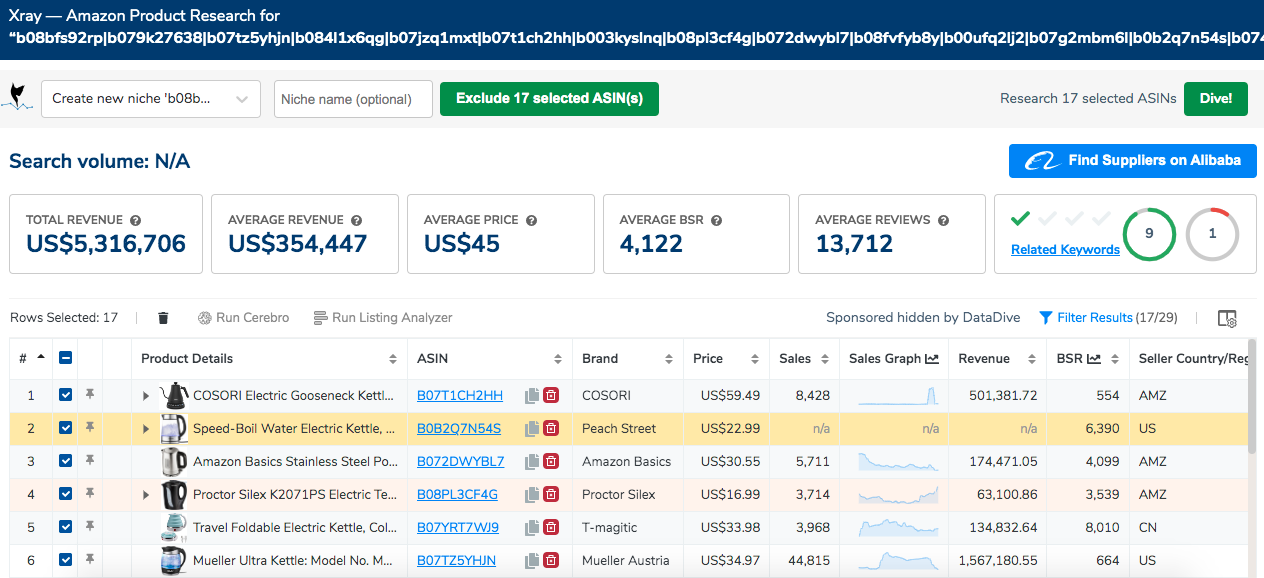
5. Xray – Amazon Product Search
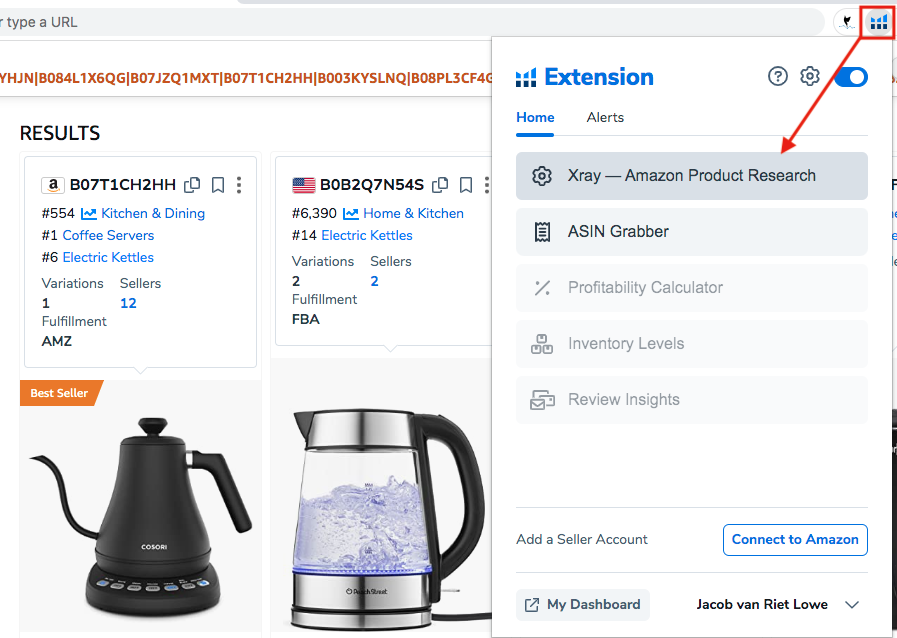 We’ve almost prepared everything for our Master Keyword List; this is the last step. On this page you have a lot of data from the average revenue to average BSR and average number of reviews. Here you can arrange products by brand or price or one of the other metrics. You can run a Cerebro search with the products you’ve selected or find suppliers on Alibaba. What we want to do now is click “Dive”.

6. An Alternative Approach
Before we dive into the Master Keyword List, we want to introduce an alternative approach. The previous steps described how to make a very focused Master Keyword List. However, there is a simpler, faster, more general approach you can take. As before, search your product on Amazon. Now instead of adding individual products to Amazon (steps 1-3), click on the Helium 10 extension, then Xray — Amazon Product Search. This time it will search by the keyword you entered, not the products you selected.
7. The Master Keyword List
We’re finally here. Now you have your Master Keyword List. More than a list, it’s a dashboard of impressive information. A shareable Google Sheet version is also created at the same time and saved to your Google account. Unfortunately we don’t have time to tour it all. What we want to bring your attention to is a few key items that will help with writing a perfect listing. The first is the amount of keywords. For our kettle we have a good selection with 223 relevant keywords using only the default settings. However, the more niche you go, the less you’ll have. If that happens, you can change the Minimum Search Volume and Relevancy. While this will increase the amount of potential keywords you have at your disposal, it also means these keywords might not be applicable for your listing. In this case you need to clean up the Master Keyword List before you begin writing.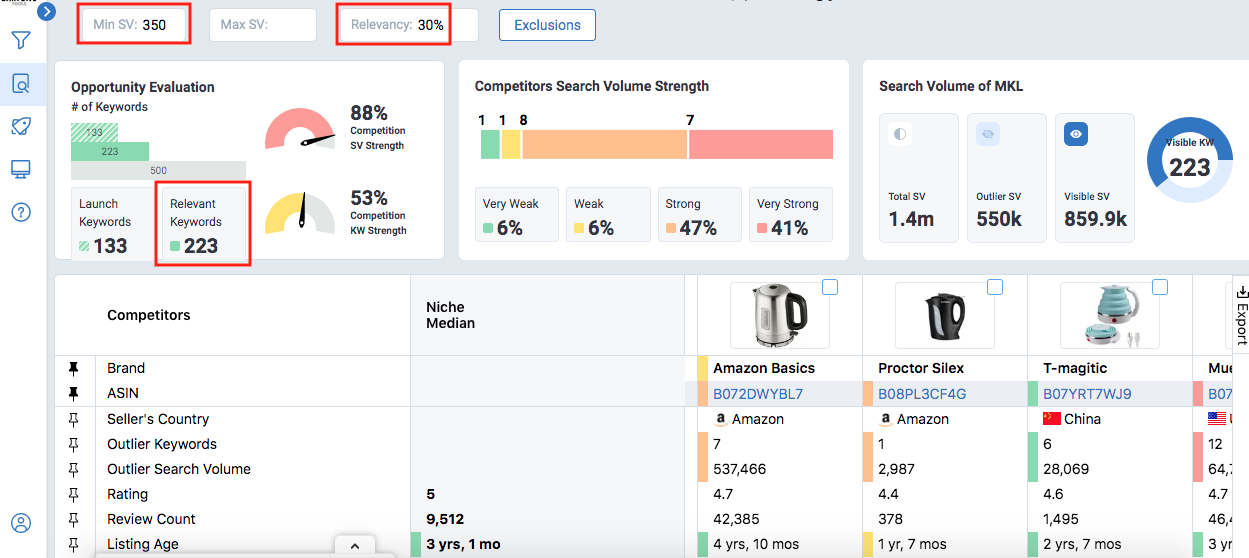 When we clean up a Master Keyword List and exclude keywords we must look for several things. Or rather, we look for several things we don’t want. First of all, we remove competitor names; don’t want to drive traffic to their listings. We also remove any terms that Amazon doesn’t approve of such as “on sale”.
Finally we remove words or phrases that might appear related but are not. For example, we might keep “kettle for teapots” since the boiled water for a kettle can go into a teapot but we might remove “kettle for campfires” if our product is an electric kettle. This is important to do because if we have chosen a competitor that has a kettle that’s designed for campfires, then they will rank for those related keywords and we won’t. Not a good idea when we’re building a listing and comparing our juice score. More on that in a second.
When we clean up a Master Keyword List and exclude keywords we must look for several things. Or rather, we look for several things we don’t want. First of all, we remove competitor names; don’t want to drive traffic to their listings. We also remove any terms that Amazon doesn’t approve of such as “on sale”.
Finally we remove words or phrases that might appear related but are not. For example, we might keep “kettle for teapots” since the boiled water for a kettle can go into a teapot but we might remove “kettle for campfires” if our product is an electric kettle. This is important to do because if we have chosen a competitor that has a kettle that’s designed for campfires, then they will rank for those related keywords and we won’t. Not a good idea when we’re building a listing and comparing our juice score. More on that in a second.

JOIN DATA DIVE TOOLS FOR AMAZON SELLERS HERE
8. Juice Scores and Comparing Products
A juice score is DataDive’s term for a listing’s overall score, which indicates the quality of a listing in terms of keywords used. The more keywords you use, the higher your score. In the screenshot below we are looking at the Listing Builder function – which as the name suggests is where we can build the text for our listing. As you start building the title, the bullet points or the description, you can see which keywords you are using. The full list will appear in the Keyword column (the red box). We’ve taken the liberty to write a draft title using the keywords suggested by DataDive such as ‘electric kettle’ ‘electric tea kettle’. Our title for this exercise is We Are Growth Hack Electric Kettle, 2L Cordless Electric Tea Kettle, Water Boilers & Heater with Auto-Shutoff, Boil-Dry Protection, Stainless Steel Design for Kitchens, Homes and Offices.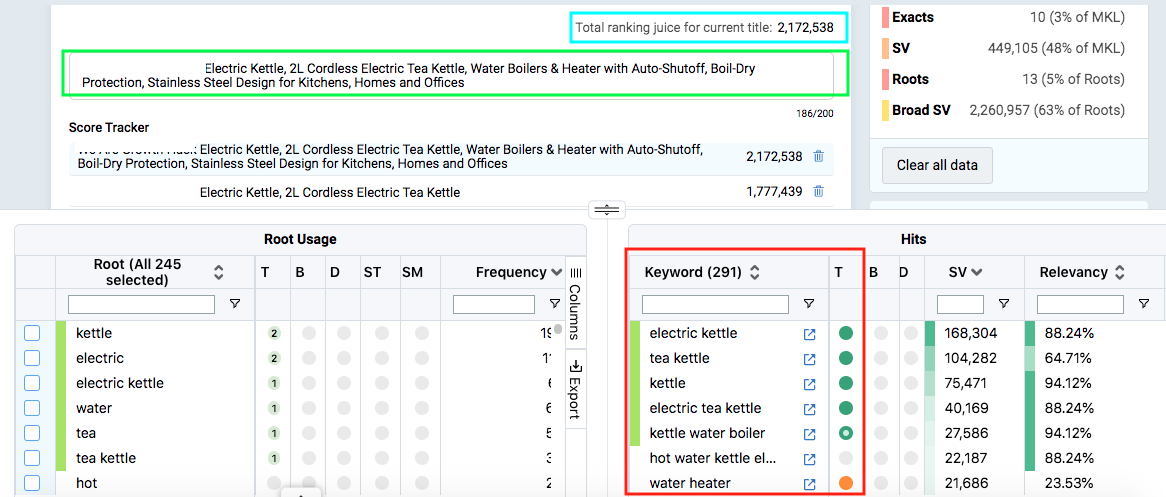 You can see our title in the green box. If we use any of the suggested keywords, they will be added to our total ranking juice score (light blue box). The more suggested keywords we use, the higher our score. Later we will compare them with the competition.
Something important to note is how we use keywords. If you use a keyword that is an exact match (e.g. electric kettle), you will get a green circle next to the keyword to signify its an exact match.
What happens if you use a plural? In that case you get a green circle with a white dot in the center, known as an ‘exact plural’. Likewise if you use several keywords but they are not a phrase match (i.e. they are not next to each other to form a phrase), DataDive will still recognize it and classify it as a ‘broad match’. This is signified with the solid orange circle. You can see that I use ‘water’ and ‘heater’ but not together, hence the orange ‘broad match’ rating. The more exact matches you use, the higher your juice score will go.
Another thing to note is keyword stacking. Both tea kettle and electric tea kettle are in the top keywords. Rather than using both (e.g. We Are Growth Hack Tea Kettle, Electric Tea Kettle with…), you can use electric tea kettle as the smaller tea kettle is contained within the larger phrase.
Finally you can be creative with your keywords. Something like ‘kettle water boiler’ doesn’t really make any sense. It sounds like a collection of search terms. Rather than putting a nonsensical phrase in your title, you can creatively disguise it. In our example, we wrote Cordless Electric Tea Kettle, Water Boiler. That way we keep the title looking clean while taking advantage of the fact that Kettle Water Boiler is a popular search term.
You can see our title in the green box. If we use any of the suggested keywords, they will be added to our total ranking juice score (light blue box). The more suggested keywords we use, the higher our score. Later we will compare them with the competition.
Something important to note is how we use keywords. If you use a keyword that is an exact match (e.g. electric kettle), you will get a green circle next to the keyword to signify its an exact match.
What happens if you use a plural? In that case you get a green circle with a white dot in the center, known as an ‘exact plural’. Likewise if you use several keywords but they are not a phrase match (i.e. they are not next to each other to form a phrase), DataDive will still recognize it and classify it as a ‘broad match’. This is signified with the solid orange circle. You can see that I use ‘water’ and ‘heater’ but not together, hence the orange ‘broad match’ rating. The more exact matches you use, the higher your juice score will go.
Another thing to note is keyword stacking. Both tea kettle and electric tea kettle are in the top keywords. Rather than using both (e.g. We Are Growth Hack Tea Kettle, Electric Tea Kettle with…), you can use electric tea kettle as the smaller tea kettle is contained within the larger phrase.
Finally you can be creative with your keywords. Something like ‘kettle water boiler’ doesn’t really make any sense. It sounds like a collection of search terms. Rather than putting a nonsensical phrase in your title, you can creatively disguise it. In our example, we wrote Cordless Electric Tea Kettle, Water Boiler. That way we keep the title looking clean while taking advantage of the fact that Kettle Water Boiler is a popular search term.
9. Final Step: Comparing The Competition
Your Master Keyword List comes with a section called Battle of the Titles and Battle of the Bullets. With those you can compare the quality of your title and bullet points with the selected competition. It doesn’t just compare your scores (which is really just a metric that DataDive has created), it has something that we think is incredibly valuable: it shows which keywords your competition is using and which ones they are not.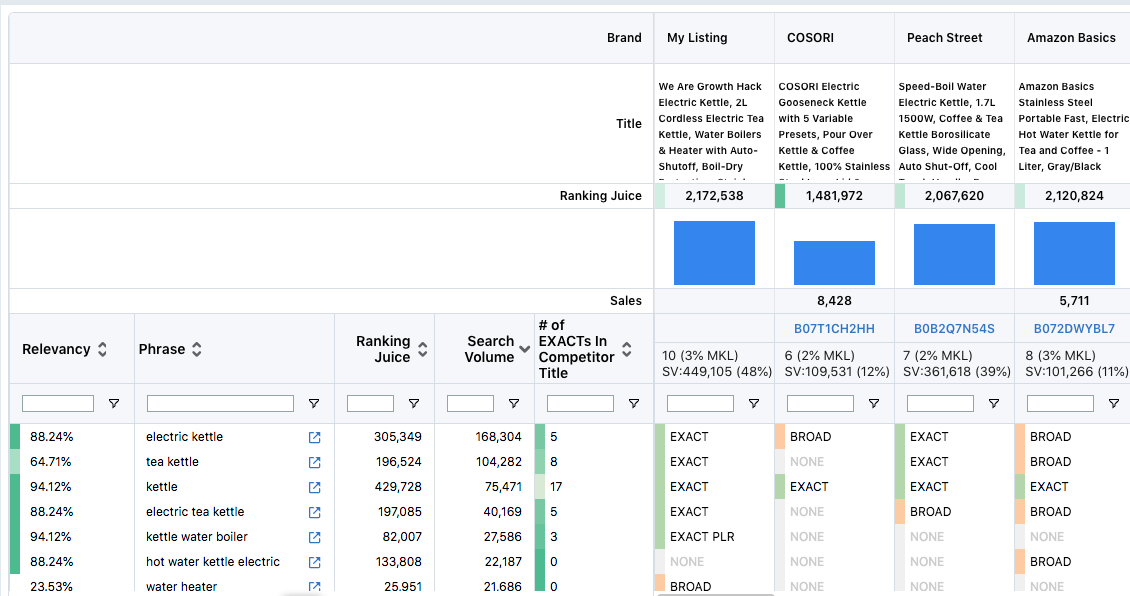 A quick glance at the above image shows that our listing and the three competitors shown all use the keyword ‘kettle’, which has a monthly search volume of 104,282. However, only one other competitor, apart from ourselves, uses the exact keyword ‘electric kettle’ with a search volume of 168,304. Clearly these other listings are missing out.
When we’re crafting listings, what we’ll check for when reviewing them against the competition is whether we’re using the keywords with the highest volume. If not, we’ll make sure to add them.
Another thing we’ll do is check that our juice score is competitive. Remember that a juice score is indicative that we’re not just using the best keywords but a broad range. We could be using the top keywords but still have a low score relative to the competition if they are using a wider selection of keywords.
Once you’re happy with the title and use the best keywords, we can repeat the exact same step with the bullet points, the description and the backend search terms. One thing to note is that at the moment, DataDive only lets you compare your title and BP with the competition. You cannot compare your description or backend keywords.
A quick glance at the above image shows that our listing and the three competitors shown all use the keyword ‘kettle’, which has a monthly search volume of 104,282. However, only one other competitor, apart from ourselves, uses the exact keyword ‘electric kettle’ with a search volume of 168,304. Clearly these other listings are missing out.
When we’re crafting listings, what we’ll check for when reviewing them against the competition is whether we’re using the keywords with the highest volume. If not, we’ll make sure to add them.
Another thing we’ll do is check that our juice score is competitive. Remember that a juice score is indicative that we’re not just using the best keywords but a broad range. We could be using the top keywords but still have a low score relative to the competition if they are using a wider selection of keywords.
Once you’re happy with the title and use the best keywords, we can repeat the exact same step with the bullet points, the description and the backend search terms. One thing to note is that at the moment, DataDive only lets you compare your title and BP with the competition. You cannot compare your description or backend keywords.


Abhu
Great post! I heard about data dive for Amazon listing seo and I’ve never tired it but you’re really convincing me to do so. Looks amazing! Thanks for sharing these tips! Always great content on your blogposts!
Anthony
It’s very interesting content! Gonna try it, thanks!
TZW
Amazing tips! I am struggling with Amazon for more than 3 years, this post gives me a clear direction on running amazon SEO. Thank you for so detailed tips. Great help.
Anthony
Looks interesting, gonna try it out! 👍🏻
TZW
Amazing post! I have been struggling with Amazon for more than 3 year. Your tips really give me a clear direction on Amazon SEO optimization. Thanks for the detailed post.