 Note: The tips we are putting together are coming from our years of experience in managing Amazon PPC Ads for various clients on a wide variety of products and categories. For best performance, many of your choices will have to be carefully taken by comparing your product features, average bid cost, your target objectives etc. This is why we are not implying that our management/optimization tips are always applicable and will always work in every case. Though in most of the cases, they will.
In this guide we will go through every step from the setup of each campaign to the manual optimization of keywords, products selection, strategic bidding, dynamic bidding, etc. If you already know how to set up your campaigns, feel free to switch between sections by clicking on the topic list below and jump to the topics you wish to master:
- Brief Terminology
- Setup Your first Automatic Campaign
- Setup Your first Manual Campaign
- Research Phase
- Expansion Phase
- Manual Campaigns Optimization
- Automatic Campaigns Optimization
- Repeat
- Common Q&A
- Conclusions
1. Brief Terminology:
PPC: pay per click (you only pay when someone clicks on your Ad) – type of campaigns CPC: cost per click – actual ad cost spent on each click Ad: the slot that displays your actual product sponsored, appears on different placements of search results Group: contains one or more ads Campaign: contains one or more groups Portfolio: contains one or more campaigns ACoS%: Advertising Cost of Sales (one of the key metrics for performance) Manual Campaign: a campaign where targetings (keywords or products) are manually selected by the user Automatic Campaign: a campaign where targeting is automatically selected by AmazonTypes of Amazon Ads
As an Amazon Seller or Vendor, you will have a wide range of available options to advertise your products within the platform and outside of it, on 3rd party affiliate websites. In this Beginners Guide, we will mainly focus on Sponsored Products Ads, although, it is useful to know what are the most common ways for sellers to advertise their products on Amazon and what each placement looks like: A. Sponsored Products – Top Search Placement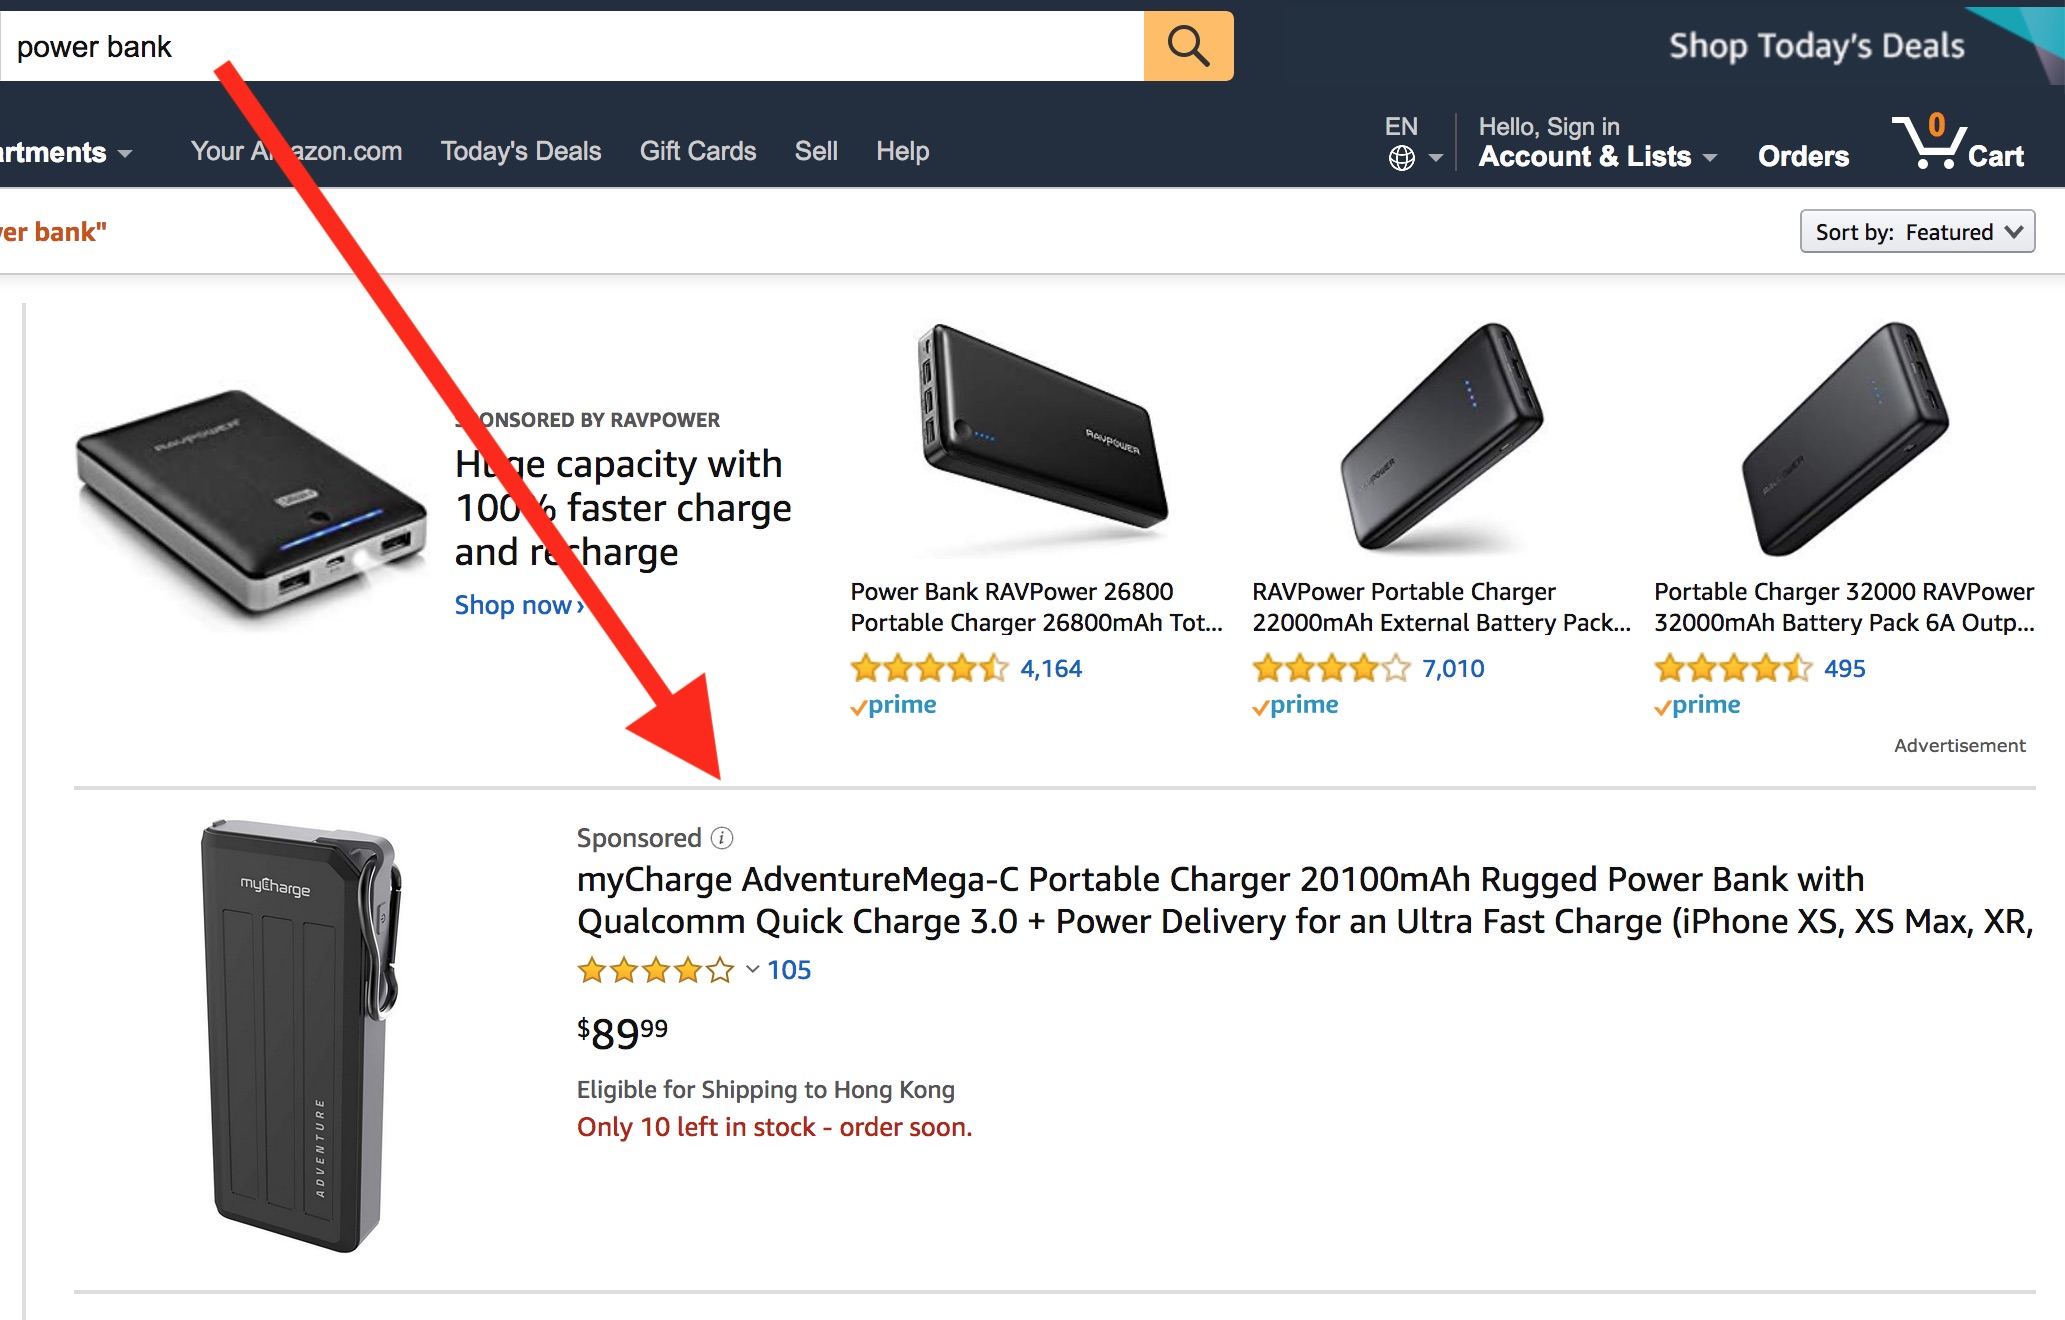 B. Sponsored Products – product page placement
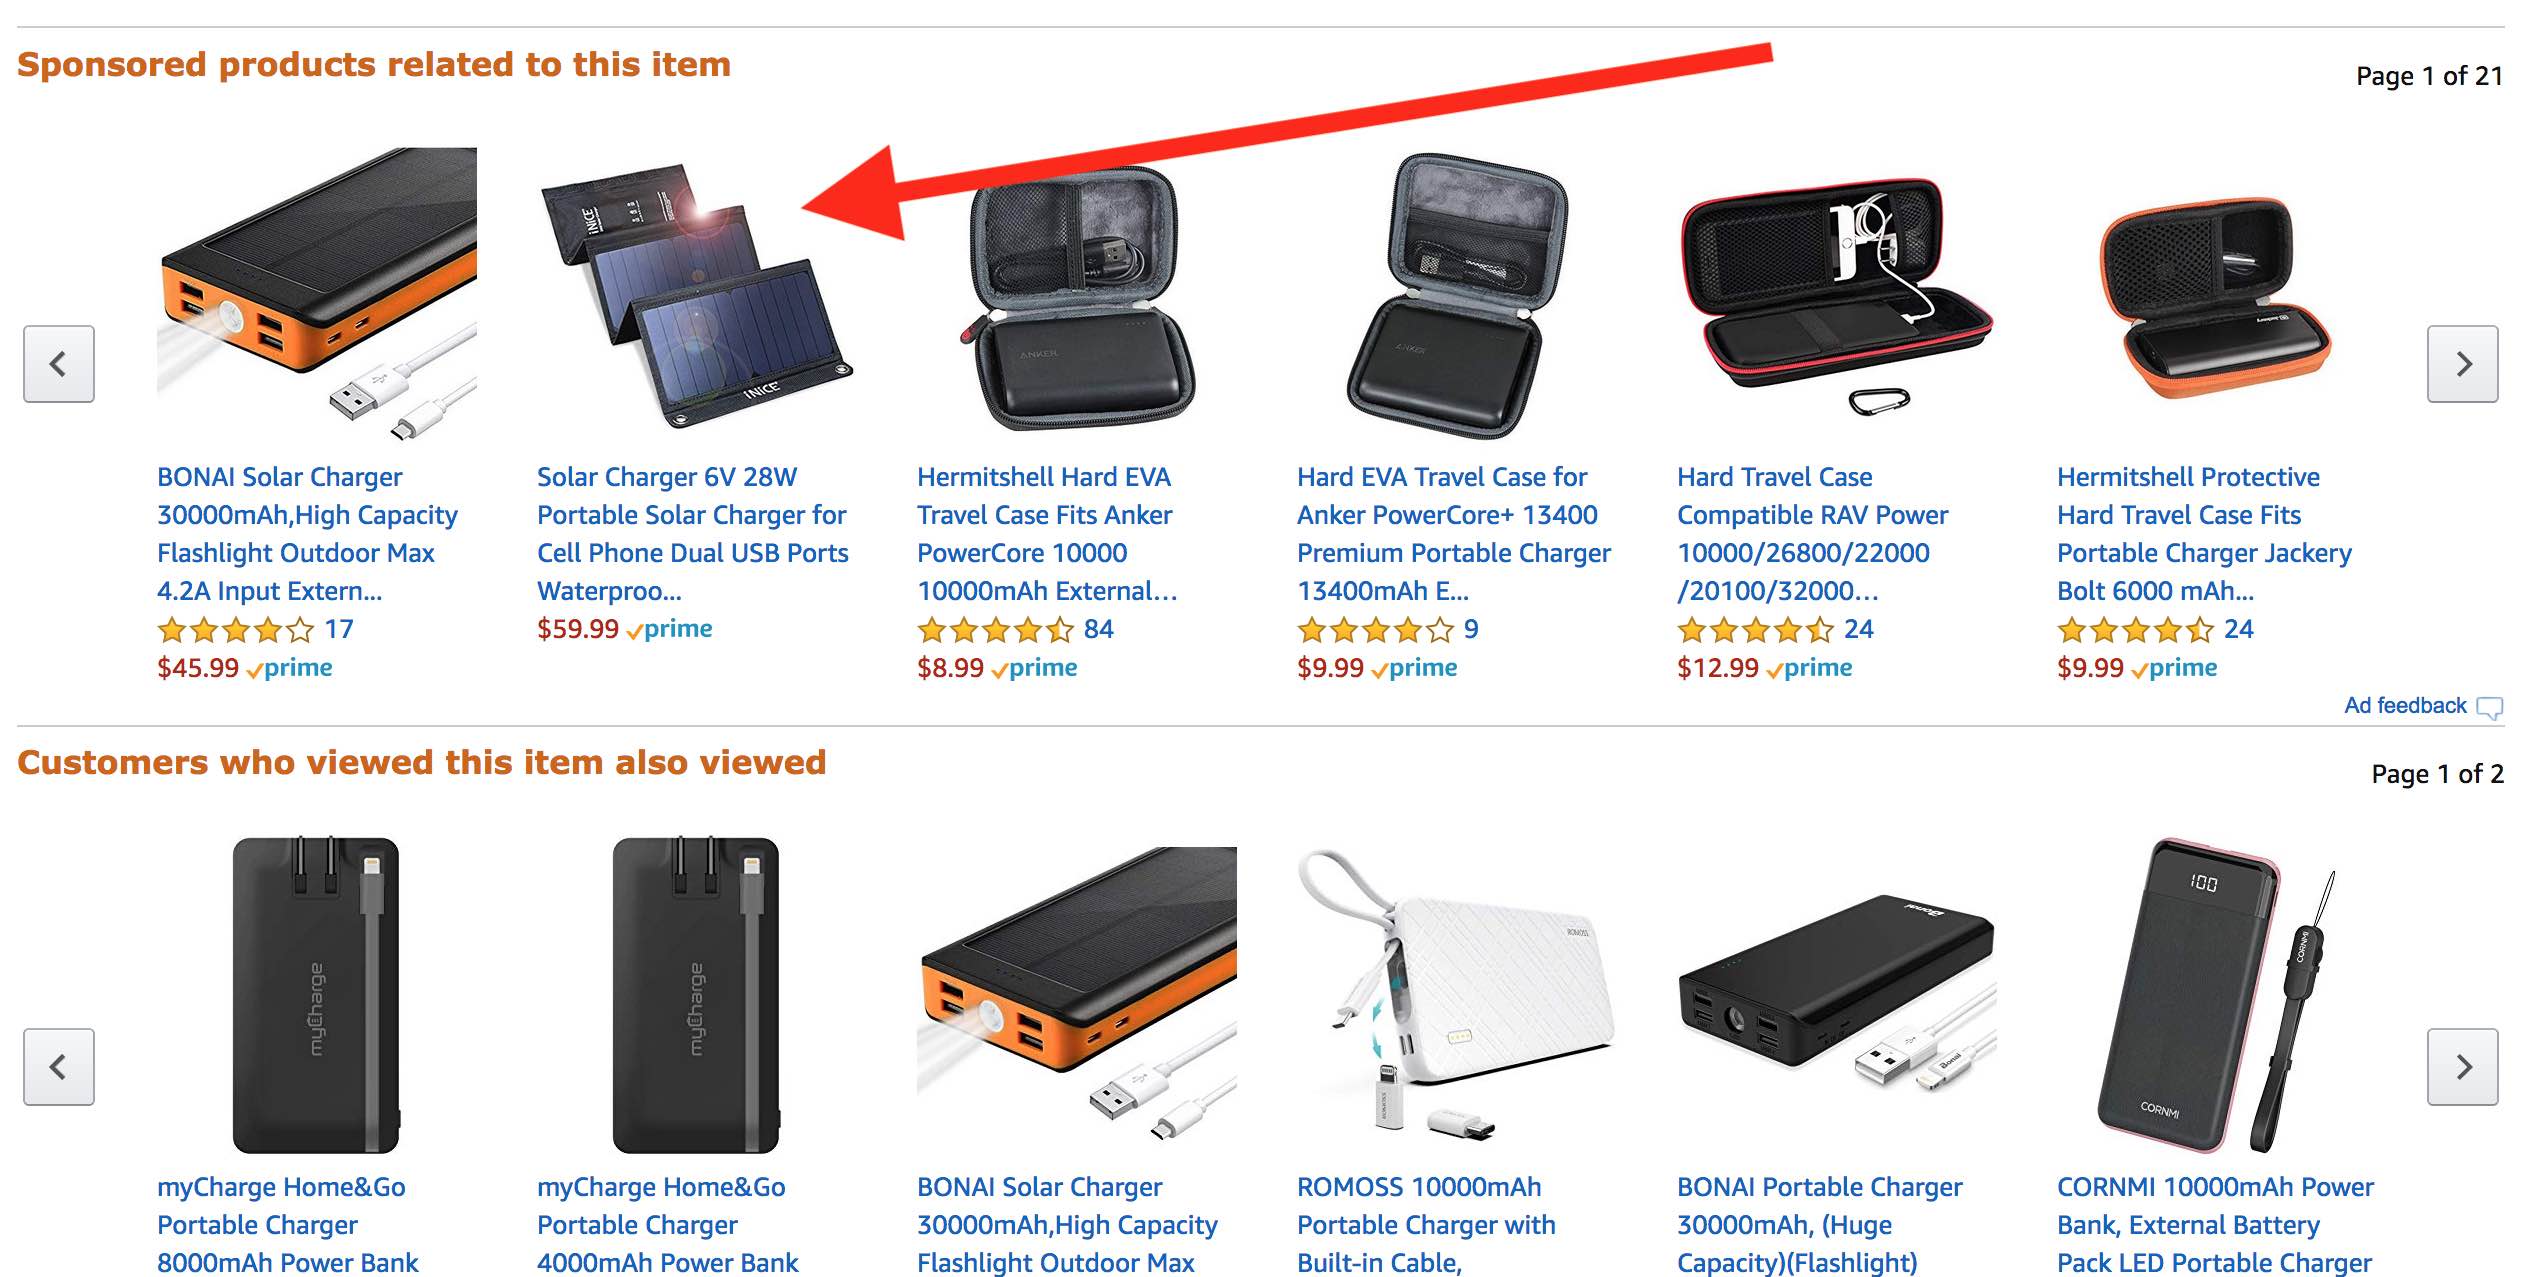 C. Product Display Ads
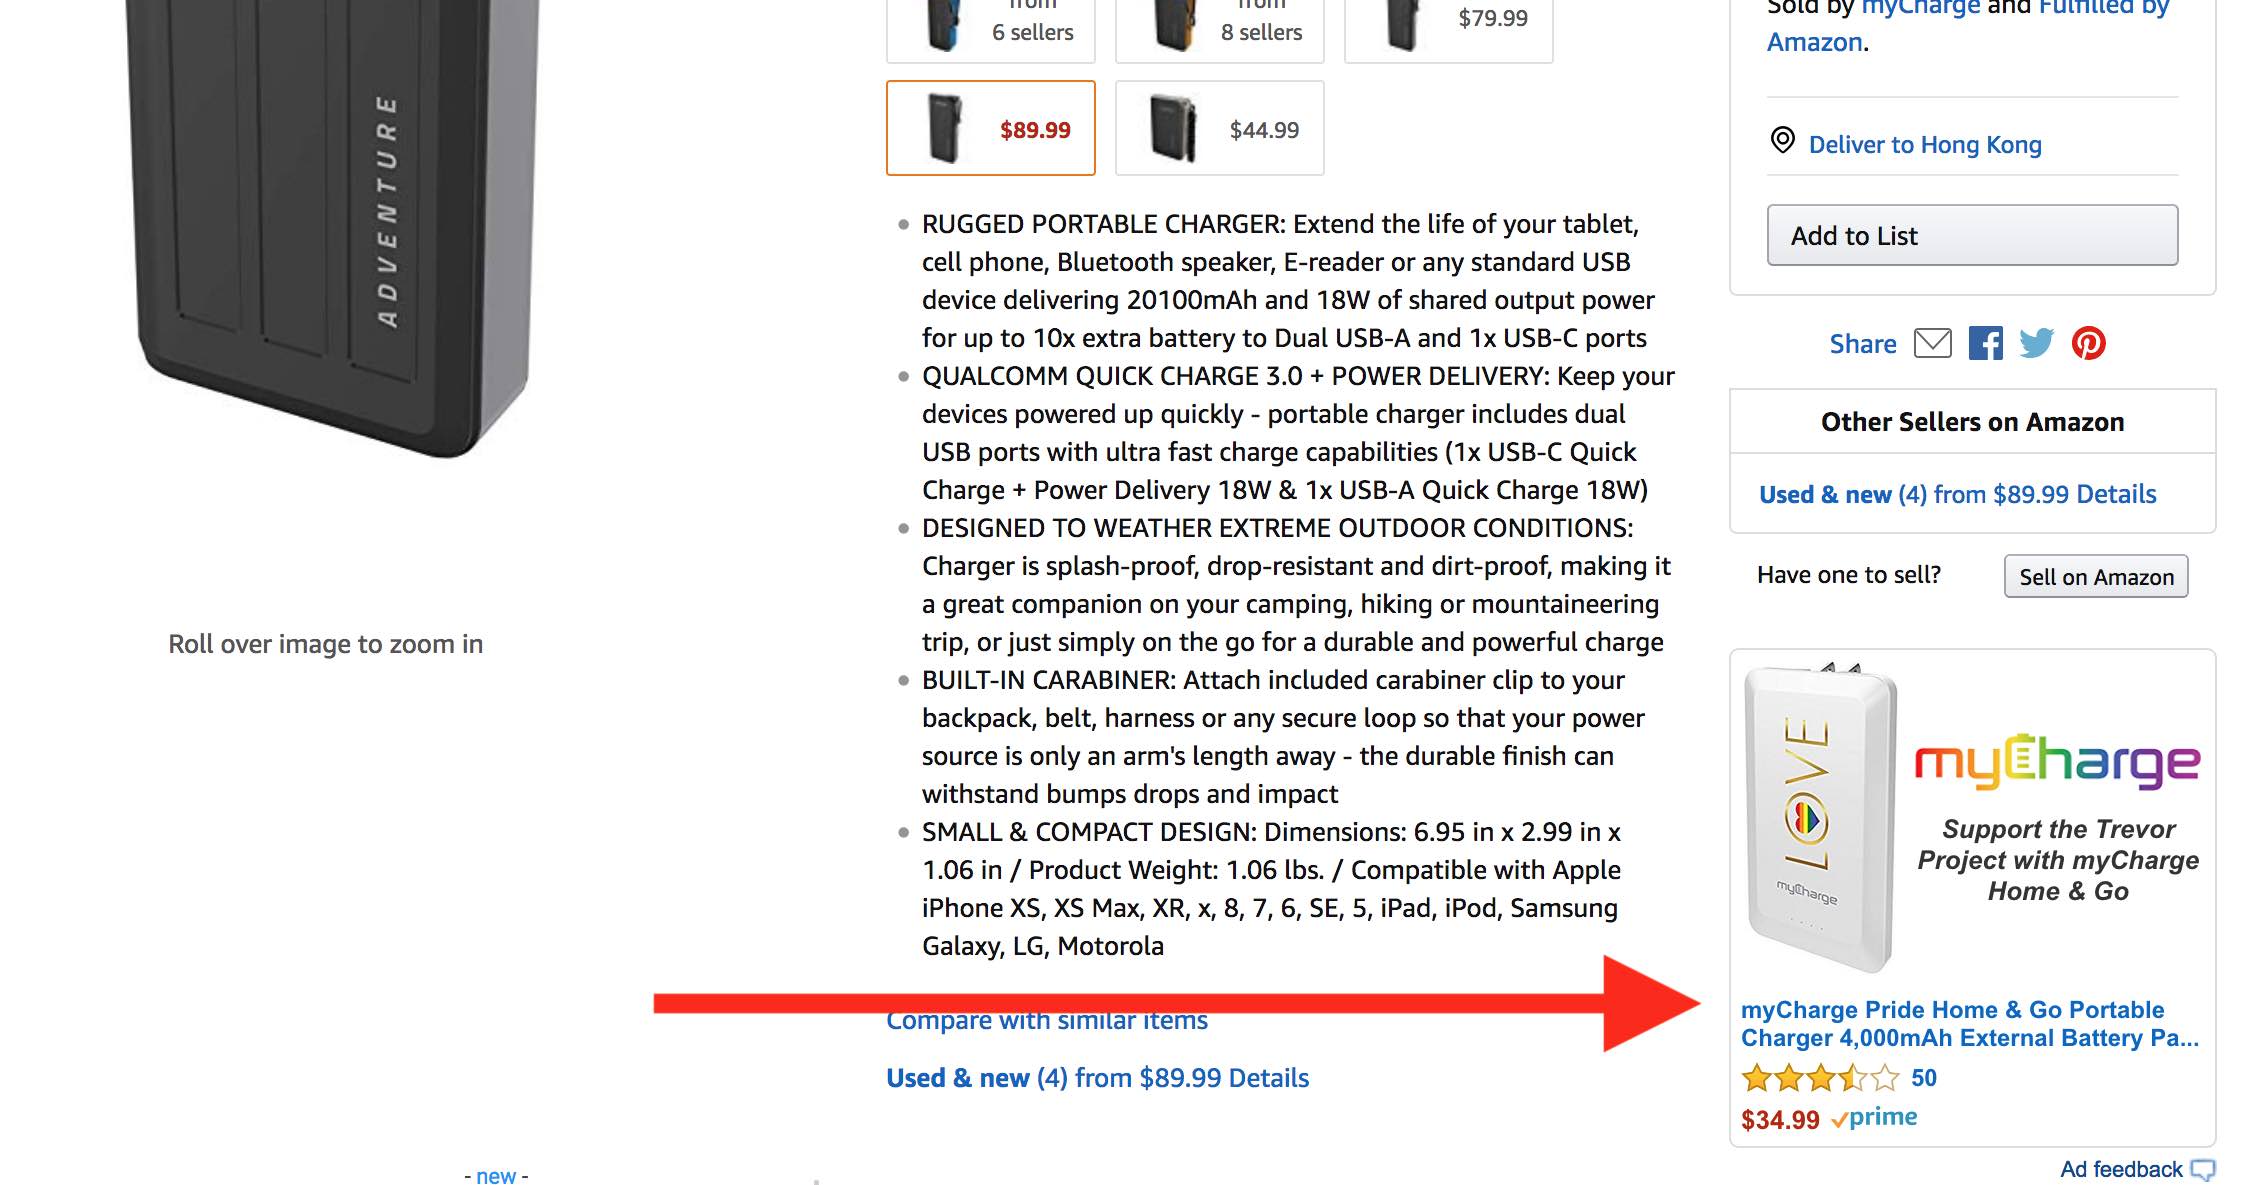 D. Sponsored Brands
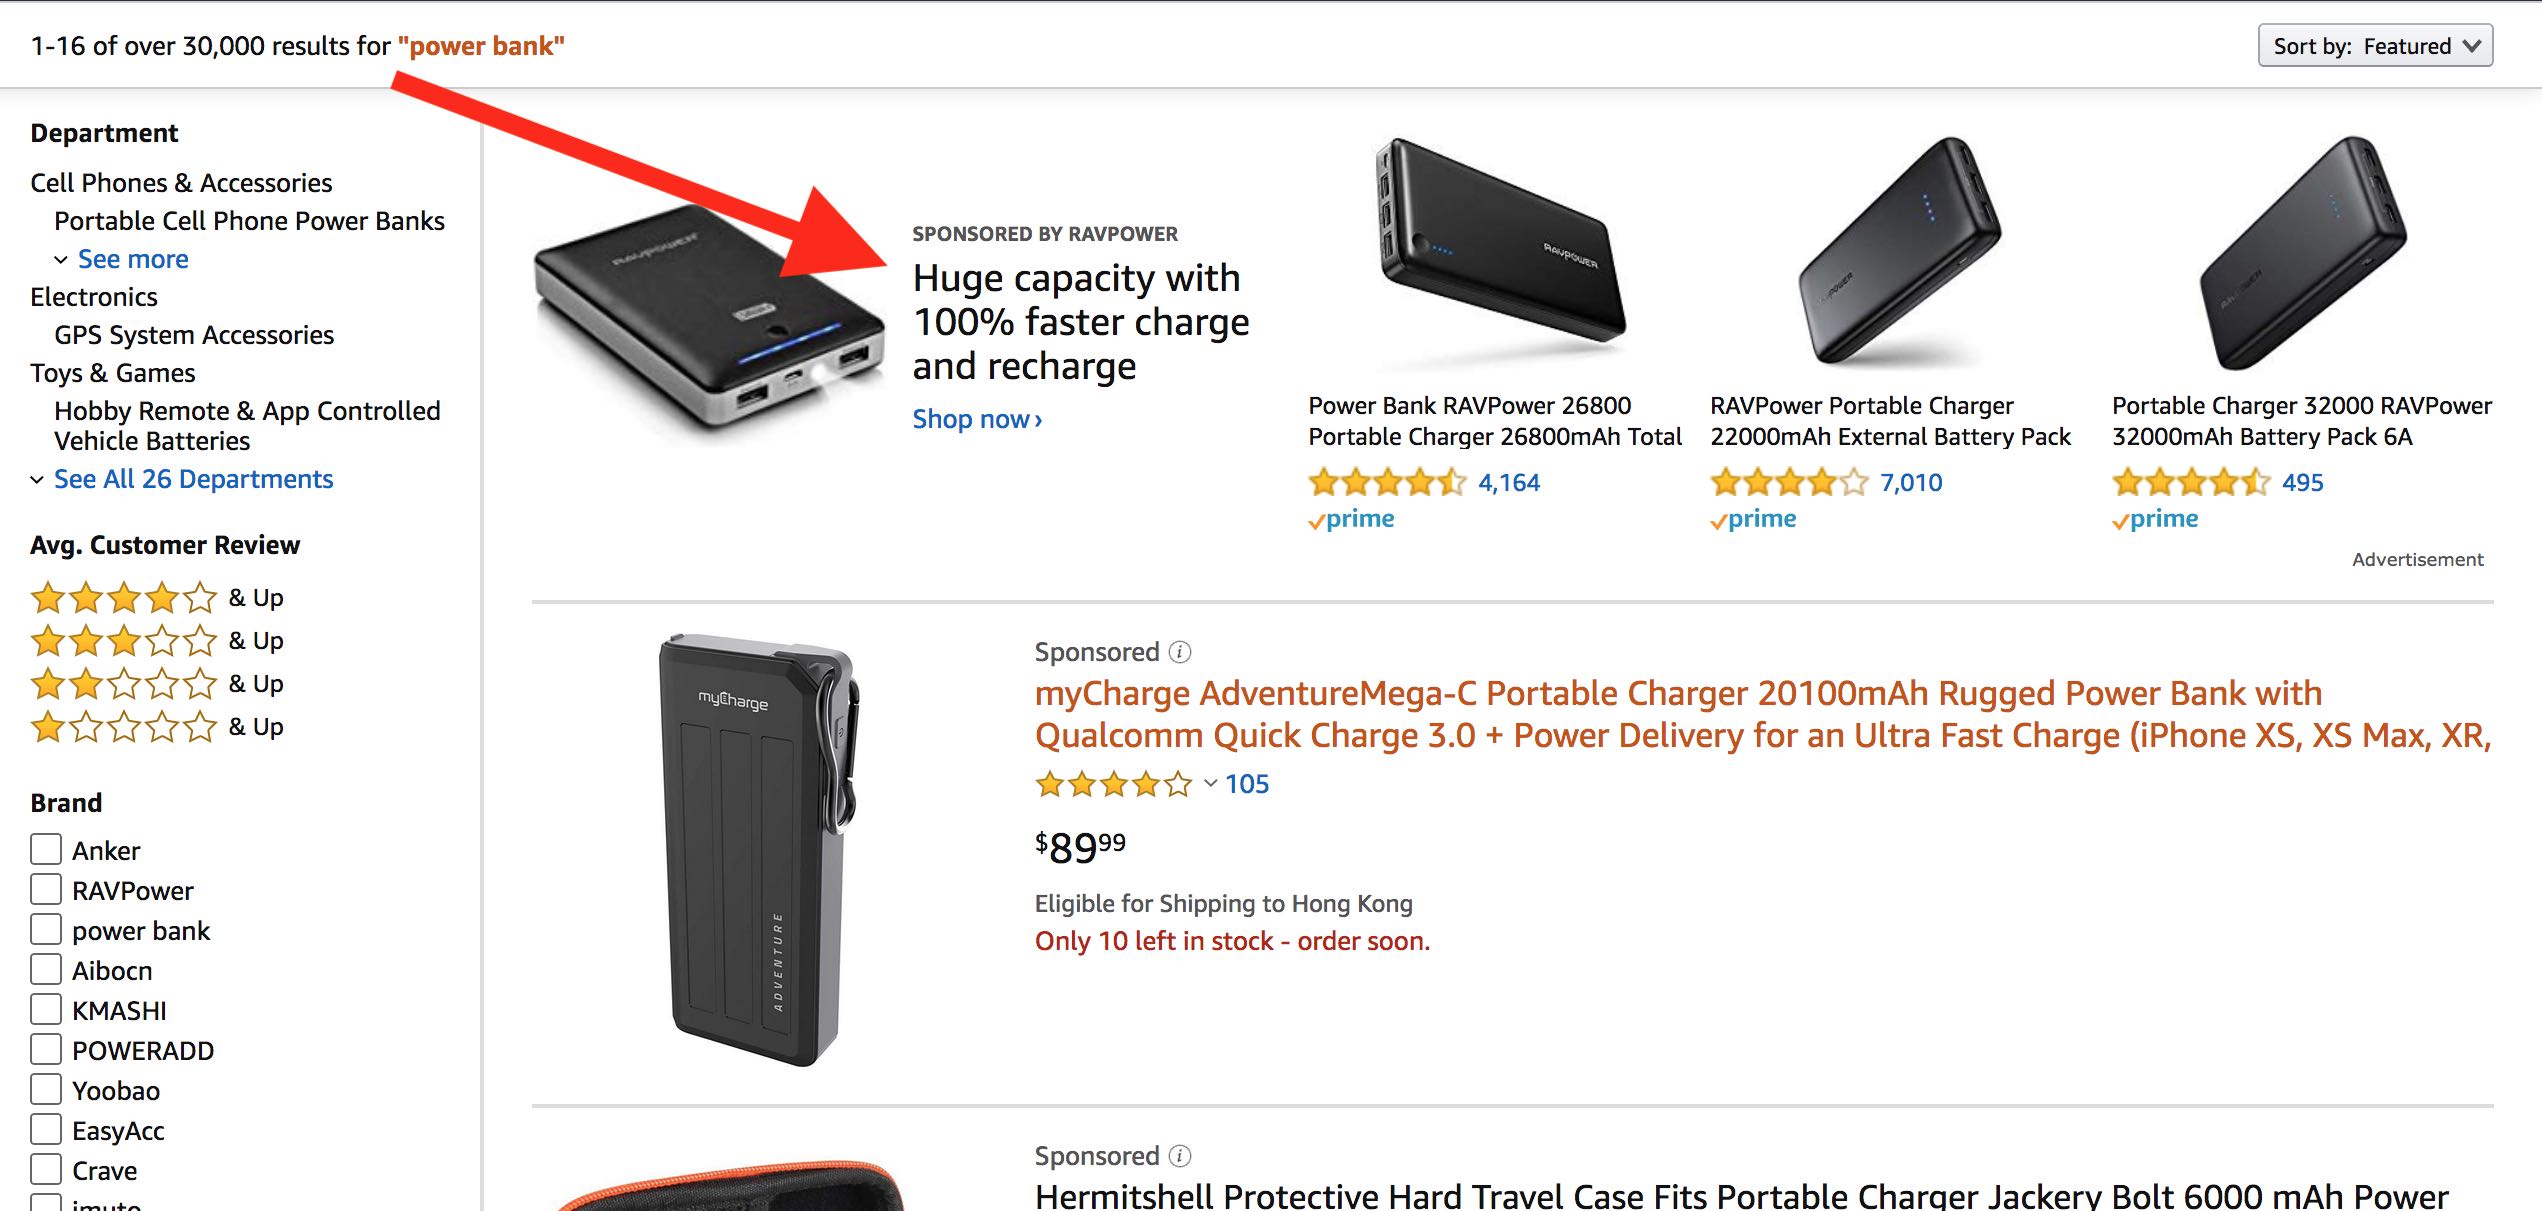 E. Editorials Recommendation – top search
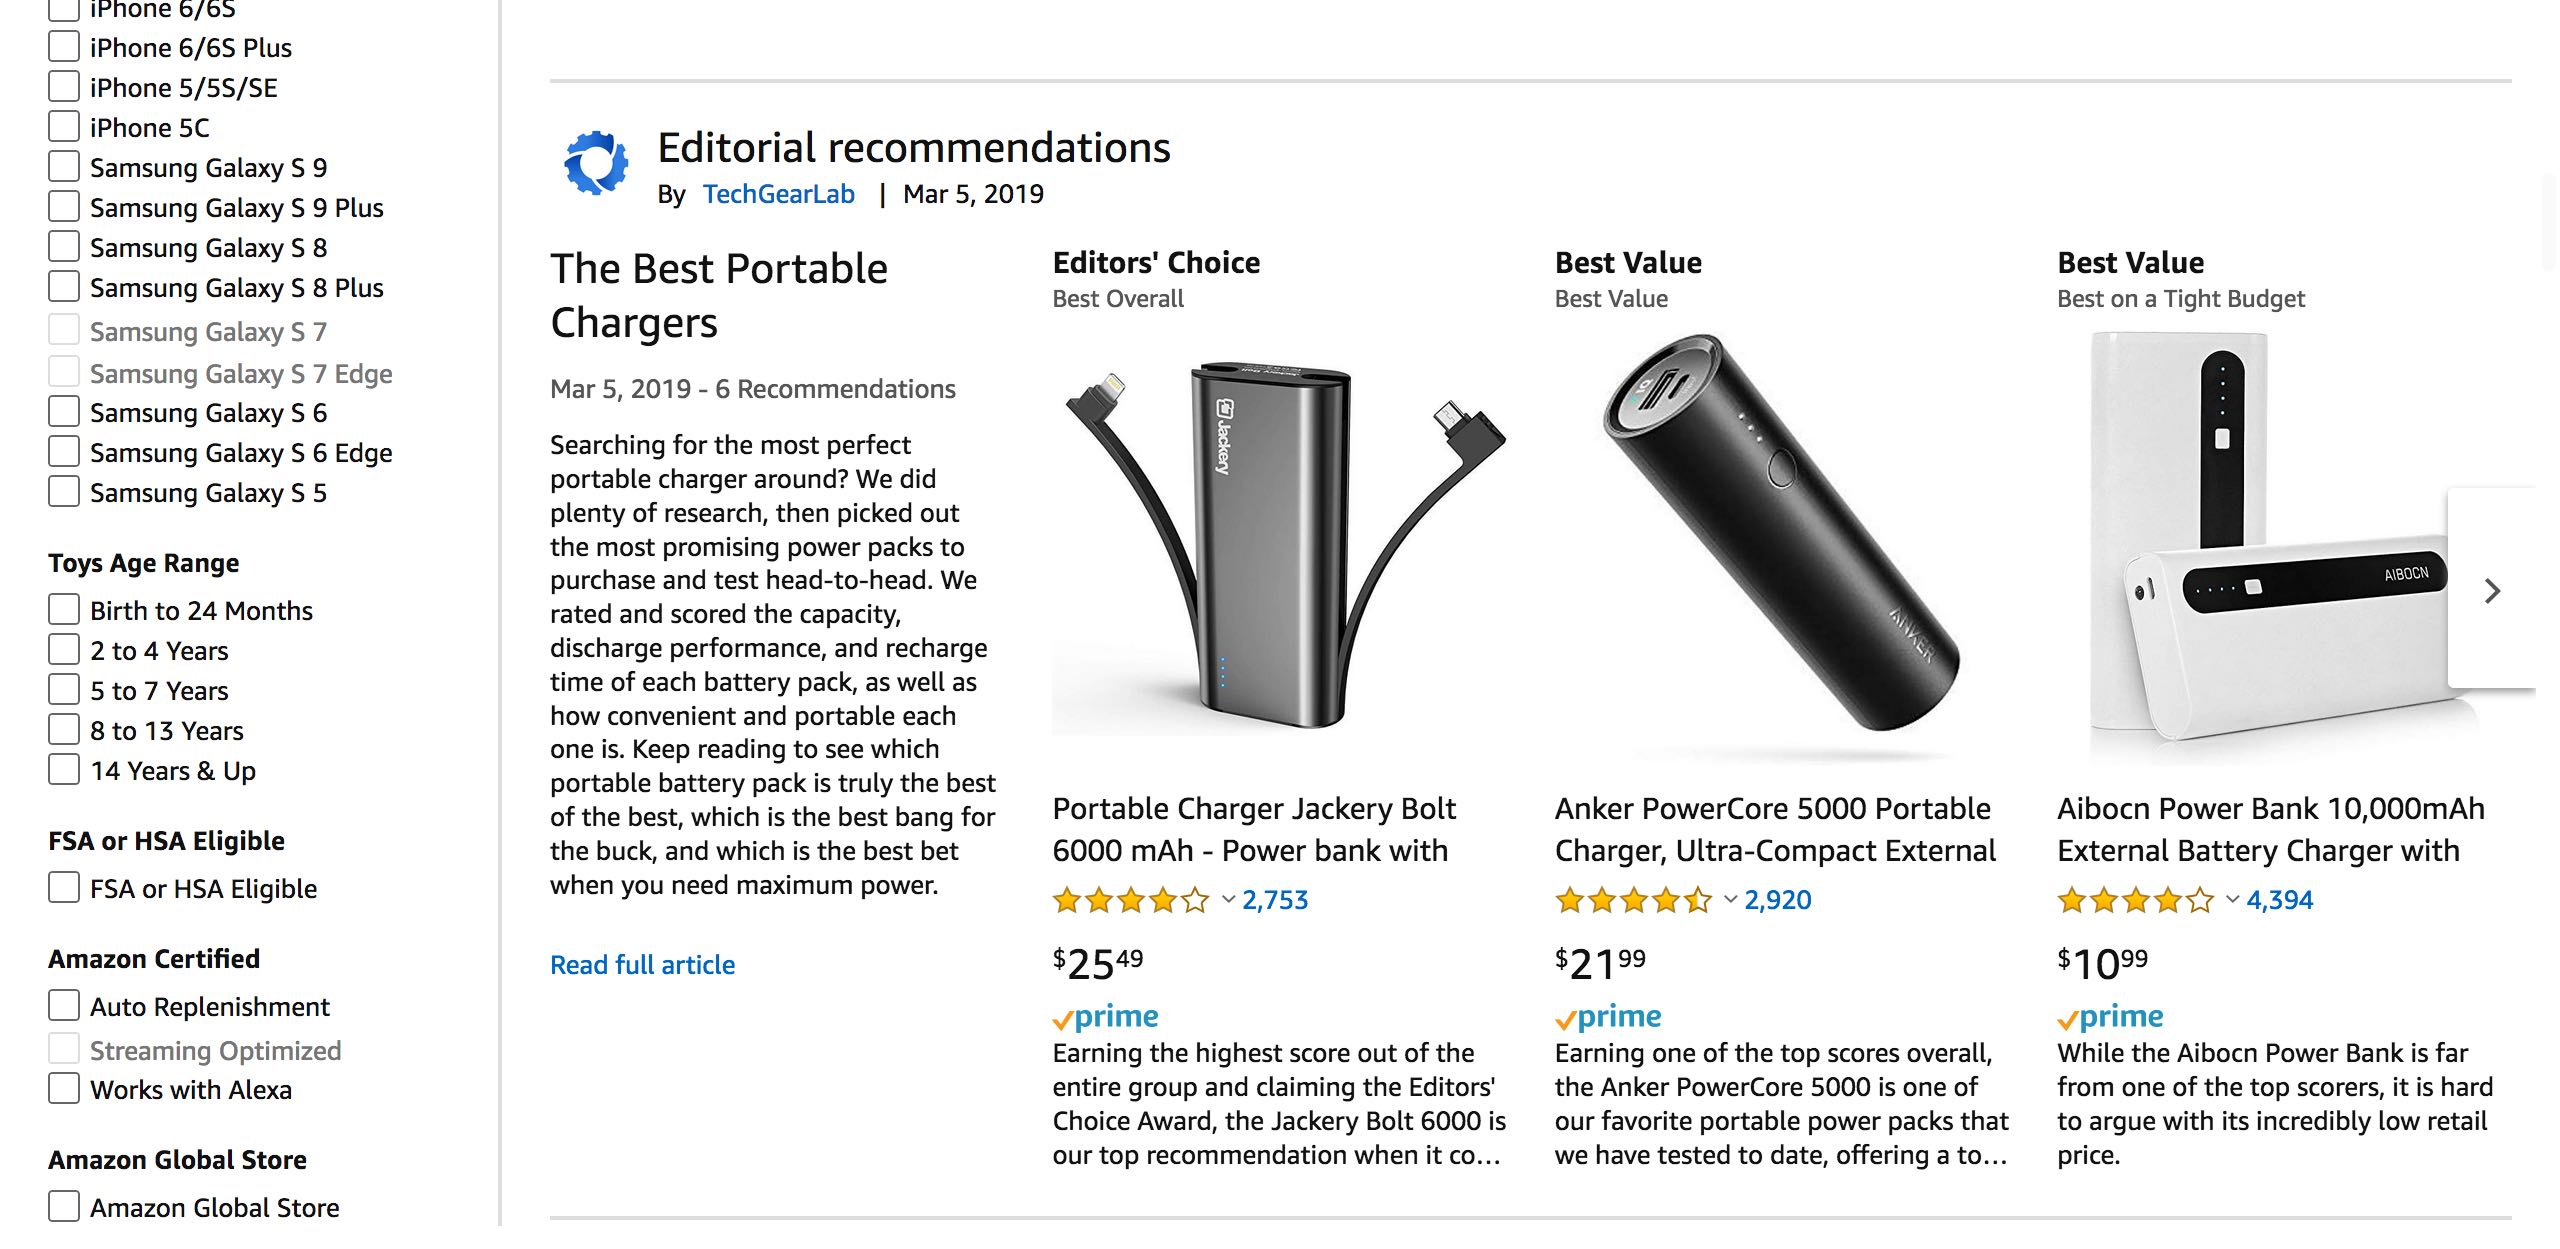 In this Beginners Guide, we will reveal all you need to know to set up, manage and optimize for performance your Sponsored Products on Amazon (placements A and B). We will also revise other options (Display Ads and Brand Ads) in the upcoming guides on this site.
2. Setup Your first Automatic Campaign
Login to your seller central and set up your first automatic Sponsored Products Ads campaign to start running ads for your products. Click on Advertising > Campaign Manager > Create Campaign: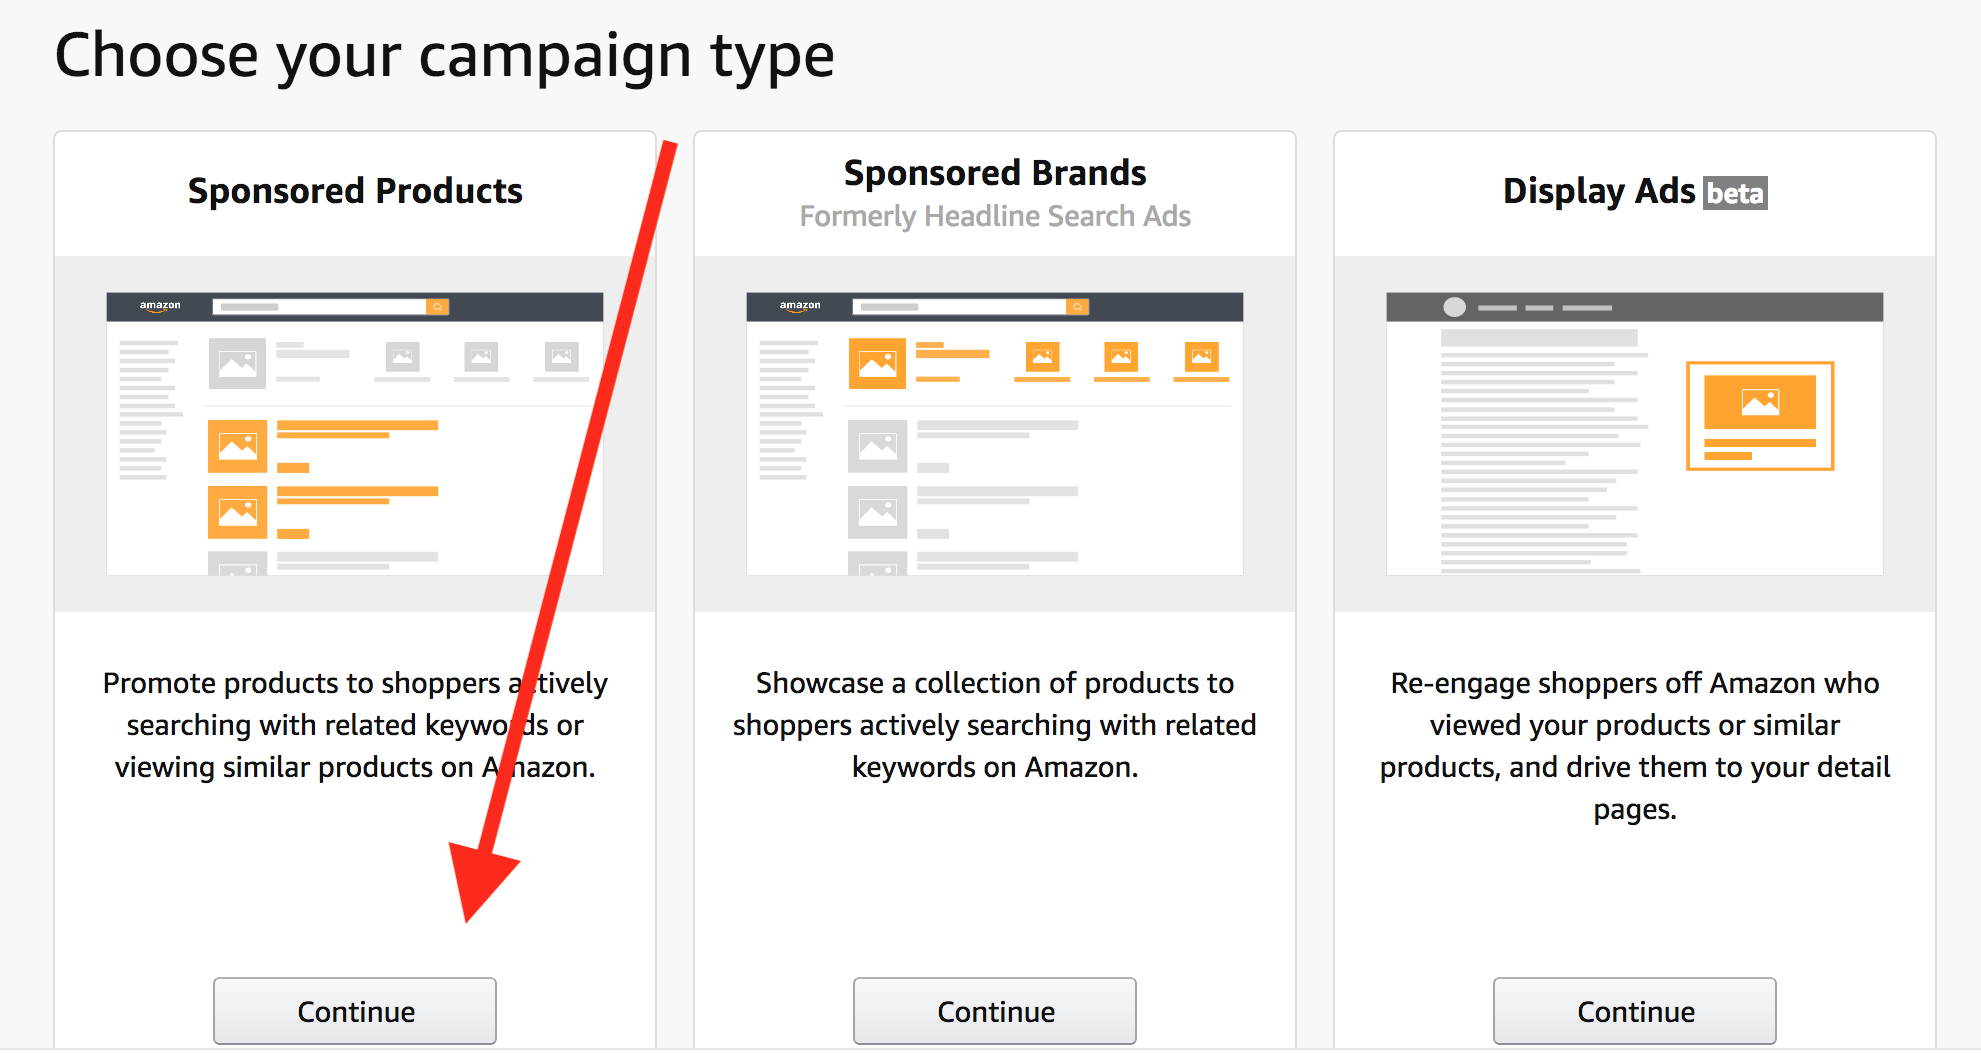 We want to start by creating an Automatic Campaign for our product, let’s imagine we are selling an Outdoor Security Camera, here’s how we will do it:
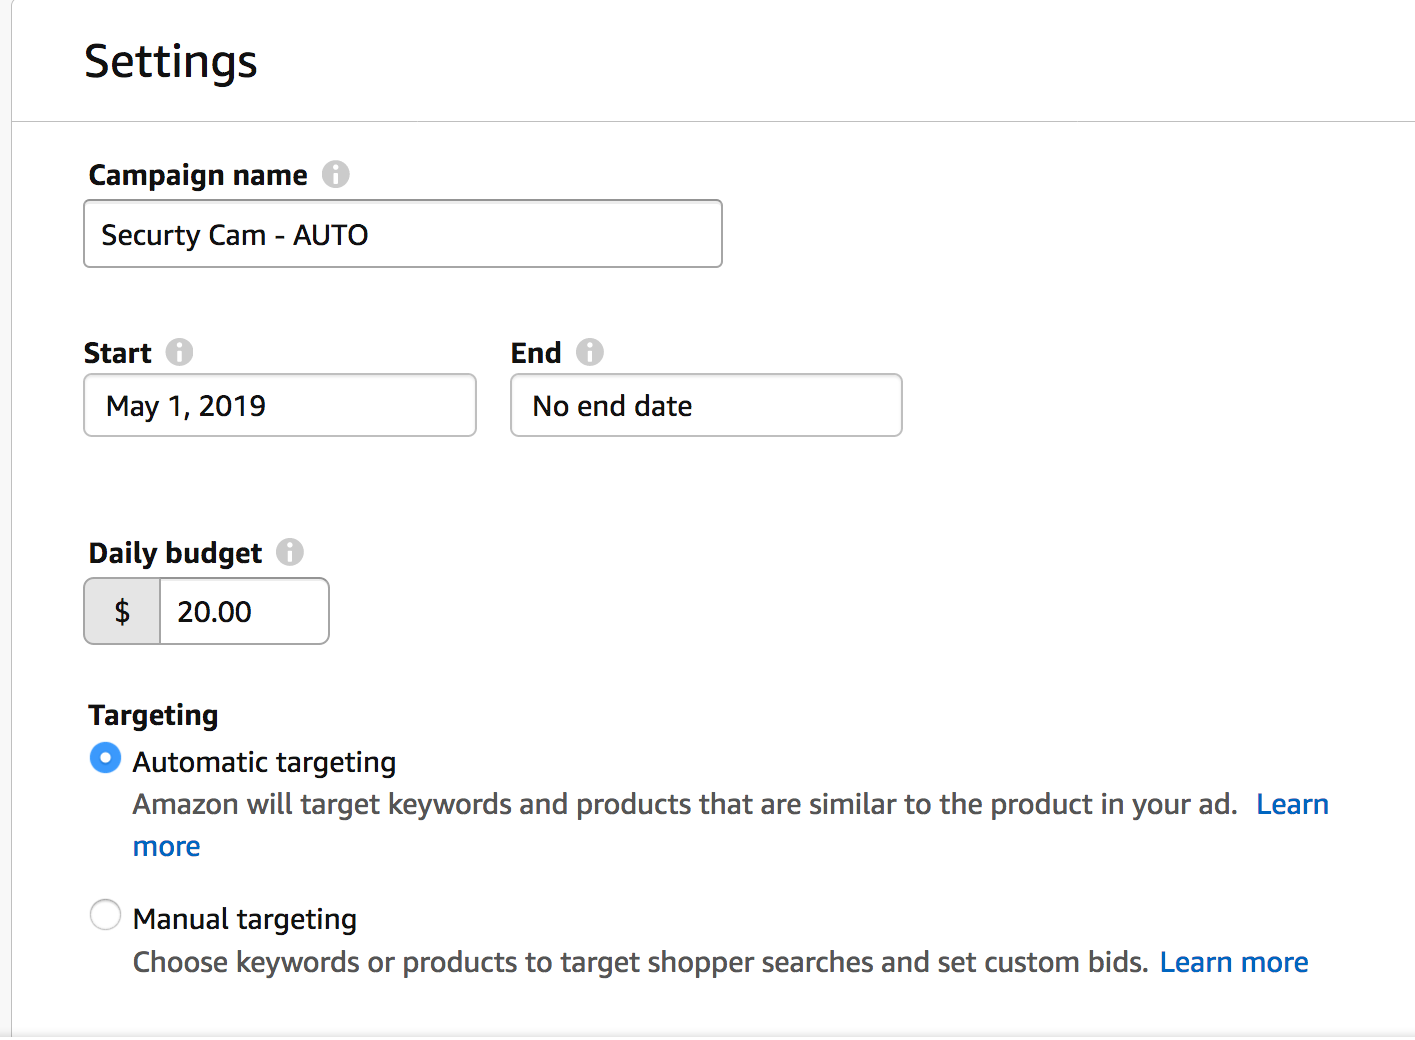 – Name your campaign “Product or Product Line + AUTO”. Why do we add “AUTO” on the campaign’s name? Because on the PPC report it will it make easier to distinguish between automatic and manual campaigns; thus the optimization/isolation job will be easier (we will see this later on).
– Set a daily budget of $20 to start with, that is a good amount for most of the accounts. We will talk more into details about budget planning and management.
– Chose “Automatic Targeting”
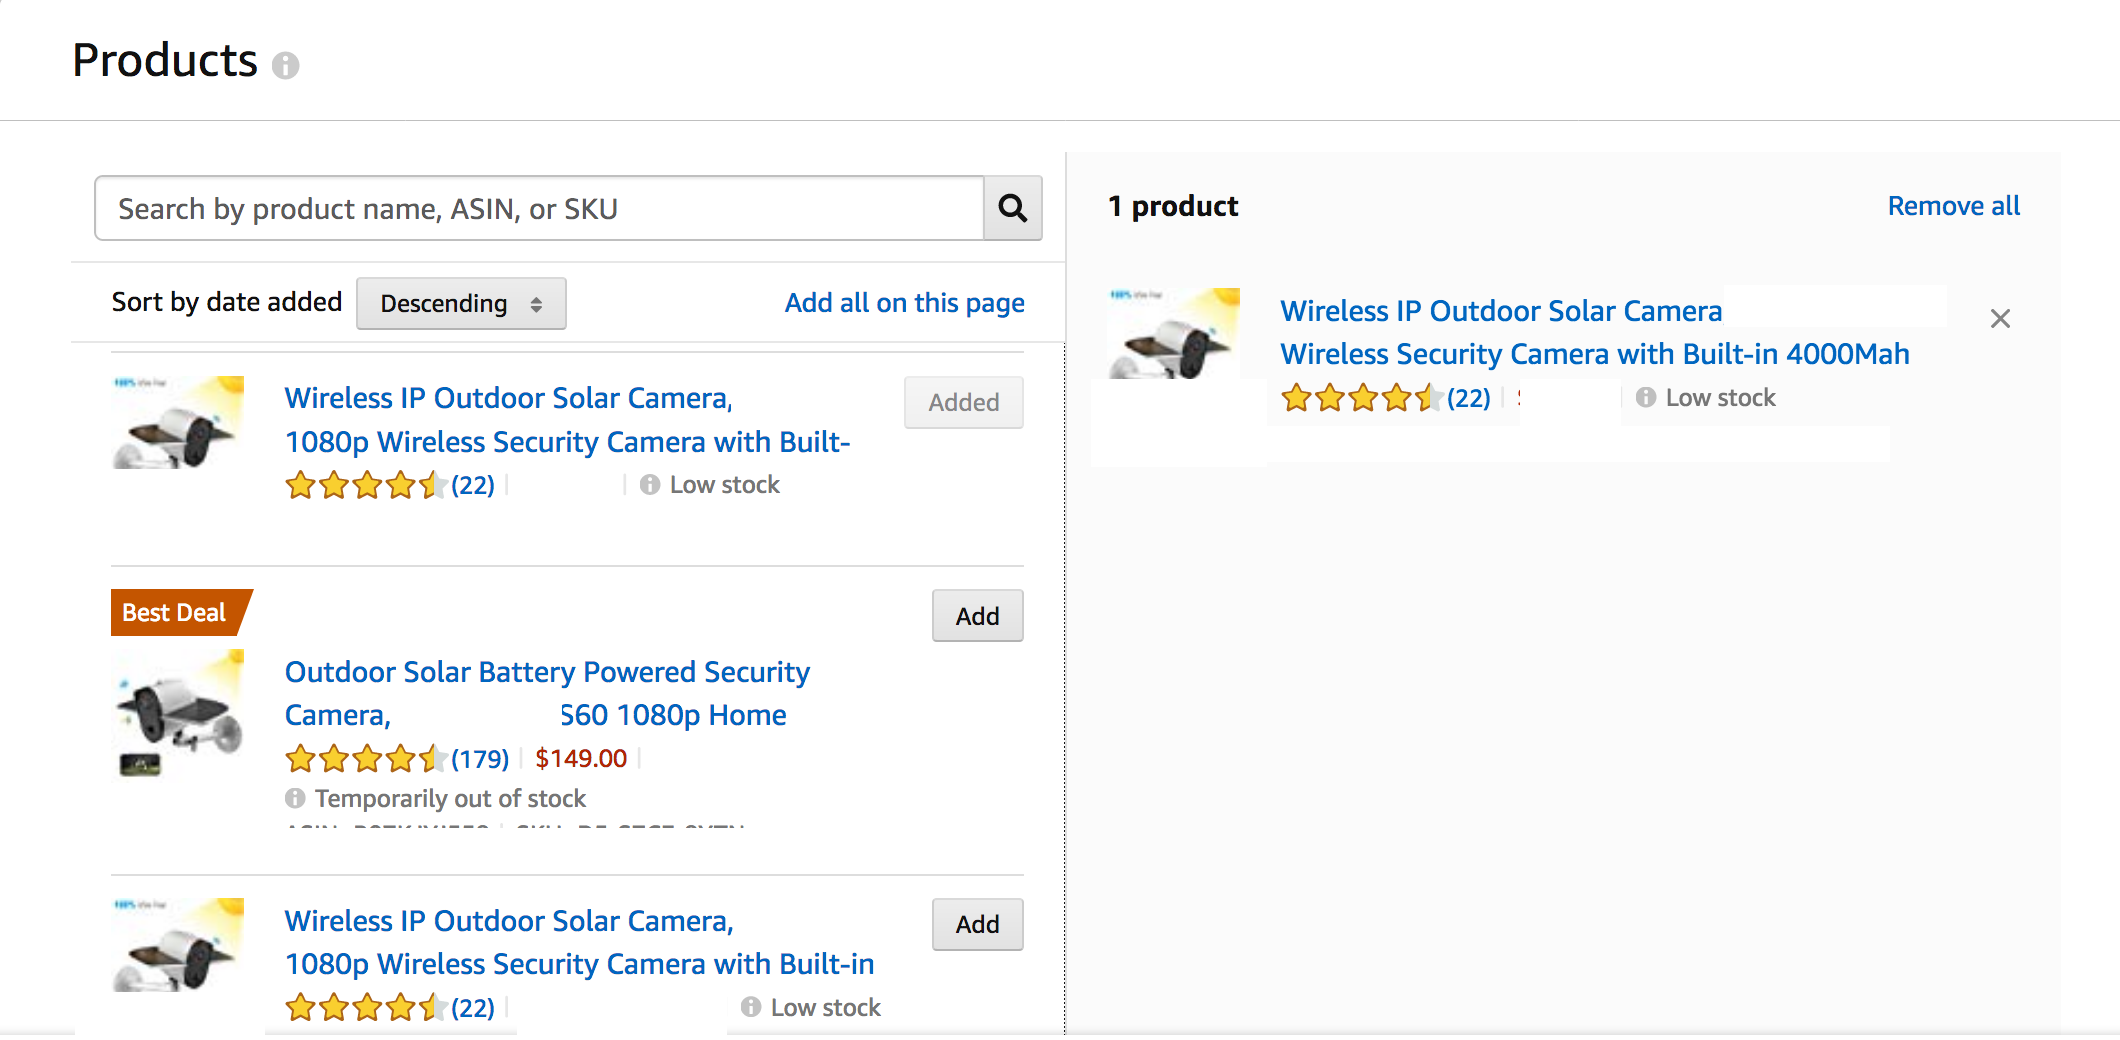
– Create your first group by adding the first product variation(s)
 – Set your bids: Amazon will suggest a bid range based on your product. If you already have history of sales from PPC, you might know already what is your average CPC. Here you can choose your bidding depending on how aggressive you want it to be, compared to the average CPC (higher or lower). For a new automatic campaign, we suggest staying on a mid-aggressive level of bidding for the first days and later on slowly decrease the bid while optimizing the targetings.
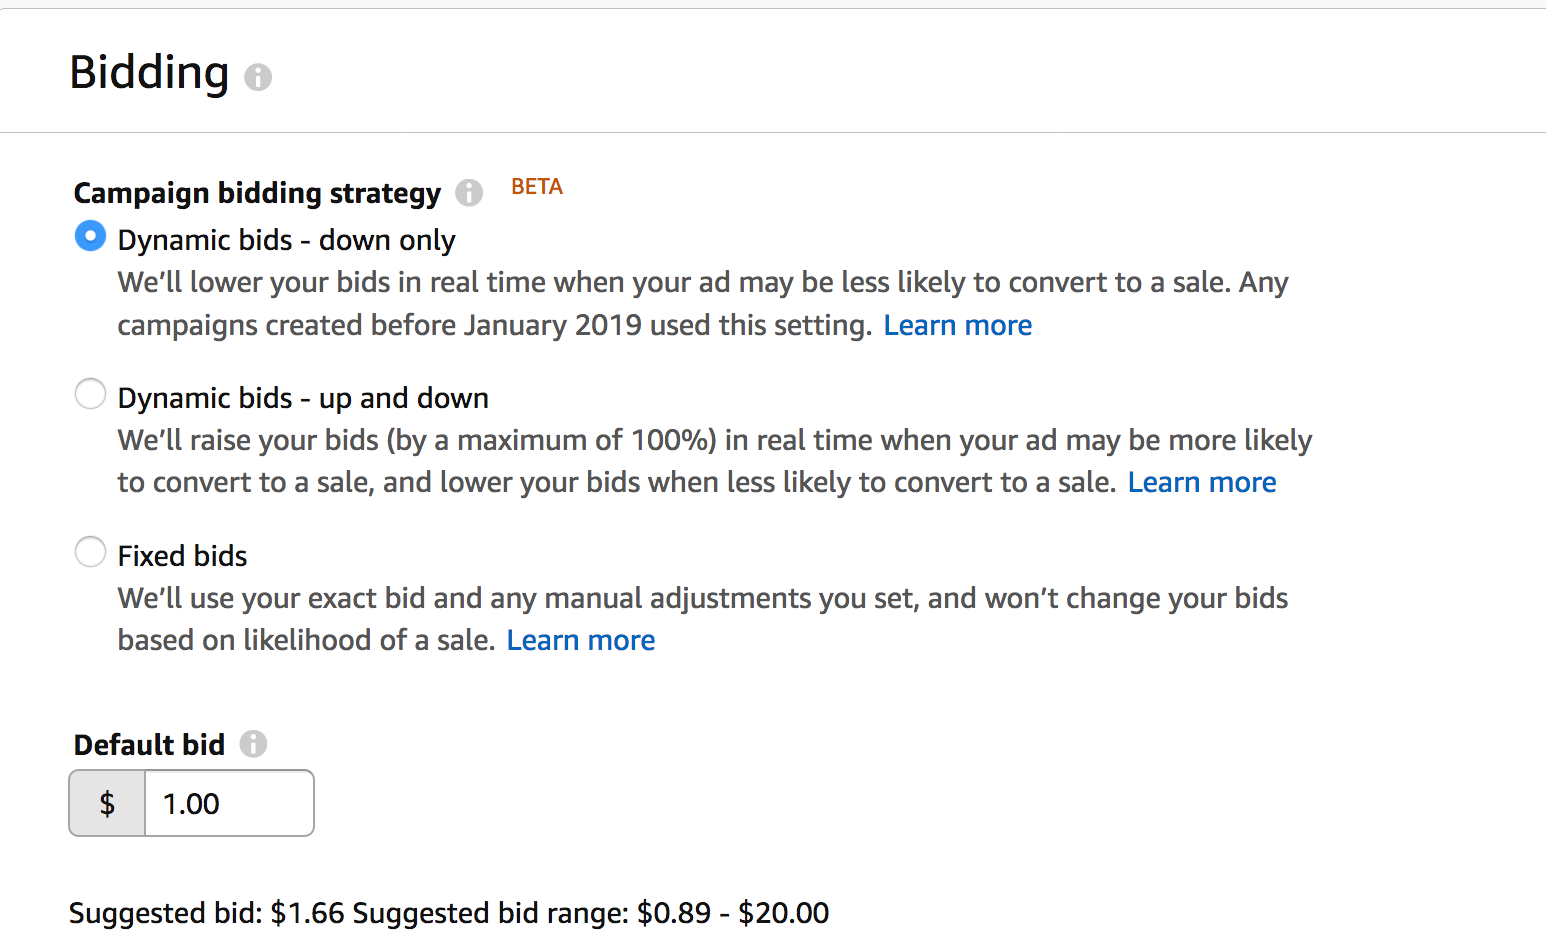 – Set your bidding strategy as “Dynamic bids – down only” this was the default settings for every new PPC campaigns on Amazon until late 2018. We will come back later on the Dynamic bidding.
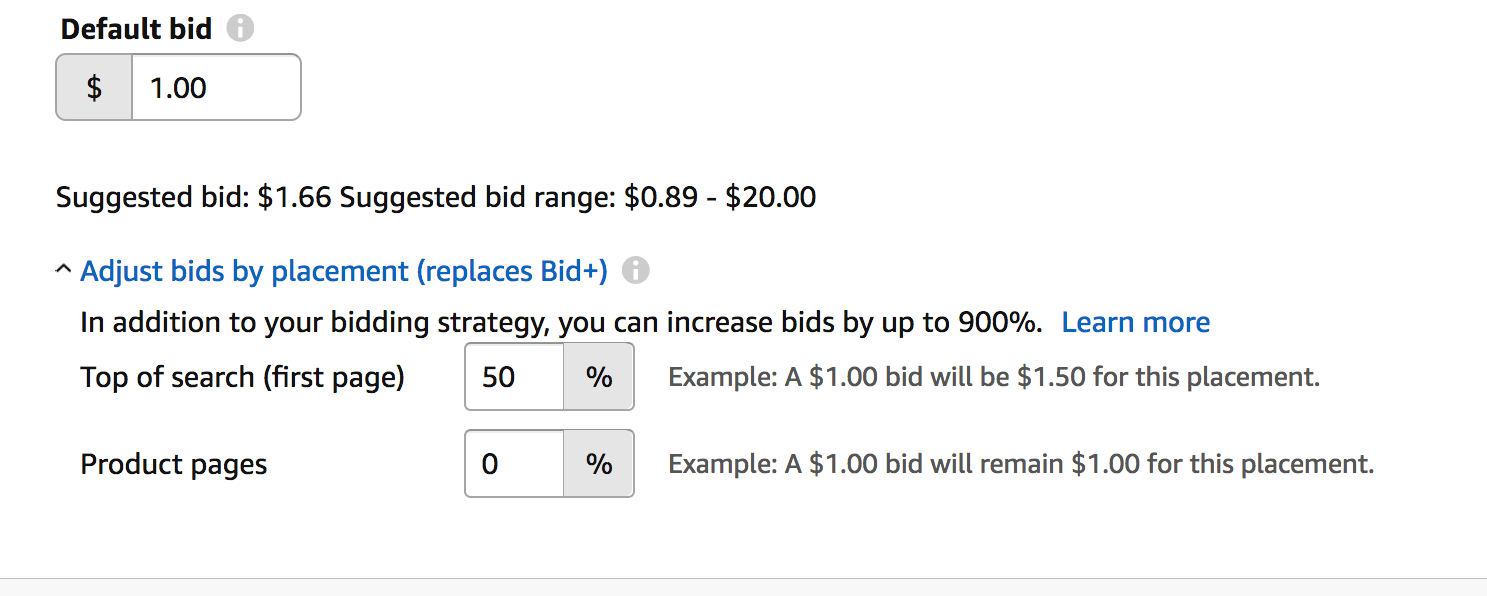
– Add a 50% dynamic bidding on the “top search” placement – this was also the default setting by Amazon until a few months ago, and it is a very good way to boost your presence on the Top Search Page placement.
 – You are now done with creating the campaign, click on “Launch Campaign” and go back to edit it to add further products if you have multiple from the same product line.
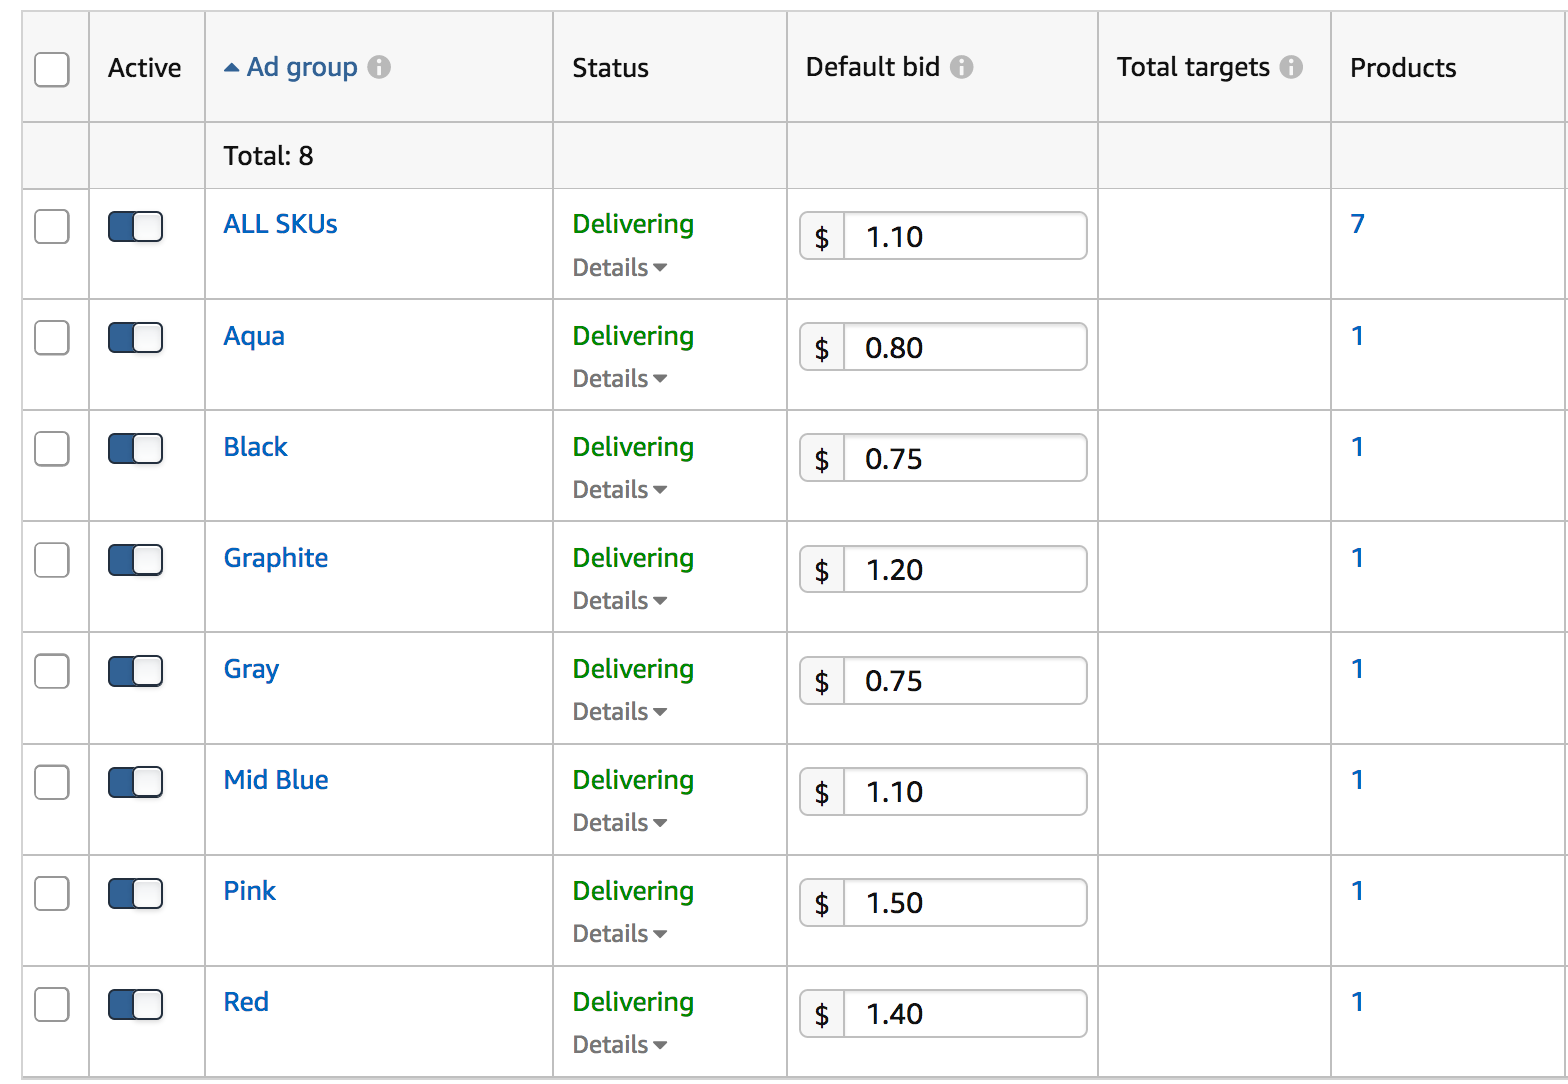
– Remember to create as many groups as many product variations you have; eventually your campaign will look like this (each variation in a different Ad Group), you can set different bids depending on how aggressive you want to be on that particular variation and depending on the suggested bid by Amazon:

Tip: to increase visibility to your products and to gain extra exposure, you can create a new group with all the product variations, that you can call “ALL SKUs” or “ALL ASINs”. This group will most likely get most of the impressions and most of the ad spent. Whether to create this group or not, will depend on your product line: if your products are very similar (variations are only color variations or size variations), then it makes high sense to create this kind of group to save time in creating and managing the campaigns. Later on, you can create subgroups with different product variations in order to test good / bad performers.
The example below shows the group division for our product line of Yoga Pants in different colors:
 As Amazon will automatically choose which keywords your product will be displayed for, as well as on which other product pages they will be displayed, it will be your job to filter the non-performing keywords and add them as negative targeting, in order to avoid excessive waste of budget. We will see this later, on the “Automatic Campaign Optimization” section.
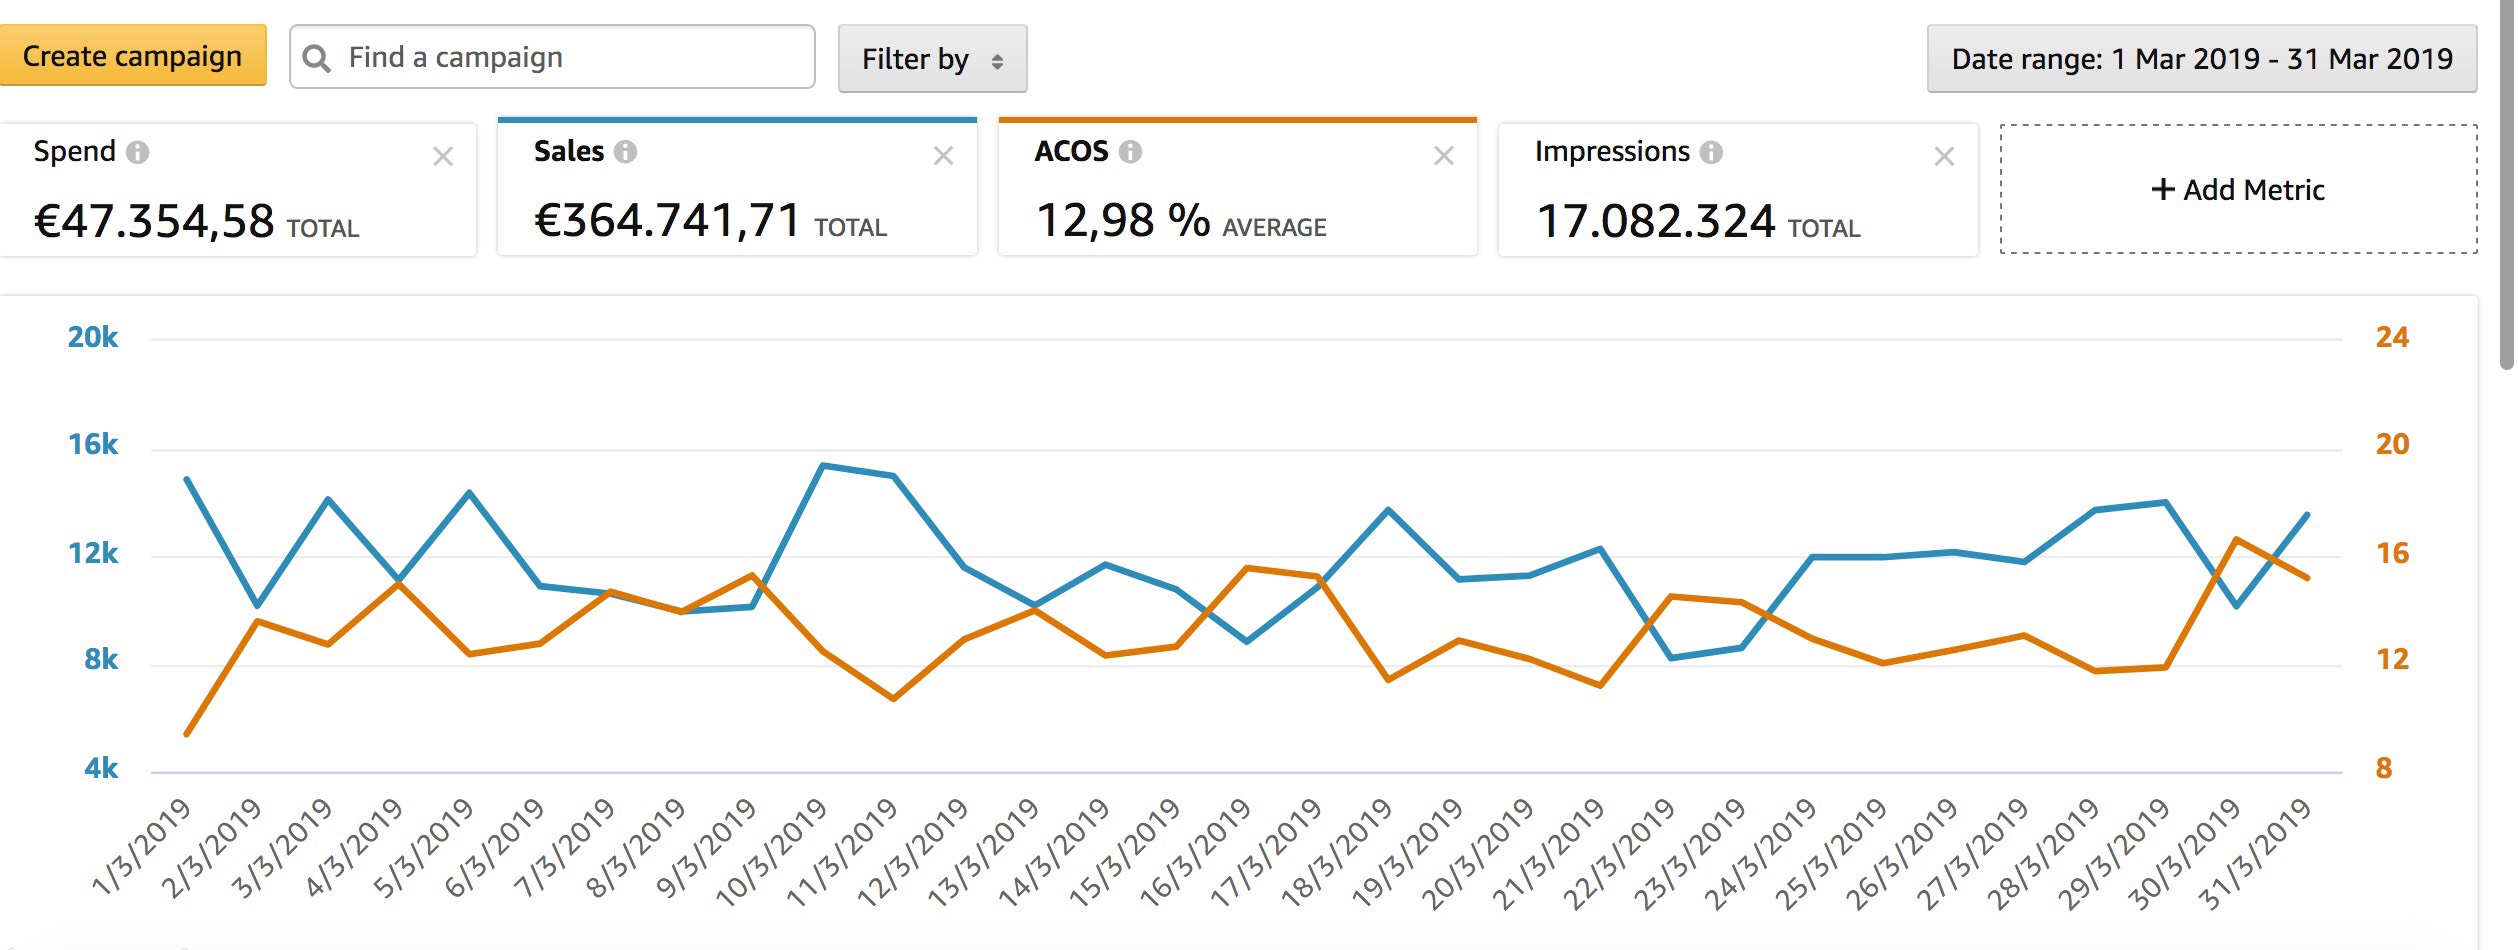 [mkd_button size=”” type=”gradient” hover_type=”gradient” target=”_self” icon_pack=”” font_weight=”” text=”364,000€ in 30 days with <13% ACos%? Ask Us How!” link=”https://wearegrowthhack.com/services-digital-marketing-fba“]
3. Setup Your first Manual Campaign
To start a Manual Campaign for your product, go back to the campaign manager and create a new campaign (Sponsored Products). Being the campaign manual, you will have to choose and provide the targeting for your product: keywords or products. This time you will click on “Manual” and you will name the campaign following the same style: “Product / Product Line + MAN/Manual” to quickly distinguish from AUTO campaigns: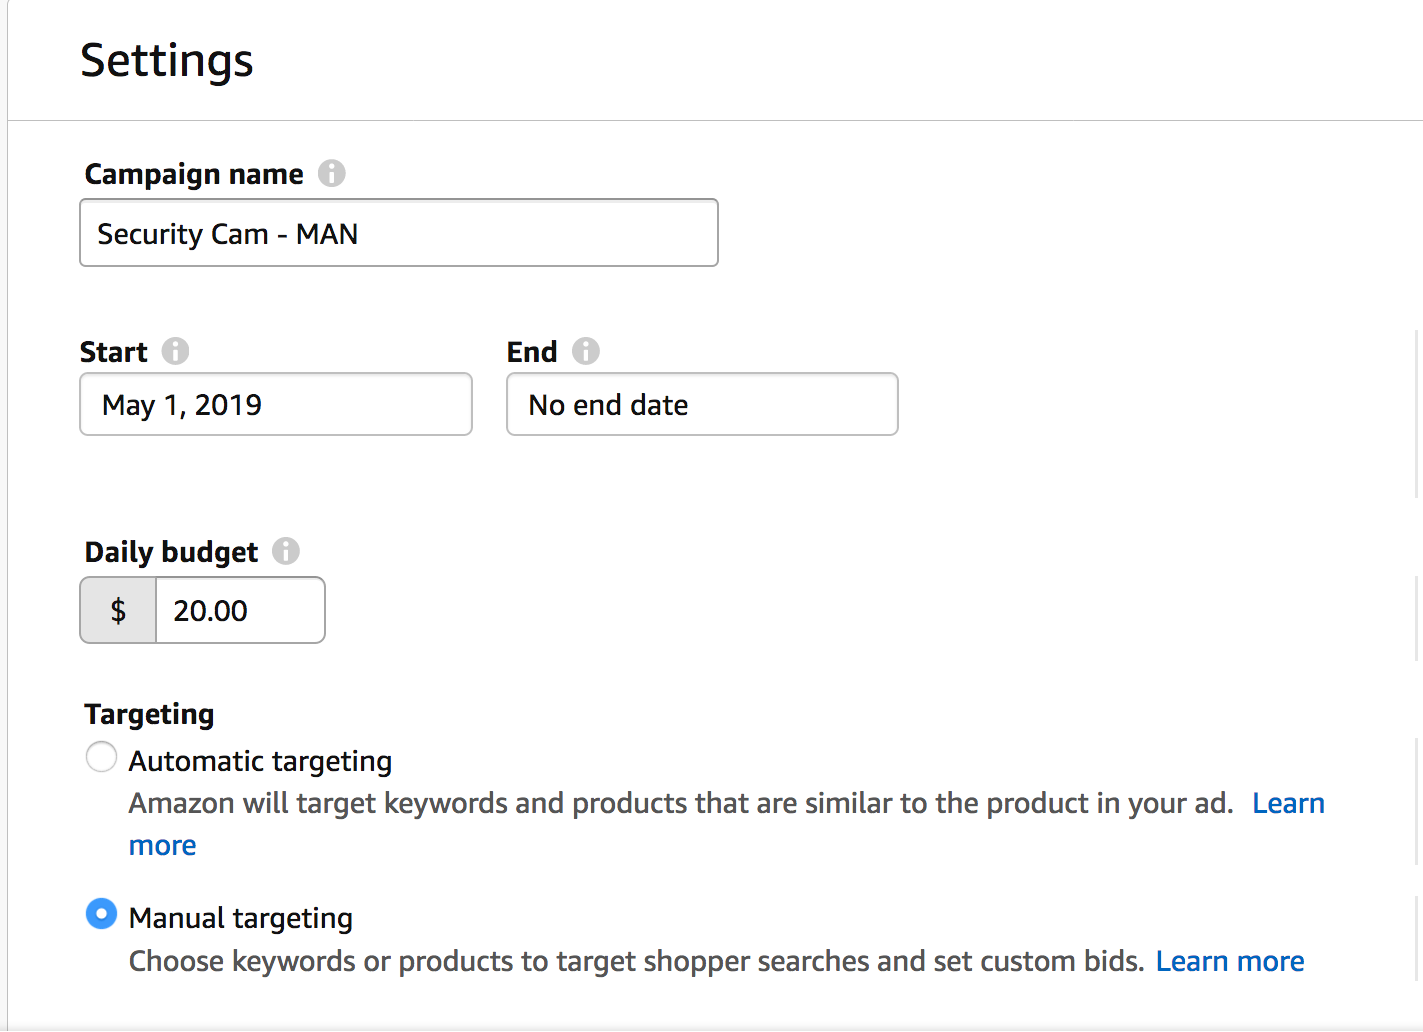 – As for the AUTO campaign, create the first group with your selected product(s) or product variation(s)
– We recommend to start once again with a “Dynamic bids – down only” bidding strategy and to add +50% on top of search (first page) as for AUTO campaigns. You will be able to adjust dynamic bidding later on.
– The default bid will once again depend on your previous CPC or on Amazon’s suggested bid and on how aggressive you want to bid for the keywords of this Manual Campaign.
– Start your first campaign by targeting Keywords, we will explain how to use Product Targeting as well in the next posts:
 – Add the Keywords, we start here with targeting Amazon suggested search terms, but you can definitely begin with keywords taken from other sources. Note: between the suggested keywords by Amazon, there could be your brand name, especially if you have a consistent sales history and people are actually searching for your brand. At an initial step, it is useful to add this keyword and all related ones into the campaign you are creating. Later on, we will explore more about branded keywords and how to manage them properly. As you can see on the screenshot below, all suggested keywords by Amazon are BROAD match, this is a good way to start a new manual campaign as this kind of match will most likely deliver a higher number of impressions to your ads.
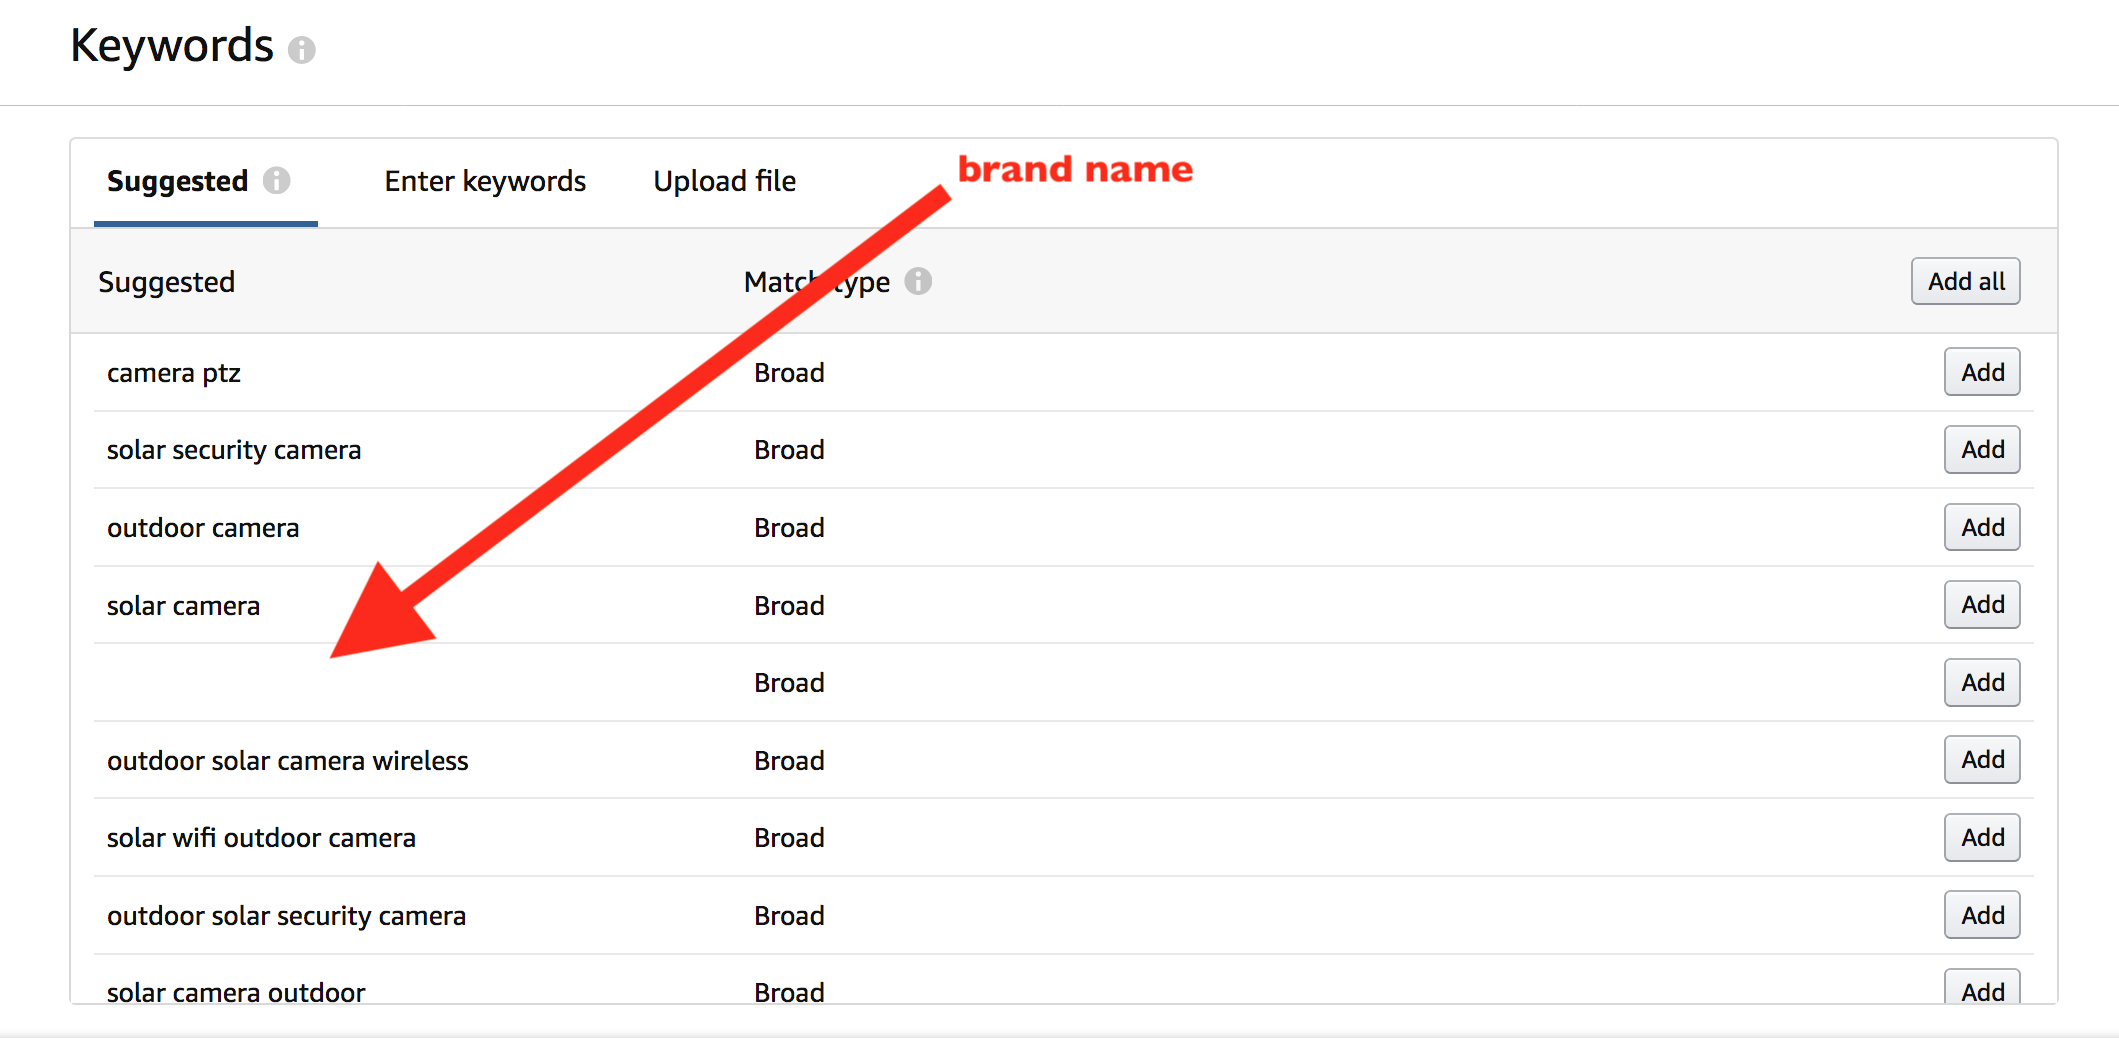 – Do not simply add all of them, search and remove from this list the keywords that might be not directly related to your product in order to avoid to show your ads for irrelevant searches:
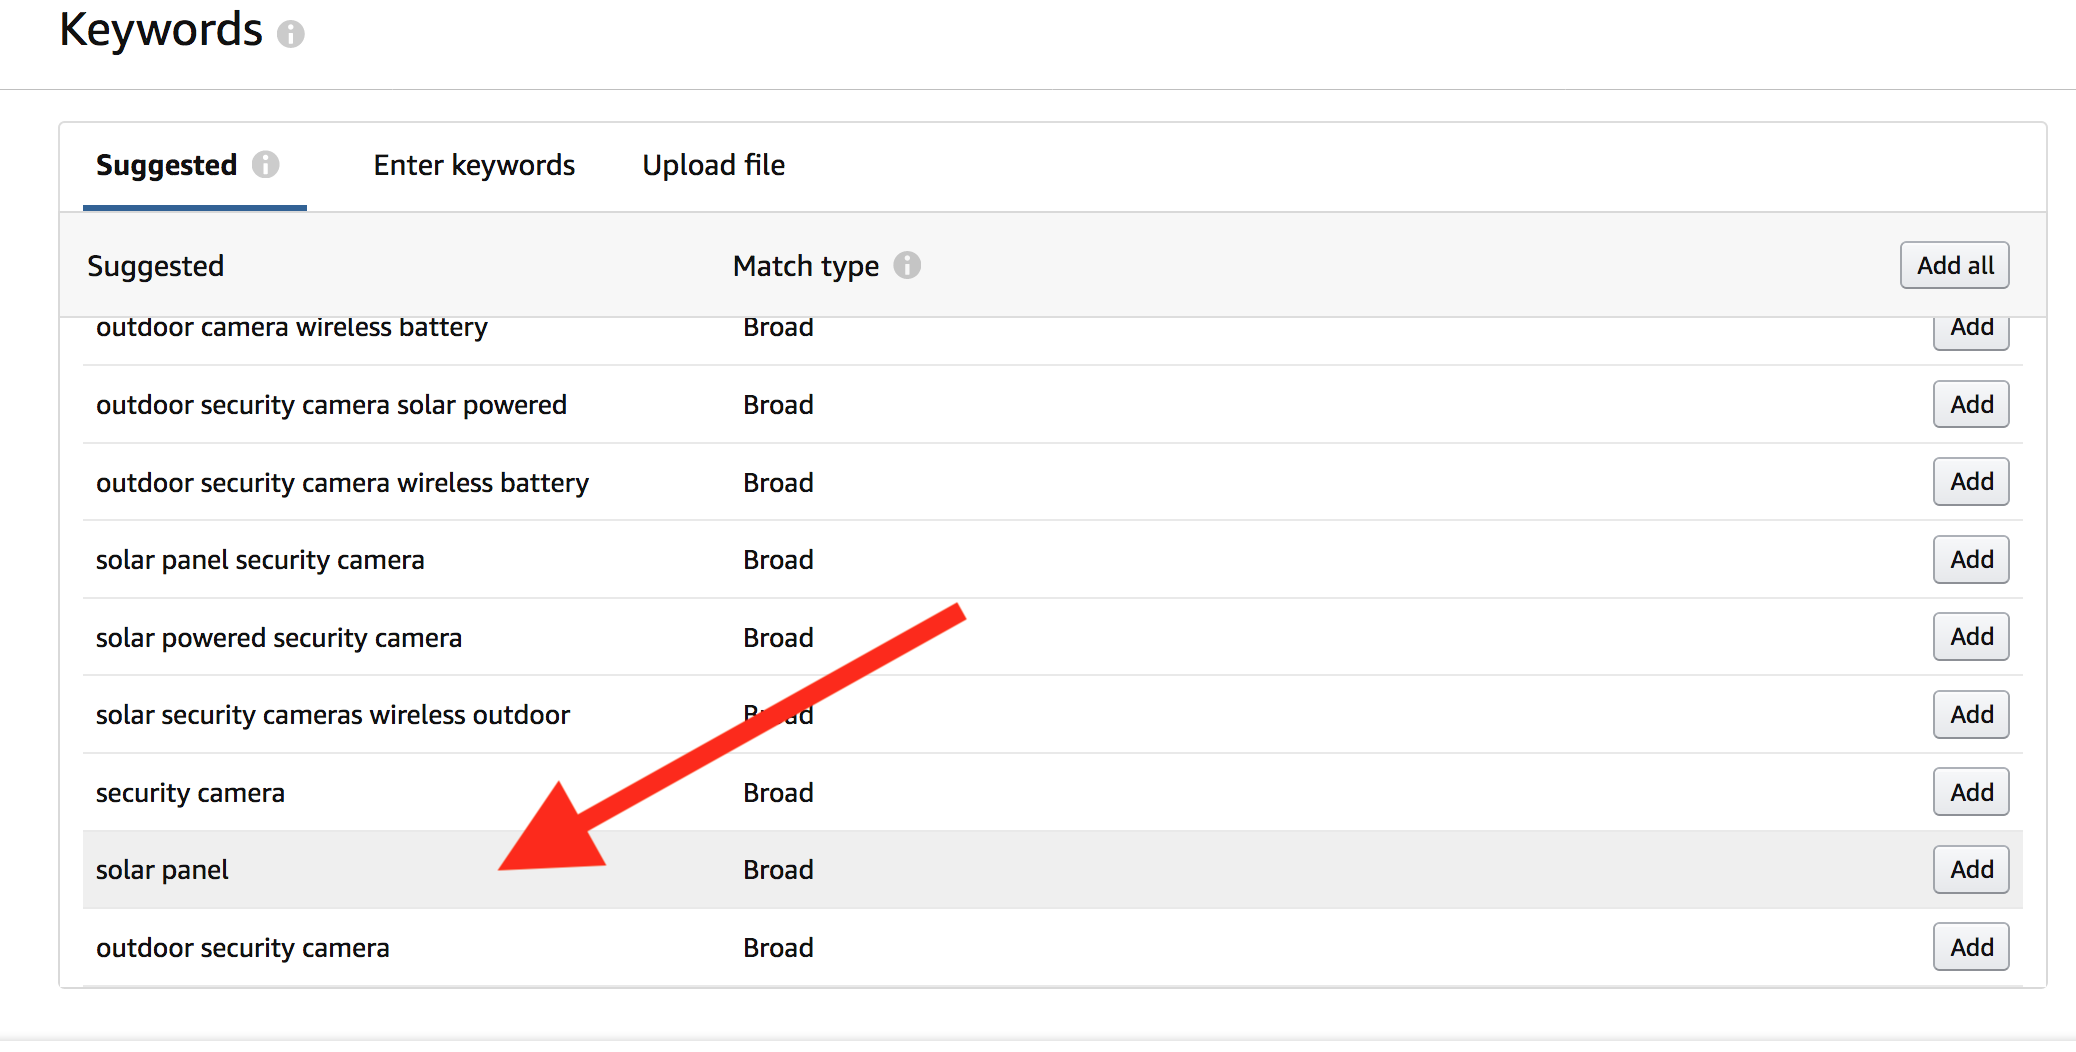 Once you have added keywords, click on “Launch Campaign” and you have created your Manual Campaign.
Note: the campaign you have just created is using keywords from Amazon suggested terms, as you will create more campaigns, it would be smart to rename this campaign later using a name that will help you identify its purpose: “Amazon Suggested Keywords” or similar will do.
As we did for the AUTO Campaign, you can create as many groups as you want, in order to test different variations of your products. You can also create a group with “ALL ASINs/SKUs”. If you want to speed up the process of getting impressions and you have enough budget available, you can create other groups that will use exactly the same keywords for the same product selection, but in different match types (PHRASE, EXACT). This method is used purely to increase your impressions and Ad Spent in a short time and to improve the tests. Otherwise, if your campaign has already a lot of groups, it would be wise to create three different campaigns, each one with a different match type. Depending on your strategy, you might instead want to start only with BROAD match, expand your terms later on using PHRASE matches and finally focus on EXACT matches after few weeks of optimization. A good general rule: each campaign will be created for a different purpose. You can create various campaigns for each different keyword sources, different bidding, different placements, different matches etc.
4. Research & Gather Data
If you are launching a new product with Amazon Sponsored Products Ads, or if you want to revive your existing campaigns, it is wise to start your approach with the right research following these steps:A. Create an Automatic Campaign with at least 20$/day budget, with bid at least as high as average CPC (or slightly higher than suggested bid).
B. Create one or more Manual Campaign(s) that use targetings from different keyword sources, preferably keeping the match type BROAD and keeping the bid on the suggested by Amazon or not higher than your average CPC.
C. Let the newly created campaigns run for at least 1 or 2 weeks. This will allow you to gather essential data and to be able to expand the target keywords later on, in order to get extra sales and to lower your average ACoS% by optimizing bids to different targetins and ad groups. Find the best performing targetings from both manual and automatic campaigns by downloading the PPC search terms report and filter by sales, keeping the terms with a good level of ACoS%.
D. To make sure that your ads appear where you want them to, you can choose to bid a little higher on Top of Search results, a +100% to start with would normally be more than enough.
E. Finally, to keep your budget under control, we advise to check your keywords bidding and spent each day and to never apply huge changes in the bidding (up or down) as Amazon will take 16 hours to 5 days to show the full data results.
The objective of this phase is to test your products with the associated keywords. This phase has typically a higher cost, right because it is mostly made to test out different keywords and bids and to gather information about keywords. So don’t worry about a higher ACoS% than your target and keep the daily budget under control. [mkd_button size=”” type=”gradient” hover_type=”gradient” target=”_self” icon_pack=”” font_weight=”” text=”ACoS% too high?! Ask us for help!” link=”https://wearegrowthhack.com/services-digital-marketing-fba”]5. Expansion
The next thing you want to do right after the research is to expand the actual converting keywords and add a lot more search terms related to them, to be able to your sales while keeping your ACoS% at a reasonable level. In this phase, you will want to gradually use a higher budget than just $20 per day ($30-50/day), so to get more impressions to all the new keywords that you will use. If the research campaigns have a very high ACoS% that influences negatively on your total cost, you might switch them off once the newly created campaigns start delivering good results. There are three main ways of getting new keywords you want to bid for, within Manual Campaigns: A. Find them on the Search Terms Report: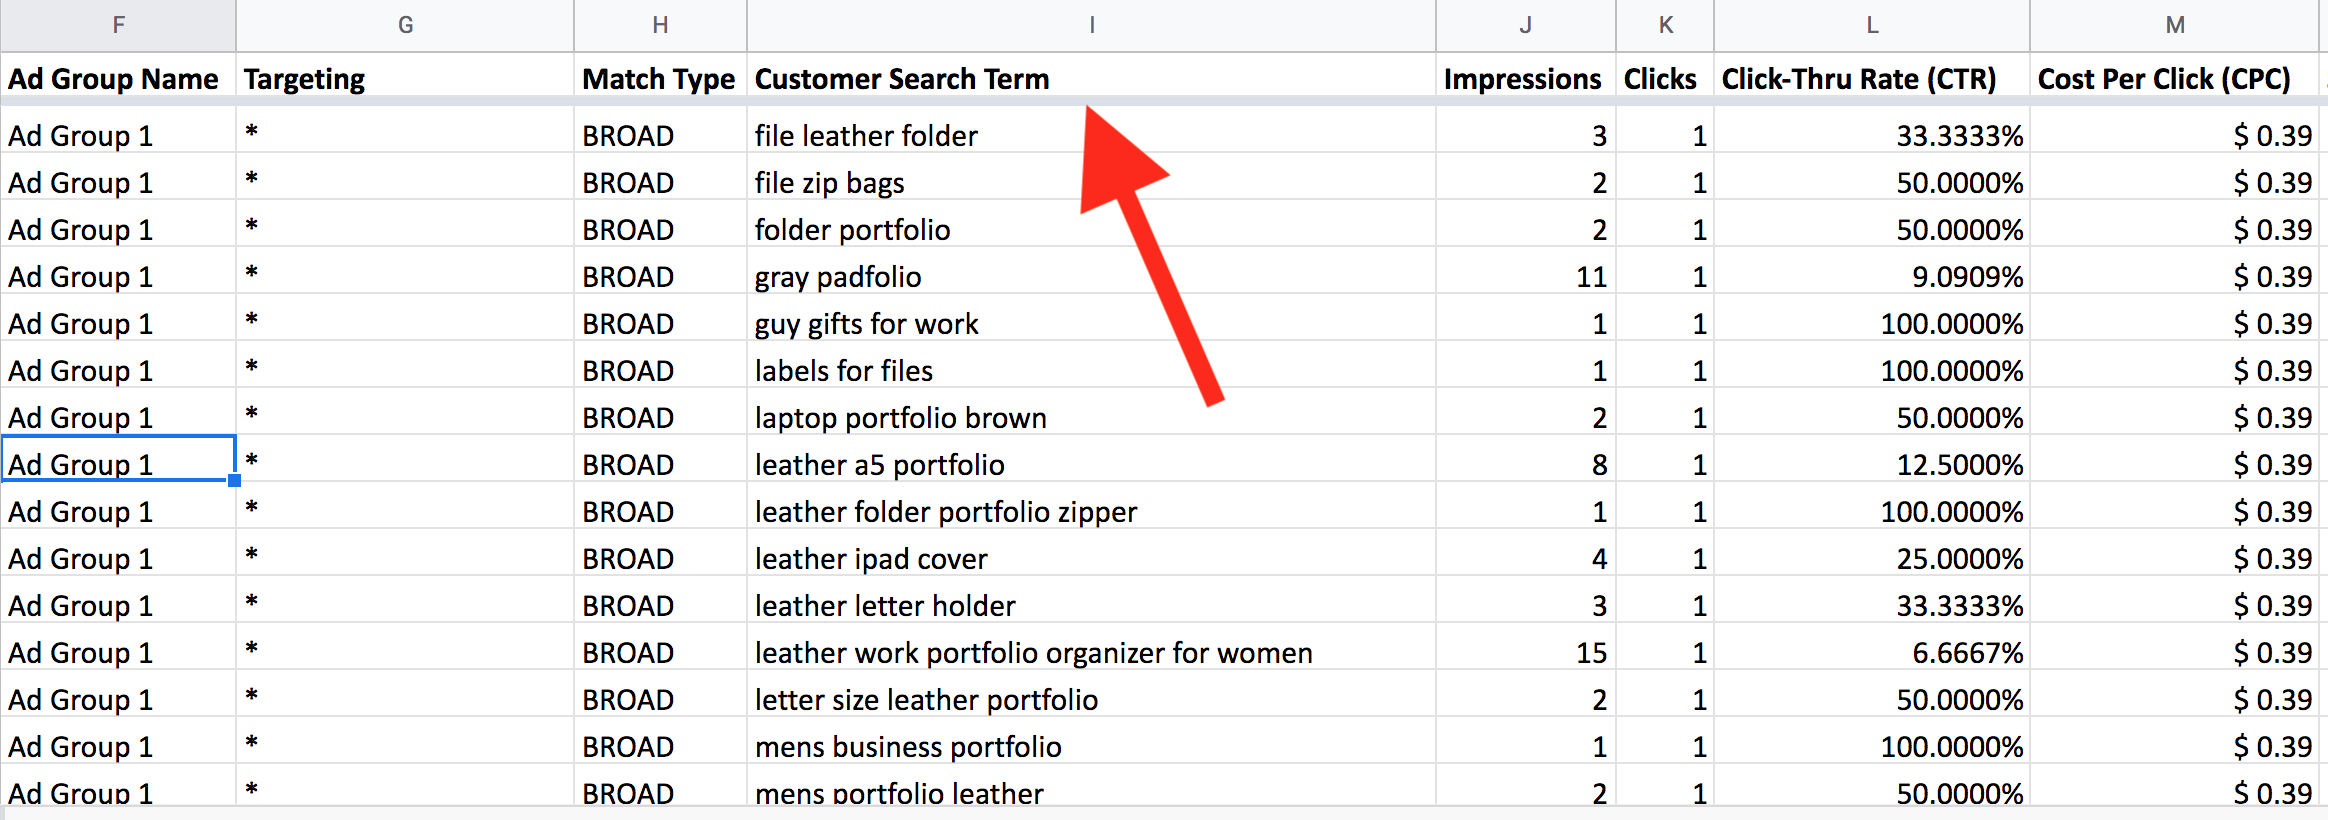 – Download the Search Terms Report from Reports > Advertising Reports (make sure to download the “search term” type)
– Get the search terms that deliver sales from AUTO campaigns (example above)
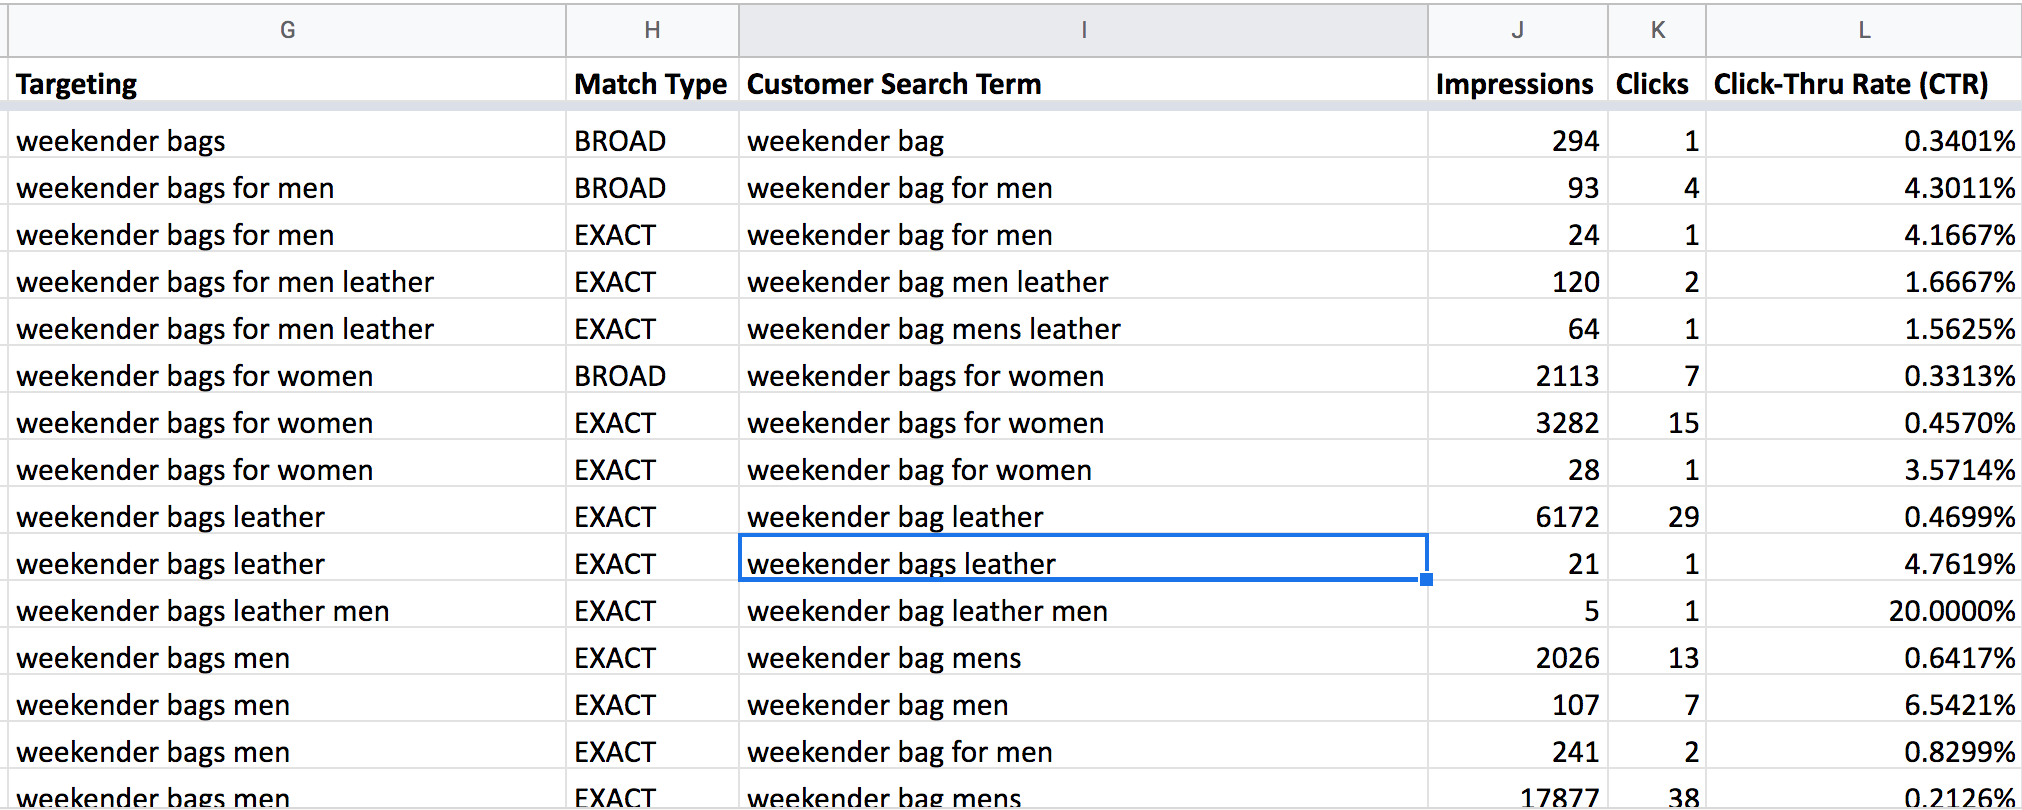
– Get the search terms that deliver sales from the Manual Campaigns. As you can see, Amazon can associate different search terms to the same targeting keywords (if BROAD or PHRASE) you will be able to use this feature to get the most out of the different match types with other adv strategies:
 B. Get lots of keywords from Keywords search tools
There are a lot of tools available online for keywords search (ubersuggest, Google Adwords Keyword Planner, Merchantwords, semrush, etc). You will get hundreds or thousands of keywords to play with.
C. Expand your existing keywords by looking at Amazon’s competitors’ listings top terms, reviews, Q&A, etc.
Take a look at the content of similar products on Amazon, read reviews, titles, bullet points. You should be able to list 10-20 top terms that keep repeating themselves in the content. Take your original terms and mix & match with the newly found terms. You will be impressed to see how many new keywords you can create with this simple method – it’s not a quick one, but very effective. You can combine competitors brand names, features, use of the product, different ways of naming the same product, etc.
Here’s an example of how many related terms we can get just by looking at one listing on Amazon:
Title + Bullet Points
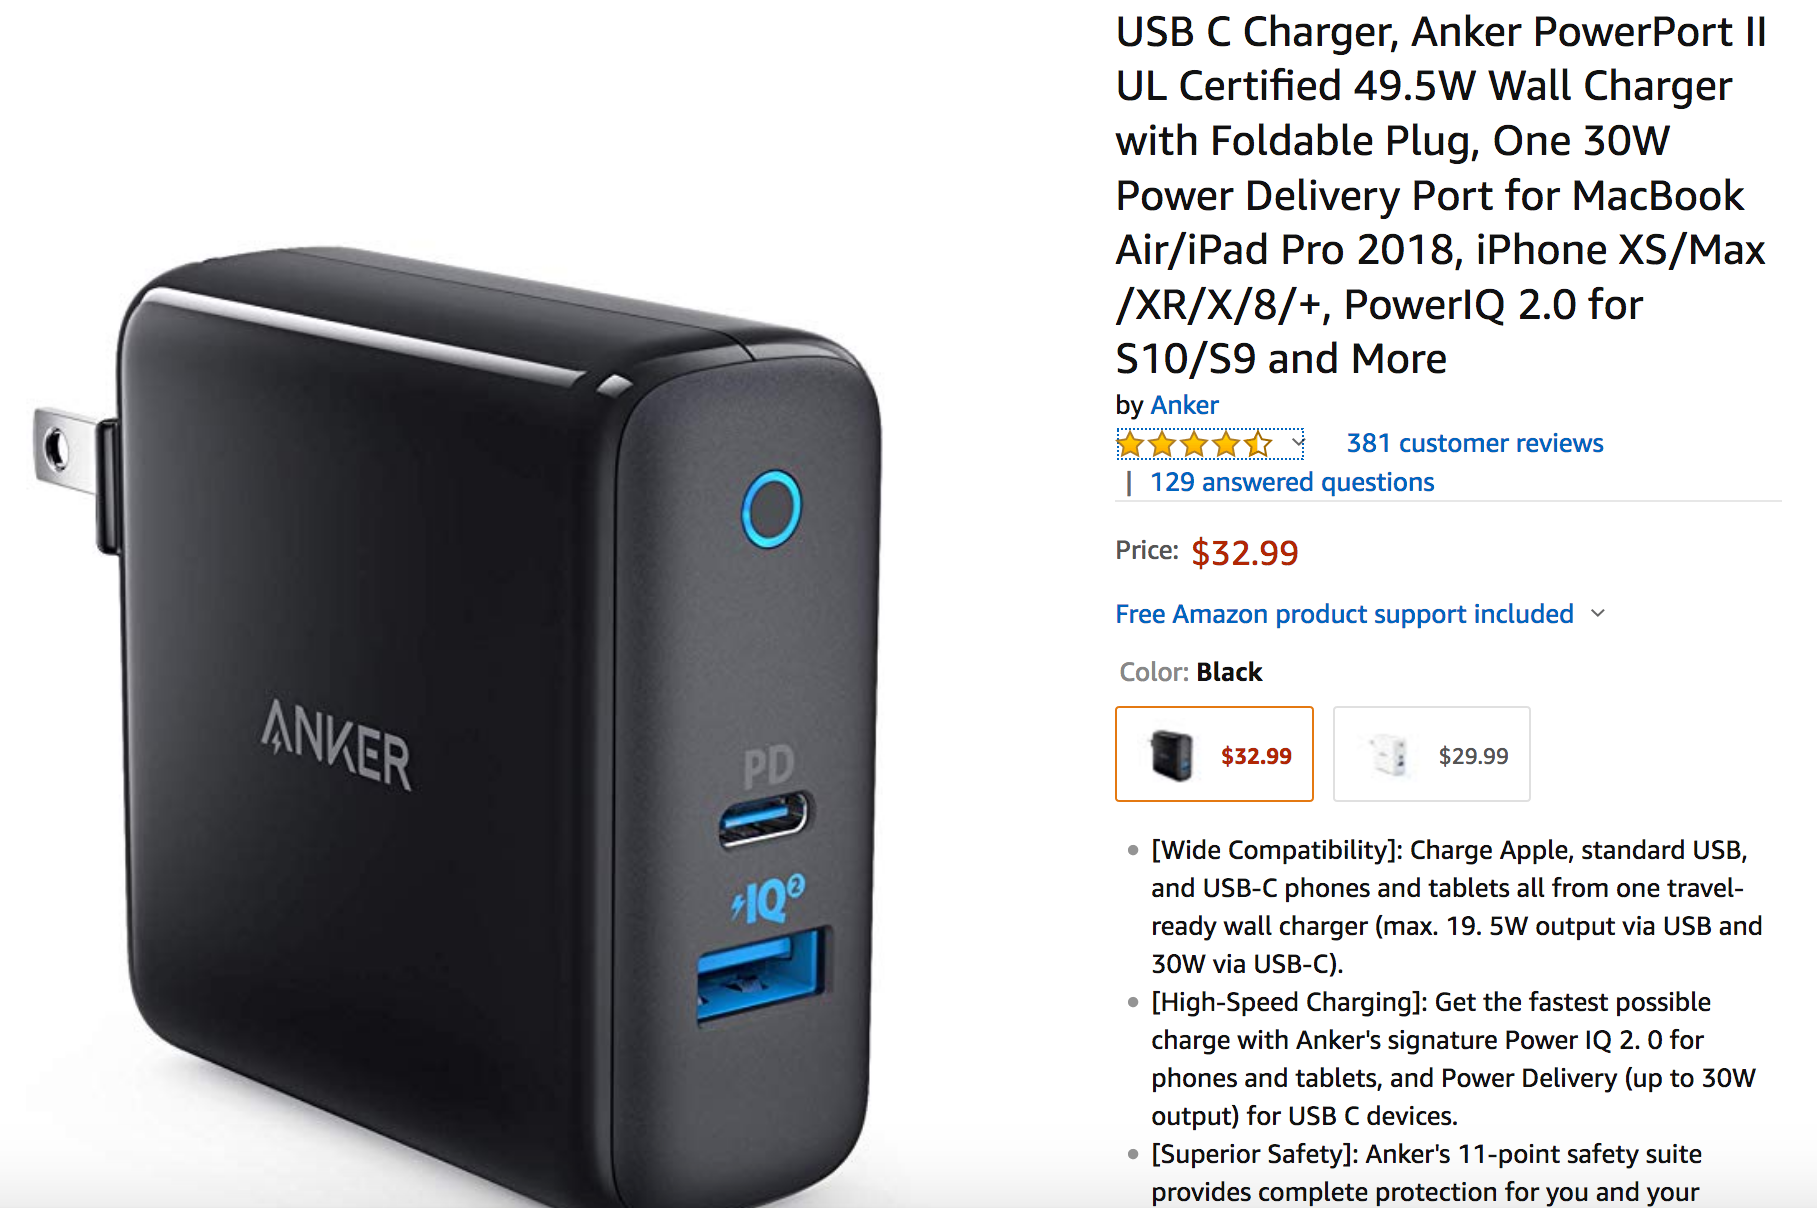 USB C, Charger, Anker, PowerPort, Power, Port, Delivery, Macbook, iPad, PowerIQ, iPhone, Compatible, Charge, Standard, phones, tablets, output, etc. These are 17 terms ready to be mixed and matched in multiple search terms combinations – up to 5 words for a single search term.
Q&A
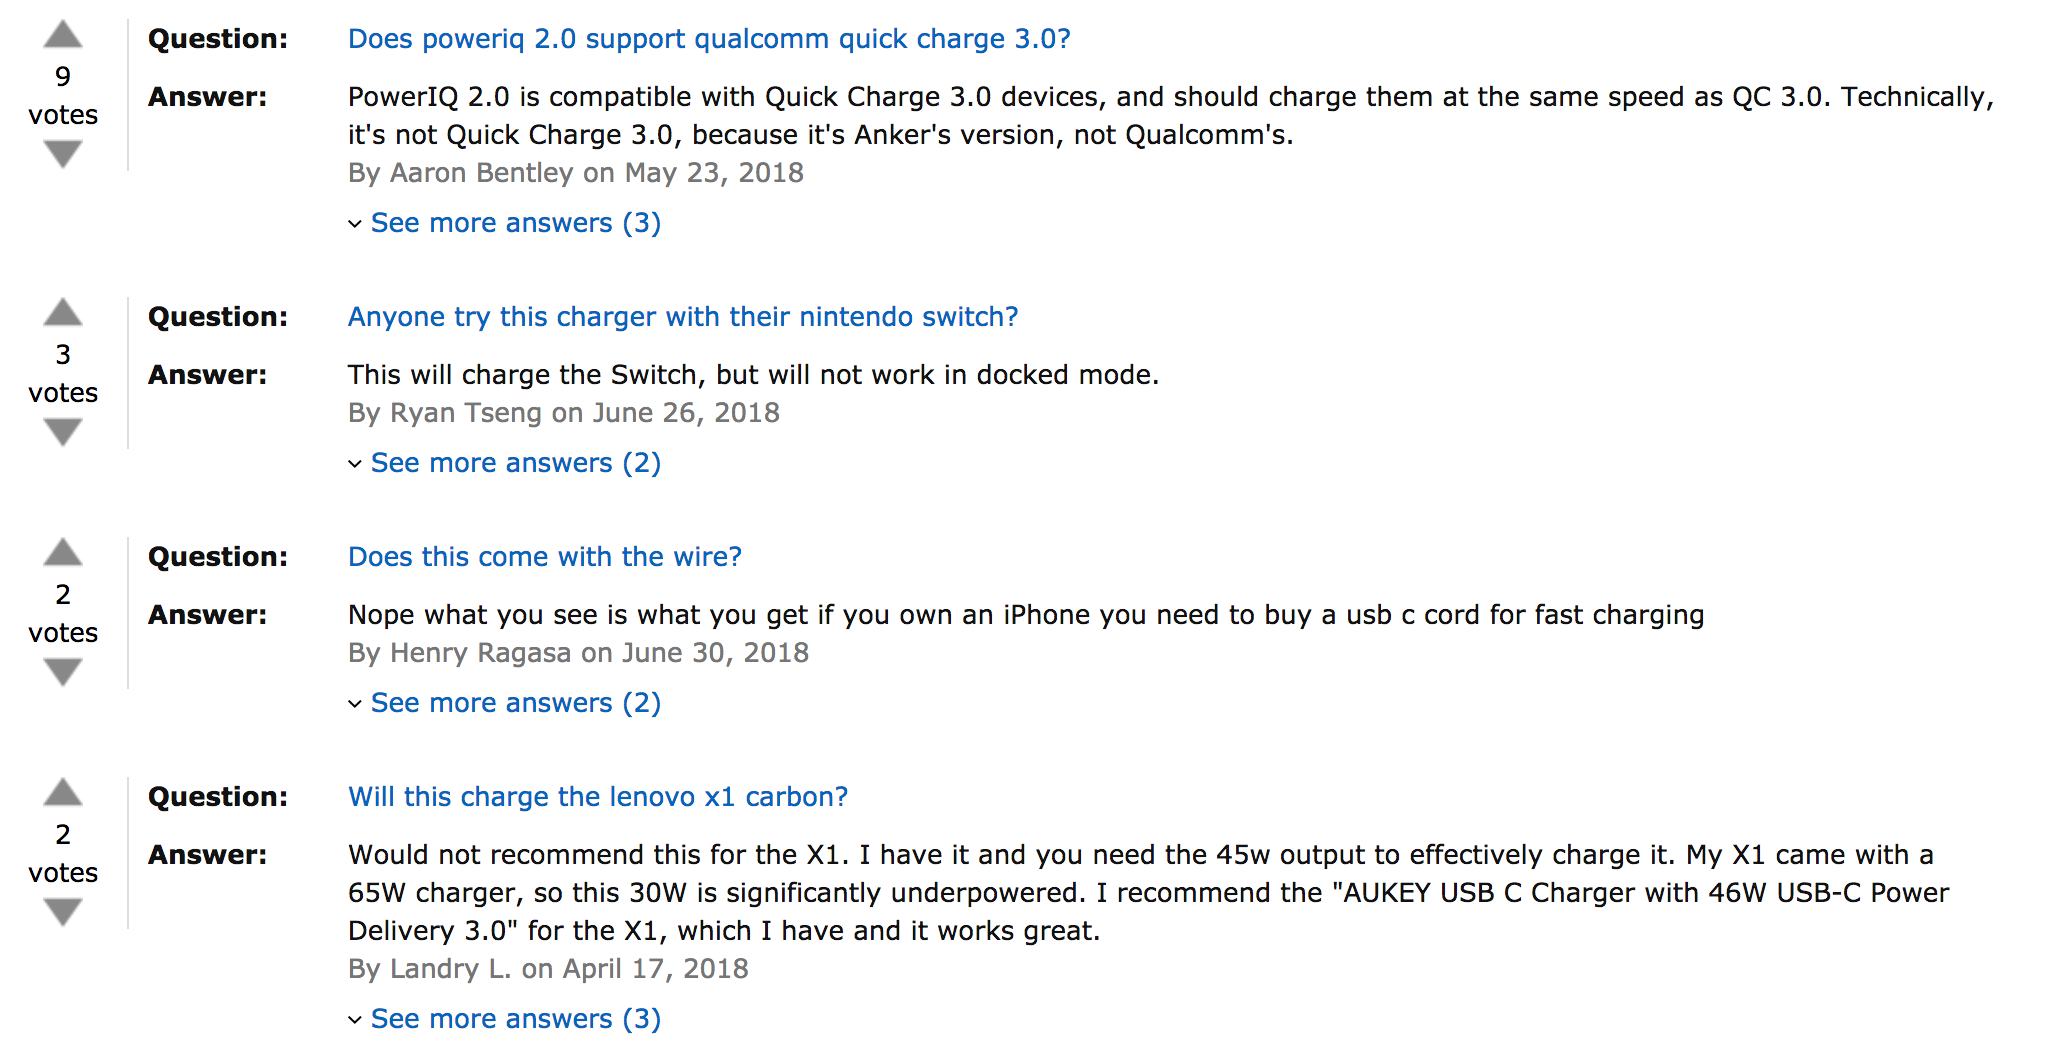 2.0, quick charge, 3.0, compatible, speed, qualcomm, nintendo switch, wire, cord, etc.
Reviews
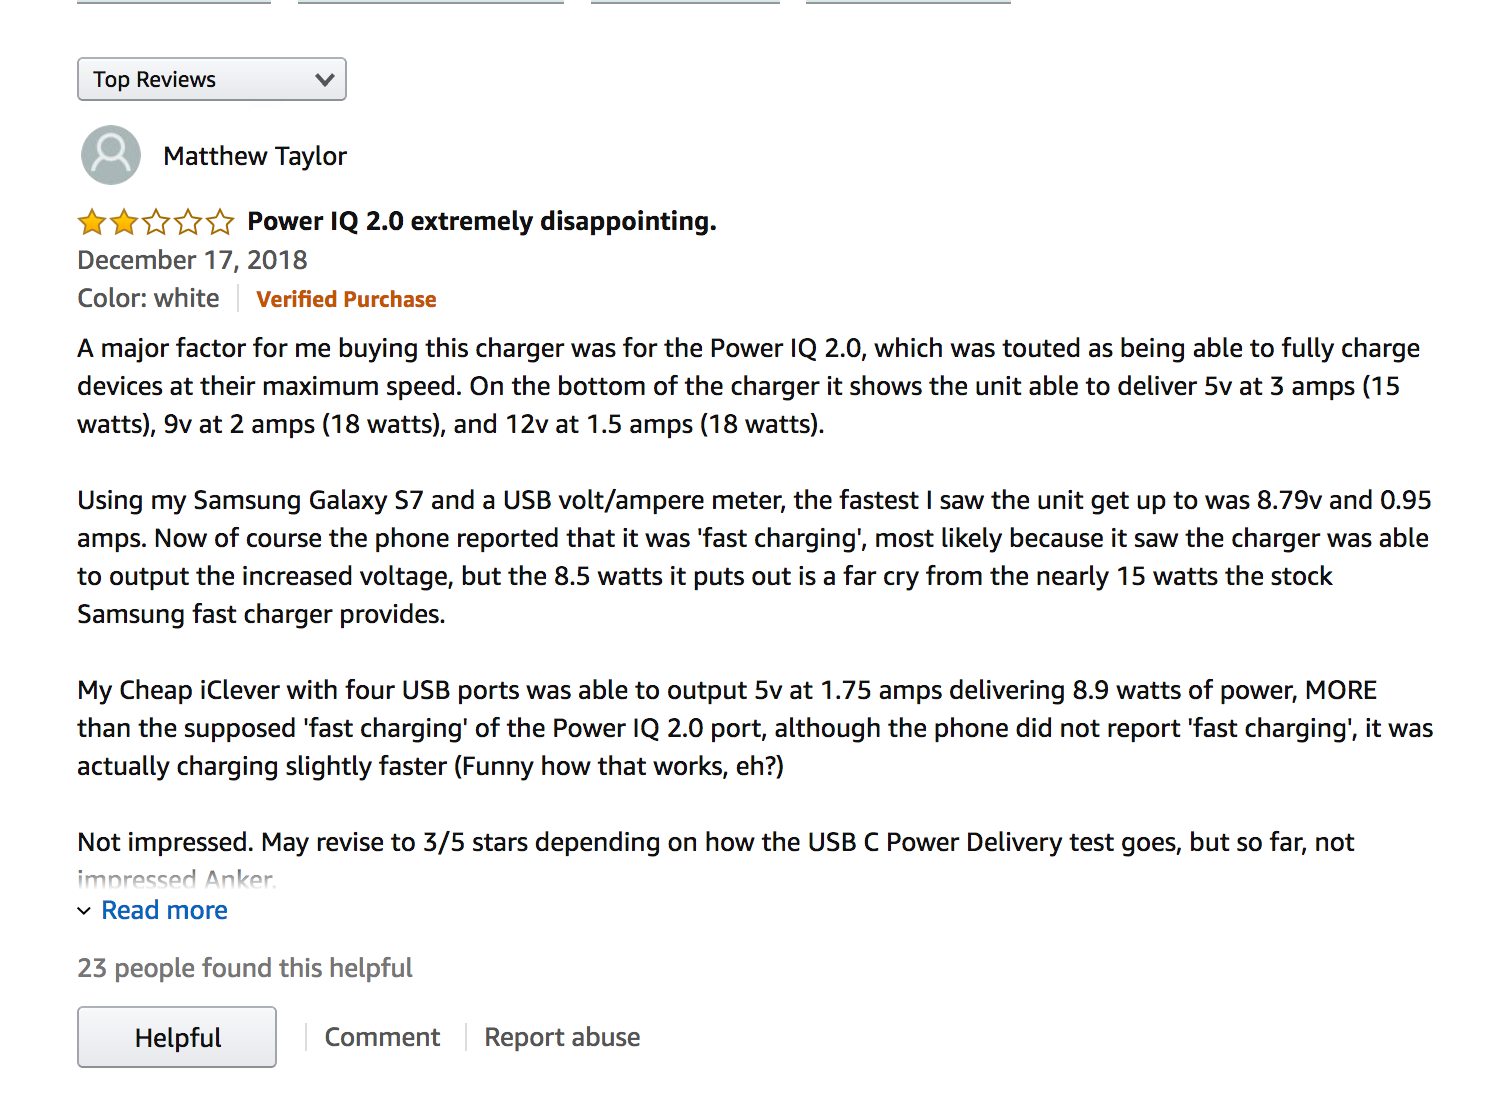 devices, amps, watts, samsung, galaxy, volt, ampere, fast charging, output, voltage, iclever, faster, power delivery, etc…
We have just found in one single listing more than 30 terms to mix and match our original keywords with. If you had 50 keywords in your original campaign and you would mix all the terms together, this would make a total of 1,500 terms (minus the irrelevant matches, mistakes, duplicates etc).
….Finally Create new Campaigns using the Expanded Terms
After you have found a lot of new keywords for your products, it is time to create new campaigns and to put them into action. The best way to do it is to create new campaigns, each new campaign from a different keywords source. This example shows the organization of a campaign that is using as source Google Keywords Planner (G stands for “Google”):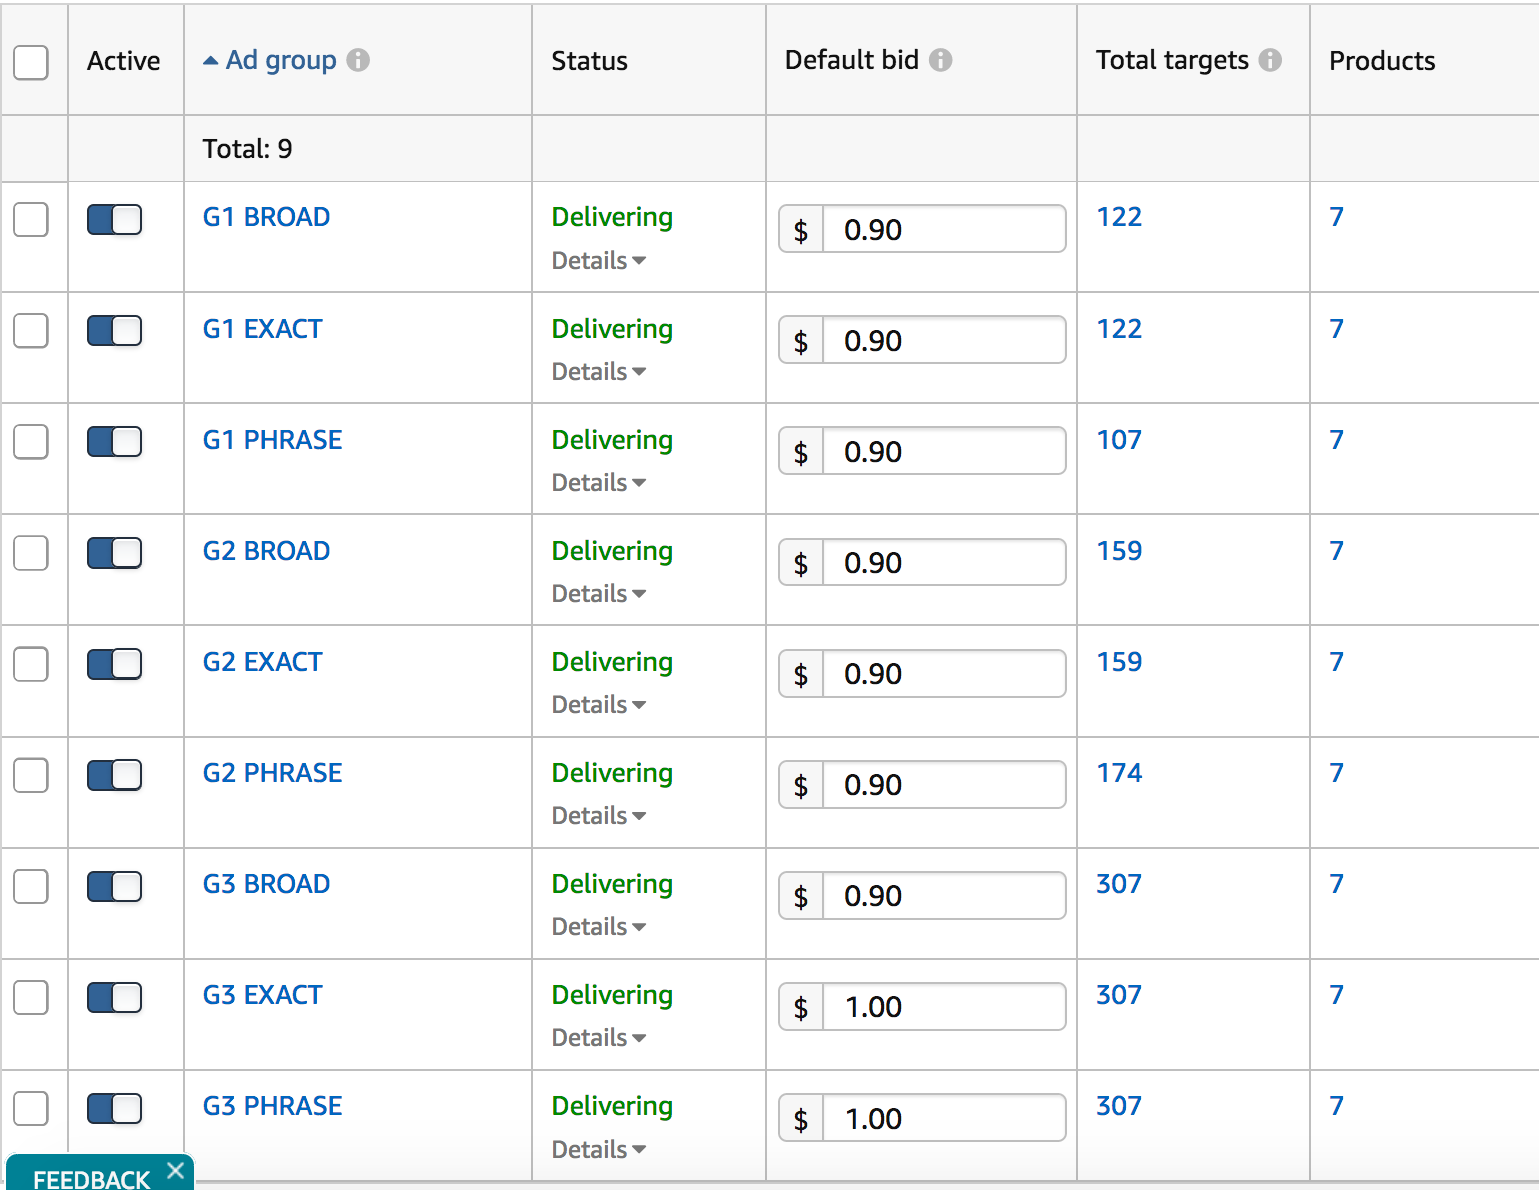 Once again, you can choose whether to use different match combinations (BROAD, PHRASE, EXACT) for the same keywords and put them all together in the same campaign in many groups, or to start with only one match type, or to create different campaigns for different match type. It will all depend on your budget and strategy. Combining all the matches in different groups will give maximum exposure to the whole campaign, especially if you set a high budget (at least $50 or $100 per day).
Note: you can add up to 1000 search terms in one single ad group, but we deeply advise to keep the number of keywords around 300 or less, in order to prevent some keywords not to get impressions.
At the end of the Expansion Phase, you will have a lot of new campaigns, most likely each one taking keywords from different sources. You can name the campaigns as “Source of keywords (Google, Merchantwords, etc) + Product Line/product + MAN”. This phase might cost you a lot in terms of budget and time. Depending on your target, you might want to keep the ACoS% under control. Remember to check the bids and spent every day or not later than every 3 days to avoid useless high spent on keywords that do not deliver sales.6. Optimization – Manual Campaigns
As you have already created your manual and automatic campaigns, you will start seeing sales coming within just a few days (sometimes within few hours only) but you will even earlier start noticing that you are spending advertising budget as well. Your j0b here will be to optimize the ad budget spent in order to take down your ACoS% to the target level or as close as possible to it. The target ACoS% might vary on your strategy: let’s say you’re advertising a product which has a break-even cost of 30%, then you want to keep your ACoS% below that level if you want to make a profit from this advertising; instead if you are launching a new product or using a part of your budget to promote this product heavily, you can accept an ACoS% that is above this level. We will talk more about the right selection of ACoS% for different purposes in other posts. We usually operate Amazon PPC Advertising optimization in 4 different levels, this process makes the job of the advertiser very articulated and adds a lot of variables to take into consideration:A. Campaign Budget – account level
Some might give this for granted, but it’s actually a very important part of the advertising management: the daily campaign budget controls the spent cap of every single campaign. The total ACoS% of your account will be calculated as: [(total campaigns spent budget / total sales) %], so it’s easy to figure that each campaign will influence the final ACoS% depending on how much of the total budget it’s using and on how good or bad it is doing. The smartest way (but not the only way, depending on your advertising purposes and strategy) will be to assign higher daily budget to the best performing campaigns (more orders and lower ACoS%) and less budget to the worst-performing campaigns. If a campaign is very important and you need to spend that budget, but its performance is not doing well – higher ACoS% than your target – we deeply suggest to create a new campaign with different settings, split the budget between the two and eventually keep only the new one if ACoS% is better.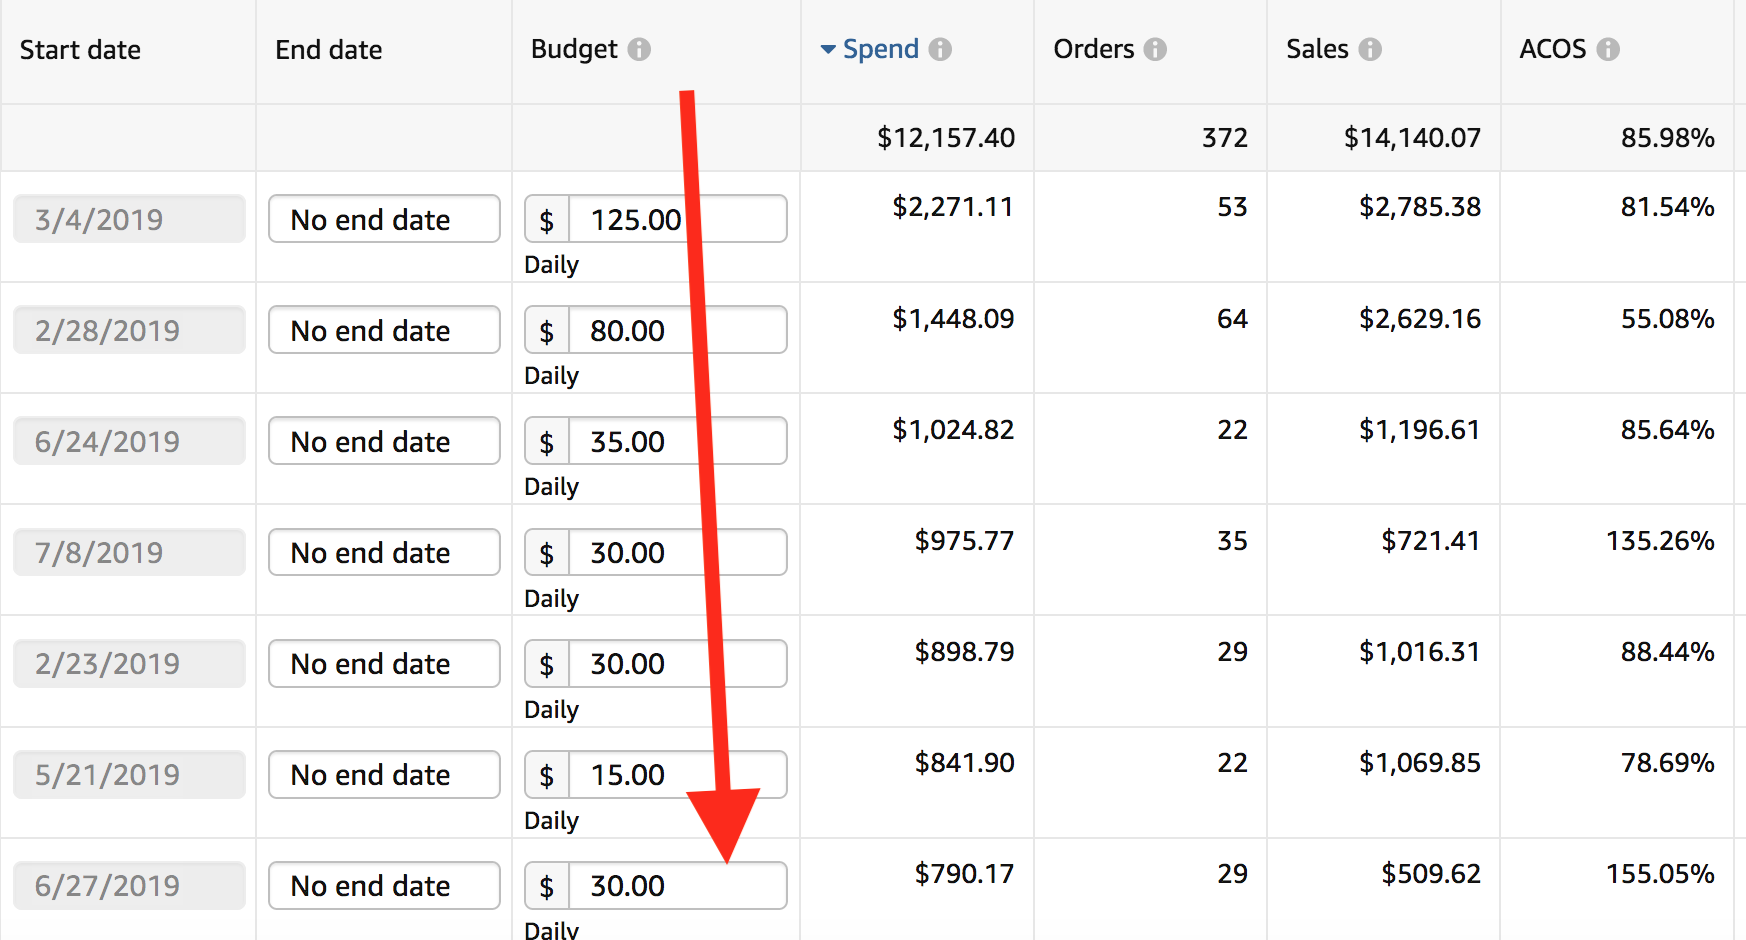
B. Placements – campaign level
Let’s move on to the actual campaign, you will notice that the tab named “Placements” (available since early 2019) will let you adjust the actual bidding placement for your targetings: “Top of search” or “Product pages”, while “Rest of search” is not yet available for adjustment. On the screenshot below you can see how we have set a 50% higher bid no top of search, as its ACOS is lower and still this bidding delivers a substantial number of orders. This will give an extra 50% increase to the original bids set by you on each targeting (product or keyword targetings). For this kind of management, we do not suggest any particular number or bidding, the best way is to slowly test by increasing and adjusting the bidding as results might vary depending on targeting method, product category, seasonality, competition on the first page, etc. Or, you might also want to bid more on Product pages placement and remove the initial 50% on Top Search, in case it doesn’t give out a great performance, as in the screenshot below – in this scenario we would remove the 50% from Top of Search and add 50% to Product pages:
 The interesting thing is that whether you’re targeting search terms or products, you have still a lot of room to play around with placements and dynamic bidding (e.g: bid higher on top of search in product targeting campaigns or the other way around bid higher on product placement in keywords targeting campaigns).
Tip: be careful when you use placements with level a higher than 200% or 300%, you might run out of budget quite early even if your default bid is very low.
C. Products Selection – group level
Something that many new Amazon advertisers forget when managing groups with several products in them, is to optimize product ads selection within the same group. Inside each group, you will always have products that are performing well and products that aren’t. For the better total performance, it is a good idea to optimize your product selection: ads can only be turned on or off at the moment; who knows if there will be a bidding option for them in the future as well… Let’s take a look at the example below, and say our target ACoS is 50%. Ad #4 needs to be turned off as it has just been wasting budget with no sales, ads #2 and #5 should definitely be kept as they’re showing a good performance. Ad #1 should probably be removed as it’s bringing the total ACoS% level way too far from the original target, and you could move it to a new group with keywords to be tested. Depending on your target and strategy, you can choose to keep or remove ad #3.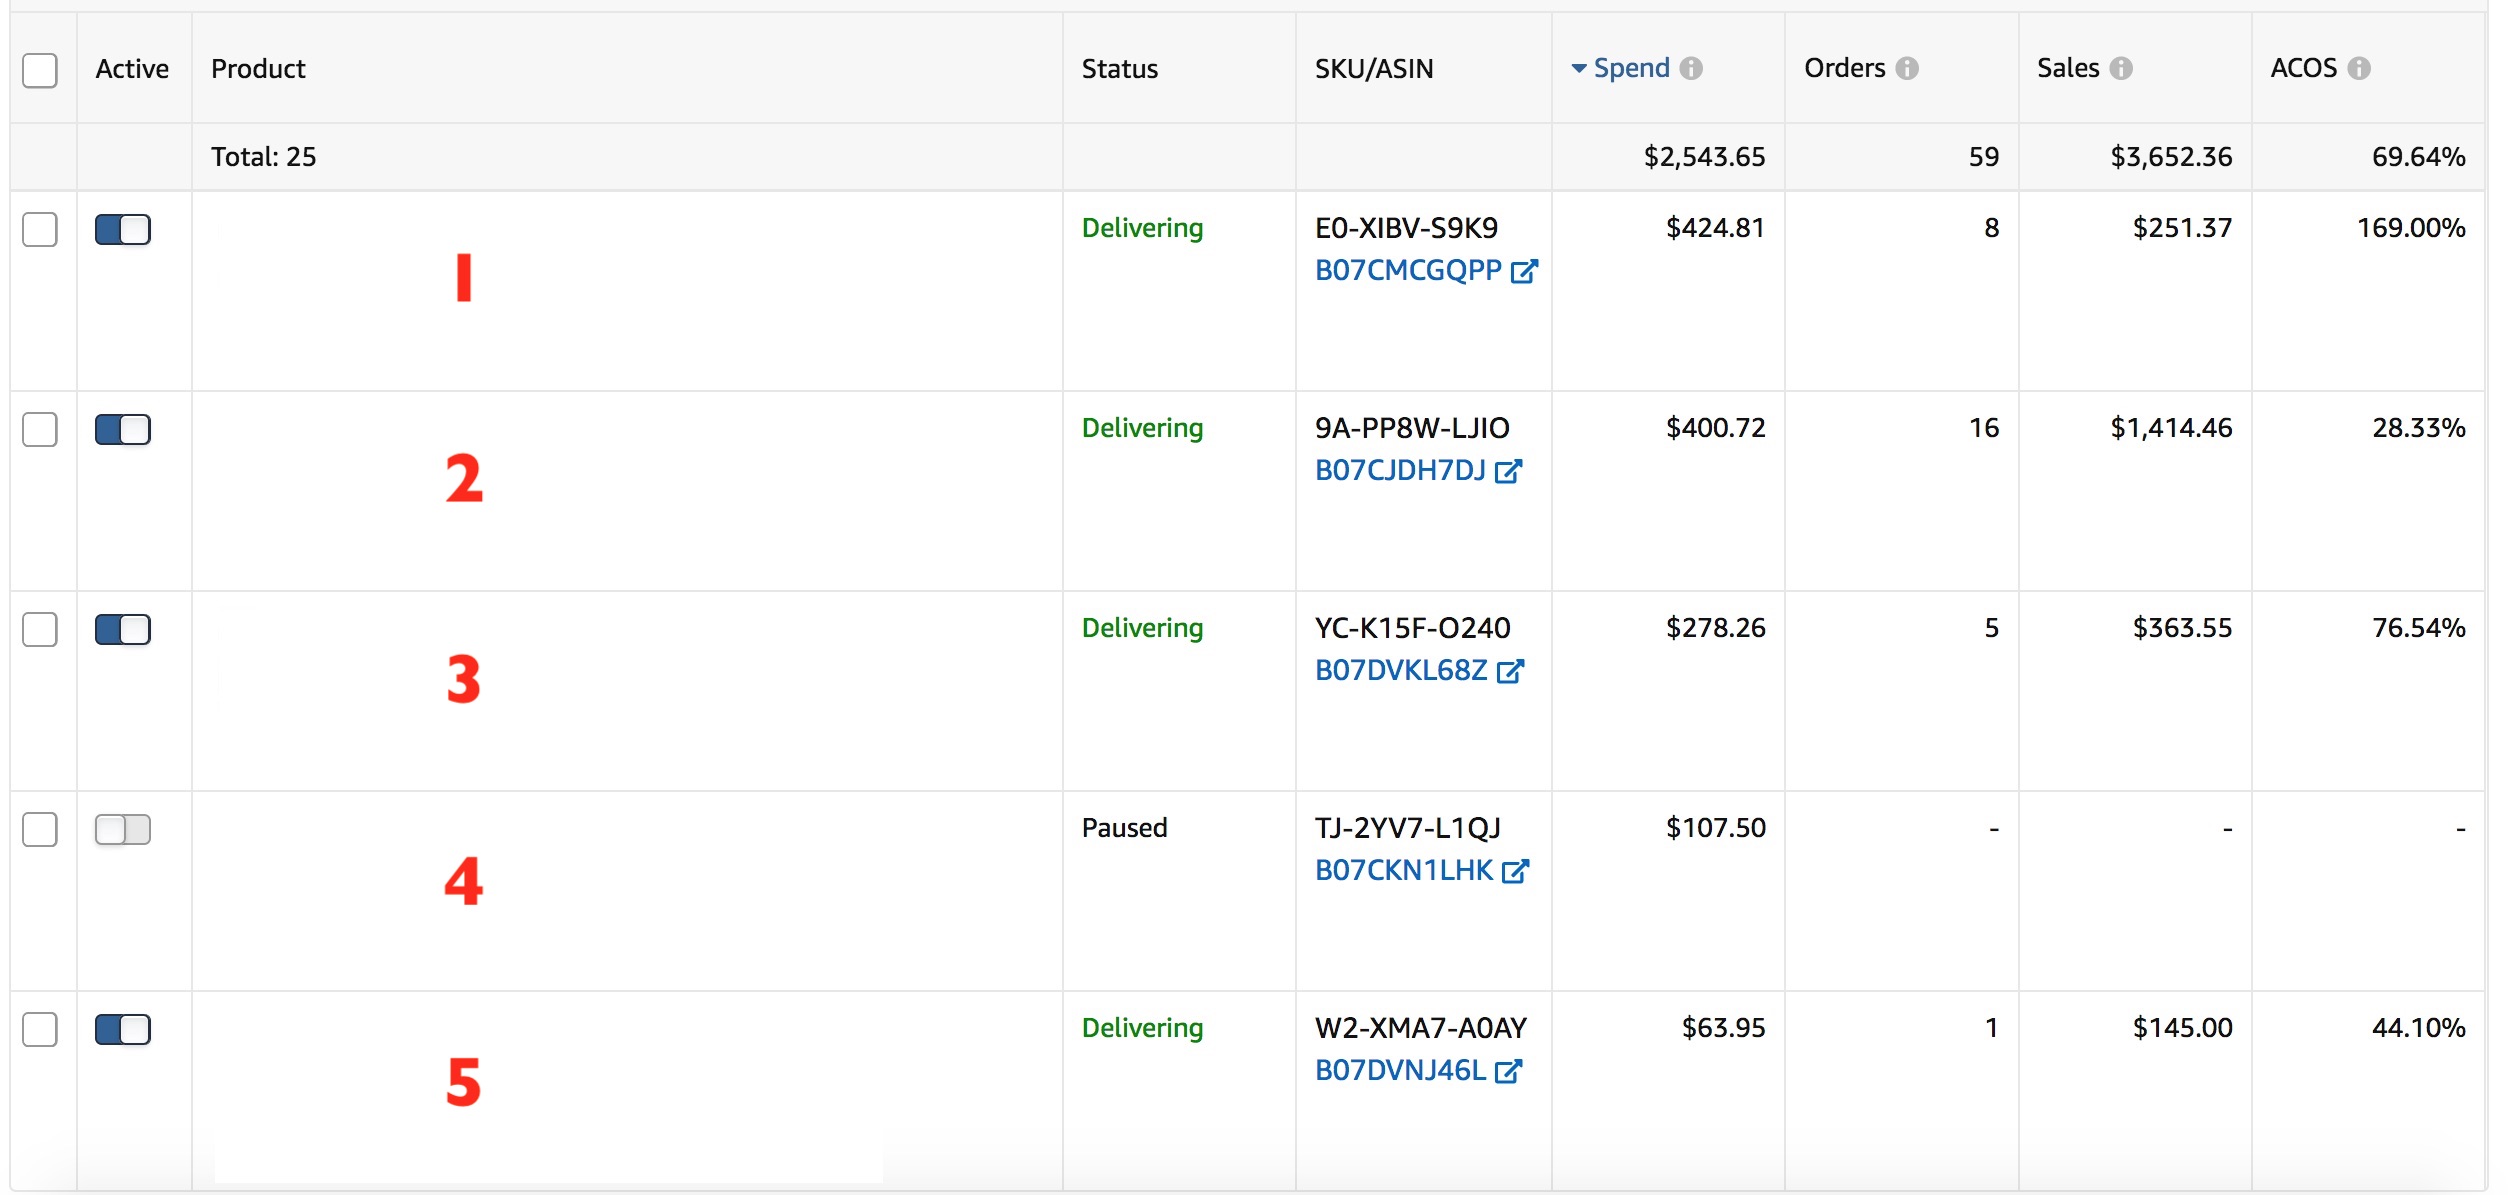
D. Keywords – group level
To optimize targetings (keywords/products) in ad groups is never an easy job: an ad manager new to this job might say “pause a keywords after 10 clicks with no sales”, “decrease bids of keywords with ACoS% higher than target ACOS”, “increase bid of keywords with ACoS% lower than target”. These assumptions are generally true as a starting point, but the truth is that in order to obtain a great performance and to fulfill your objectives, as every single change to targeting bids should be made taking in consideration the following variables (and probably even more): – Time frame: one of the most common mistakes is to look at PPC targetings performance of the same day or the day before. Amazon normally takes 16 hours to 5 days to showcase full stats (most of the times data in 24 hours are reliable anyway), so worrying for a high ACoS% or an out of budget in the morning is definitely a no-go. Also, taking a look at different time frames might help you understand your overall performance. E.g: one keyword might be doing very good in the past 30 days but very bad in the past 5 days. Is that a reason to pause it? The choice will depend on your strategy and the relevancy.Tip: What’s the best time to optimize your campaigns and bids? We suggest running constant optimization day after day during the first week of your campaigns or during high seasons. Once your sales and the spent budget get stable, you can run optimization each 3-5 days.
– Relevancy: You might choose, depending on your strategy, to always keep your bid at the highest level for a few keywords that you want to always rank for (on paid ads). You should consider investing a lot of budget or a limited amount of budget to rank on some particular keywords in order to boost your organic rankings in the long term. Clearly, you should forget about very a low ACoS% in this case. – Target ACos%: Your target ACOS might be the number one priority in many cases, especially if you’re not pushing rank for certain keywords, but you are focusing on making sales and profit from your Amazon Sponsored Products Ads. Here you should apply the general rules we have mentioned before: adjust each bid depending on how far they are to your target ACoS (up or down) and keep the bid stable when acos is near to the target. – Product price: Never forget that your bid should be adjusted while keeping an eye on your product price! The reason is simple. If for example your average CPC is 1$, your product price is $20 and your target ACoS is 50%, then you should remove/pause a keyword with 10 or more clicks and no sales. But in the very likely case that your product price is above $50 and you have same CPC, would it make sense to stop that keyword after 10 clicks? You would have stopped a keyword before it reaches a potential ACoS% of 20% with one single purchase. – Strategy: Generally, during a product launch phase you should be willing to invest a bigger part of your budget into Sponsored Products Advertising and depending on your product costs you might be ready to accept an ACoS between 50% to 100% or even more. – Seasonality: ACoS% on targetings is highly influenced by seasonality. During Summer or your products’ low sales season, you might notice a higher ACoS and lower amount of sales, while during promotional events such as Prime Day, Black Friday, high sales seasons (Christmas etc) you will probably notice a higher volume of sales and lower ACoS%. – CPC: Your actual CPC might help you in setting the bids, especially when creating new campaigns. Pull down the sponsored products reports to have a clear vision of your CPC. – Campaign budget: Always take into consideration your campaigns’ daily budget. If you just started a campaign with hundreds of keywords and set the budget cap to $20 or less, you might run out of budget quite soon if your bids are in the average or suggested level.E. From BROAD to EXACT
When it comes to optimization of PPC campaigns, your objective will be to spend the highest portion of budget on your finest campaigns, with highest sales and lower ACoS%. In order to do this, you will have to operate a careful and selective search terms isolation (something similar to the AUTO campaigns optimization below) by adding negative terms in your manual campaigns and passing gradually from BROAD keywords, that are the best to get a lot of clicks and impressions to EXACT keywords, that instead are much better to focus on targeting high converting customer search terms, leaving less space for wasted budget. This process will take you a lot of time after careful research, expansion, lots of testing of campaigns with different keywords sources and match type. Eventually, you will be able to trim out the targetings that are bringing your ACoS% far from the target level and focus on the most valuable ones.7. Optimization – Automatic Campaigns
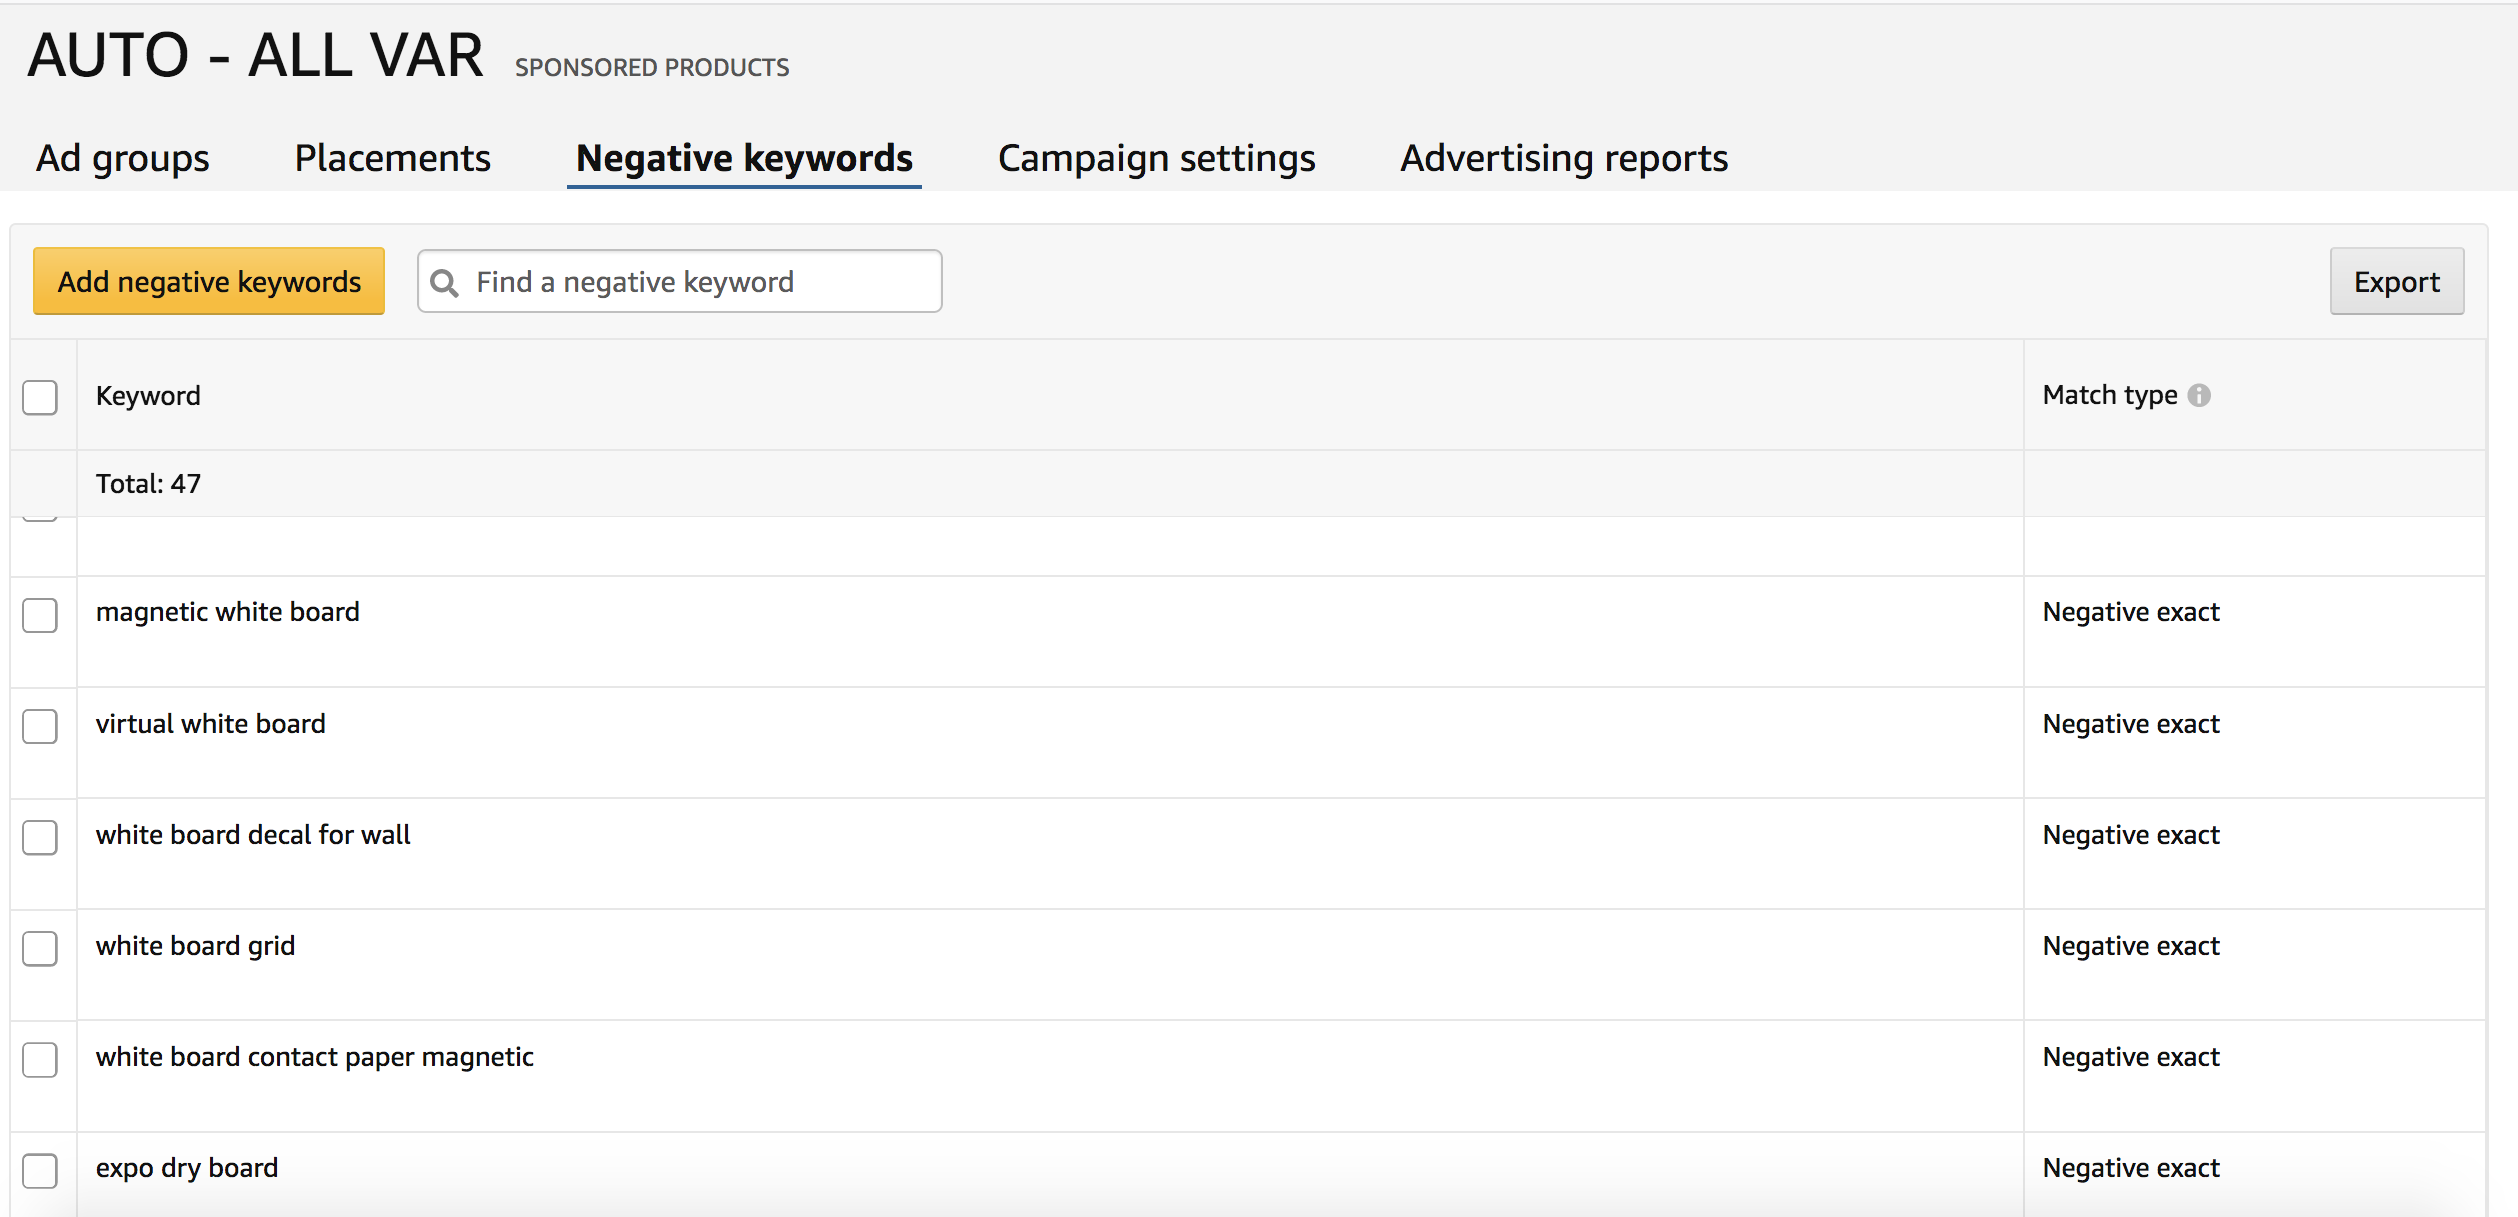
Optimizing the automatic campaigns is very important not only to reduce the ACOS, but also to give more budget space to the search terms selected by Amazon that could actually deliver important sales for your ads. There are two main ways today to optimize automatic campaigns on Amazon Sponsored Products: adjusting matches, adding negative keywords – if we don’t include here the product ads selection within the group (same system for manual campaigns). – Adjusting Matches: this feature was introduced a few months ago by Amazon as well, and makes the optimization work more manageable, even though it is not as accurate as adding negative targetings (next paragraph). Here you will be able to choose the bid for each kind of automatic targeting among Substitutes, Close match, Loose match and Complements. In the case of this screenshot below, we have already paused the Loose match targeting after a few clicks as it didn’t deliver any sales, while Substitutes and Close match were delivering sales with a good ACoS.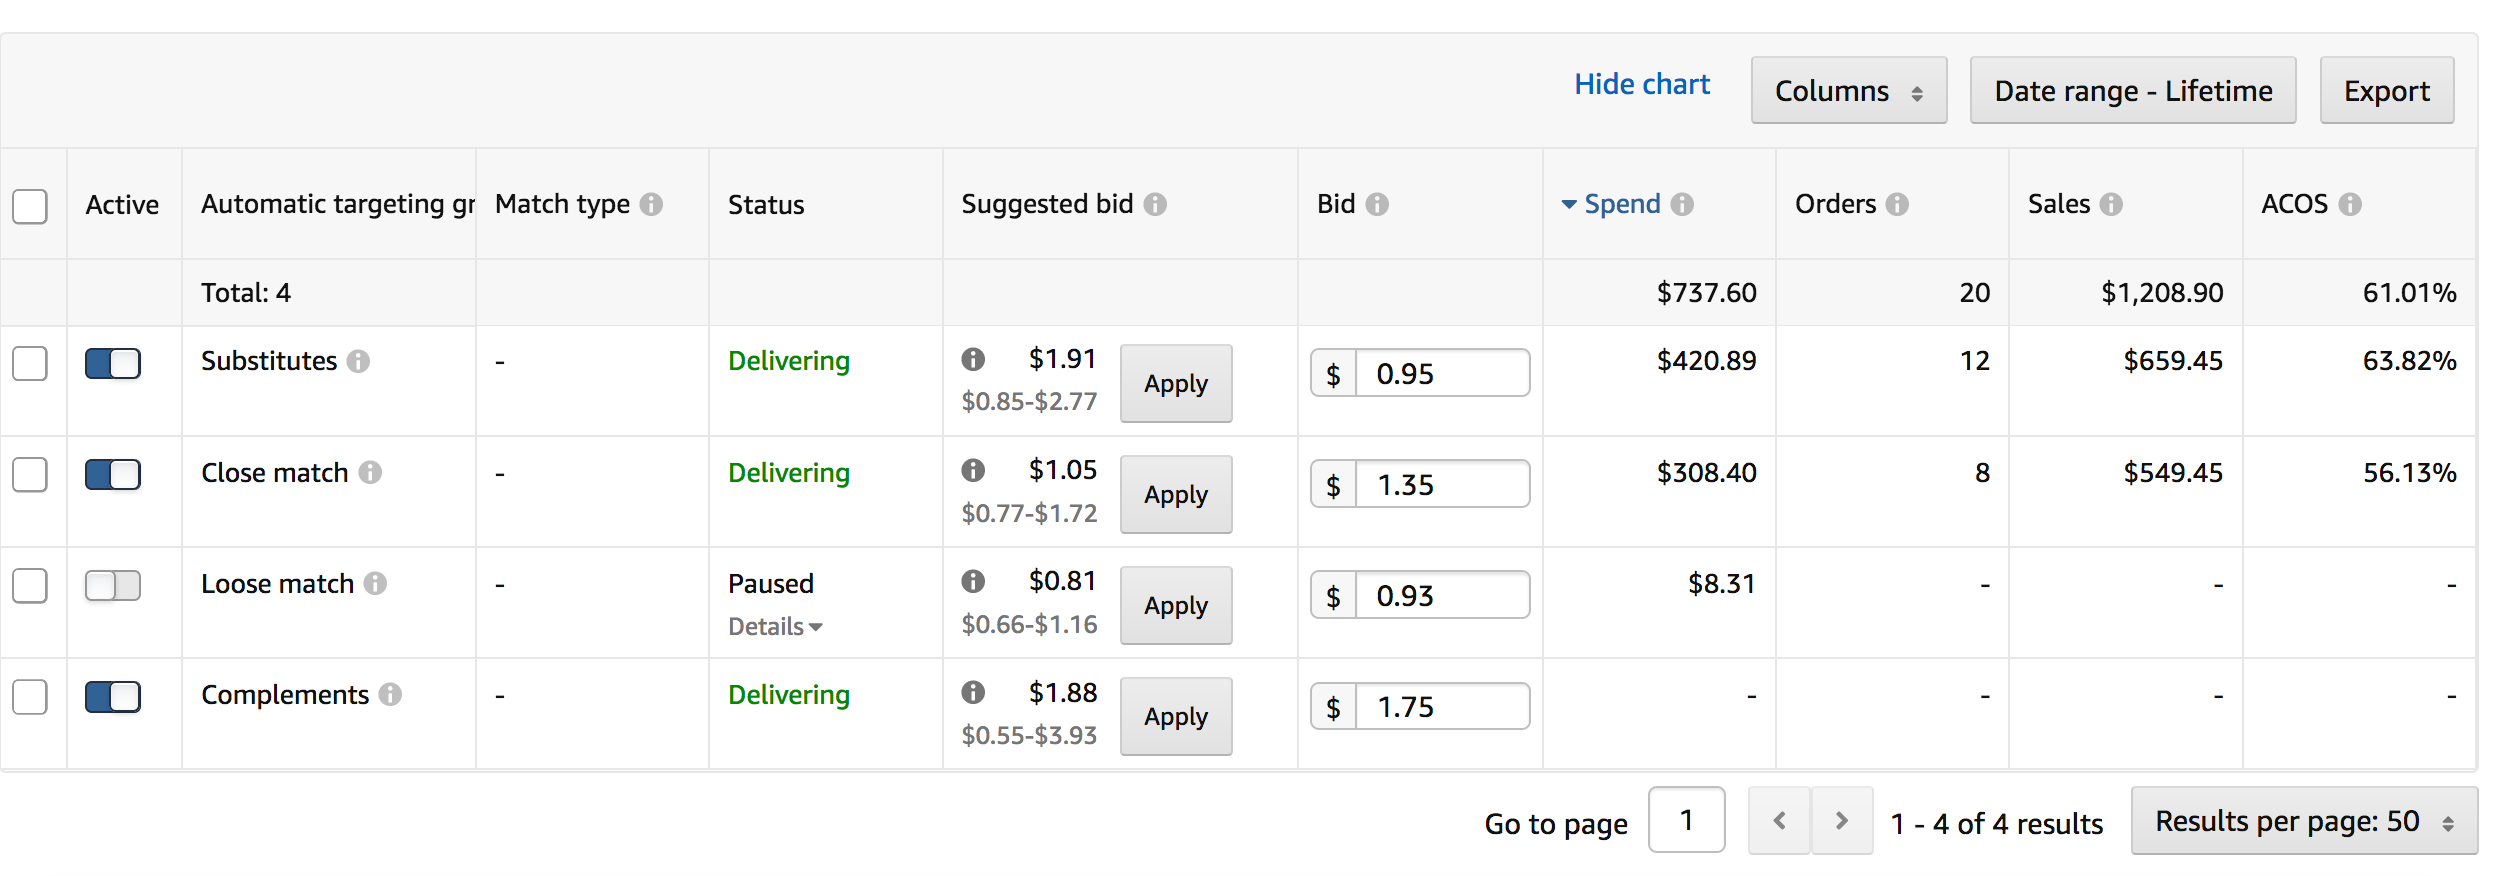 – Adding negative targetings: in order to optimize on a deeper level your automatic campaigns, you will need to add negative targetings. You can mainly do it on two levels: campaign level (negative targeting applied to all the groups) or group level (applied only to that specific group), you have a full choice on this.
We usually create auto campaigns for similar products or same product category so that you can add negative targetings only at the campaign level and save time – example below:
 If you’re wondering how to choose the negative targetings to isolate from your automatic campaigns, here’s how to find them. Go on the “Advertising Reports” section, you will be redirected to the page below, and you will be able to get your Advertising Report in 3 steps:
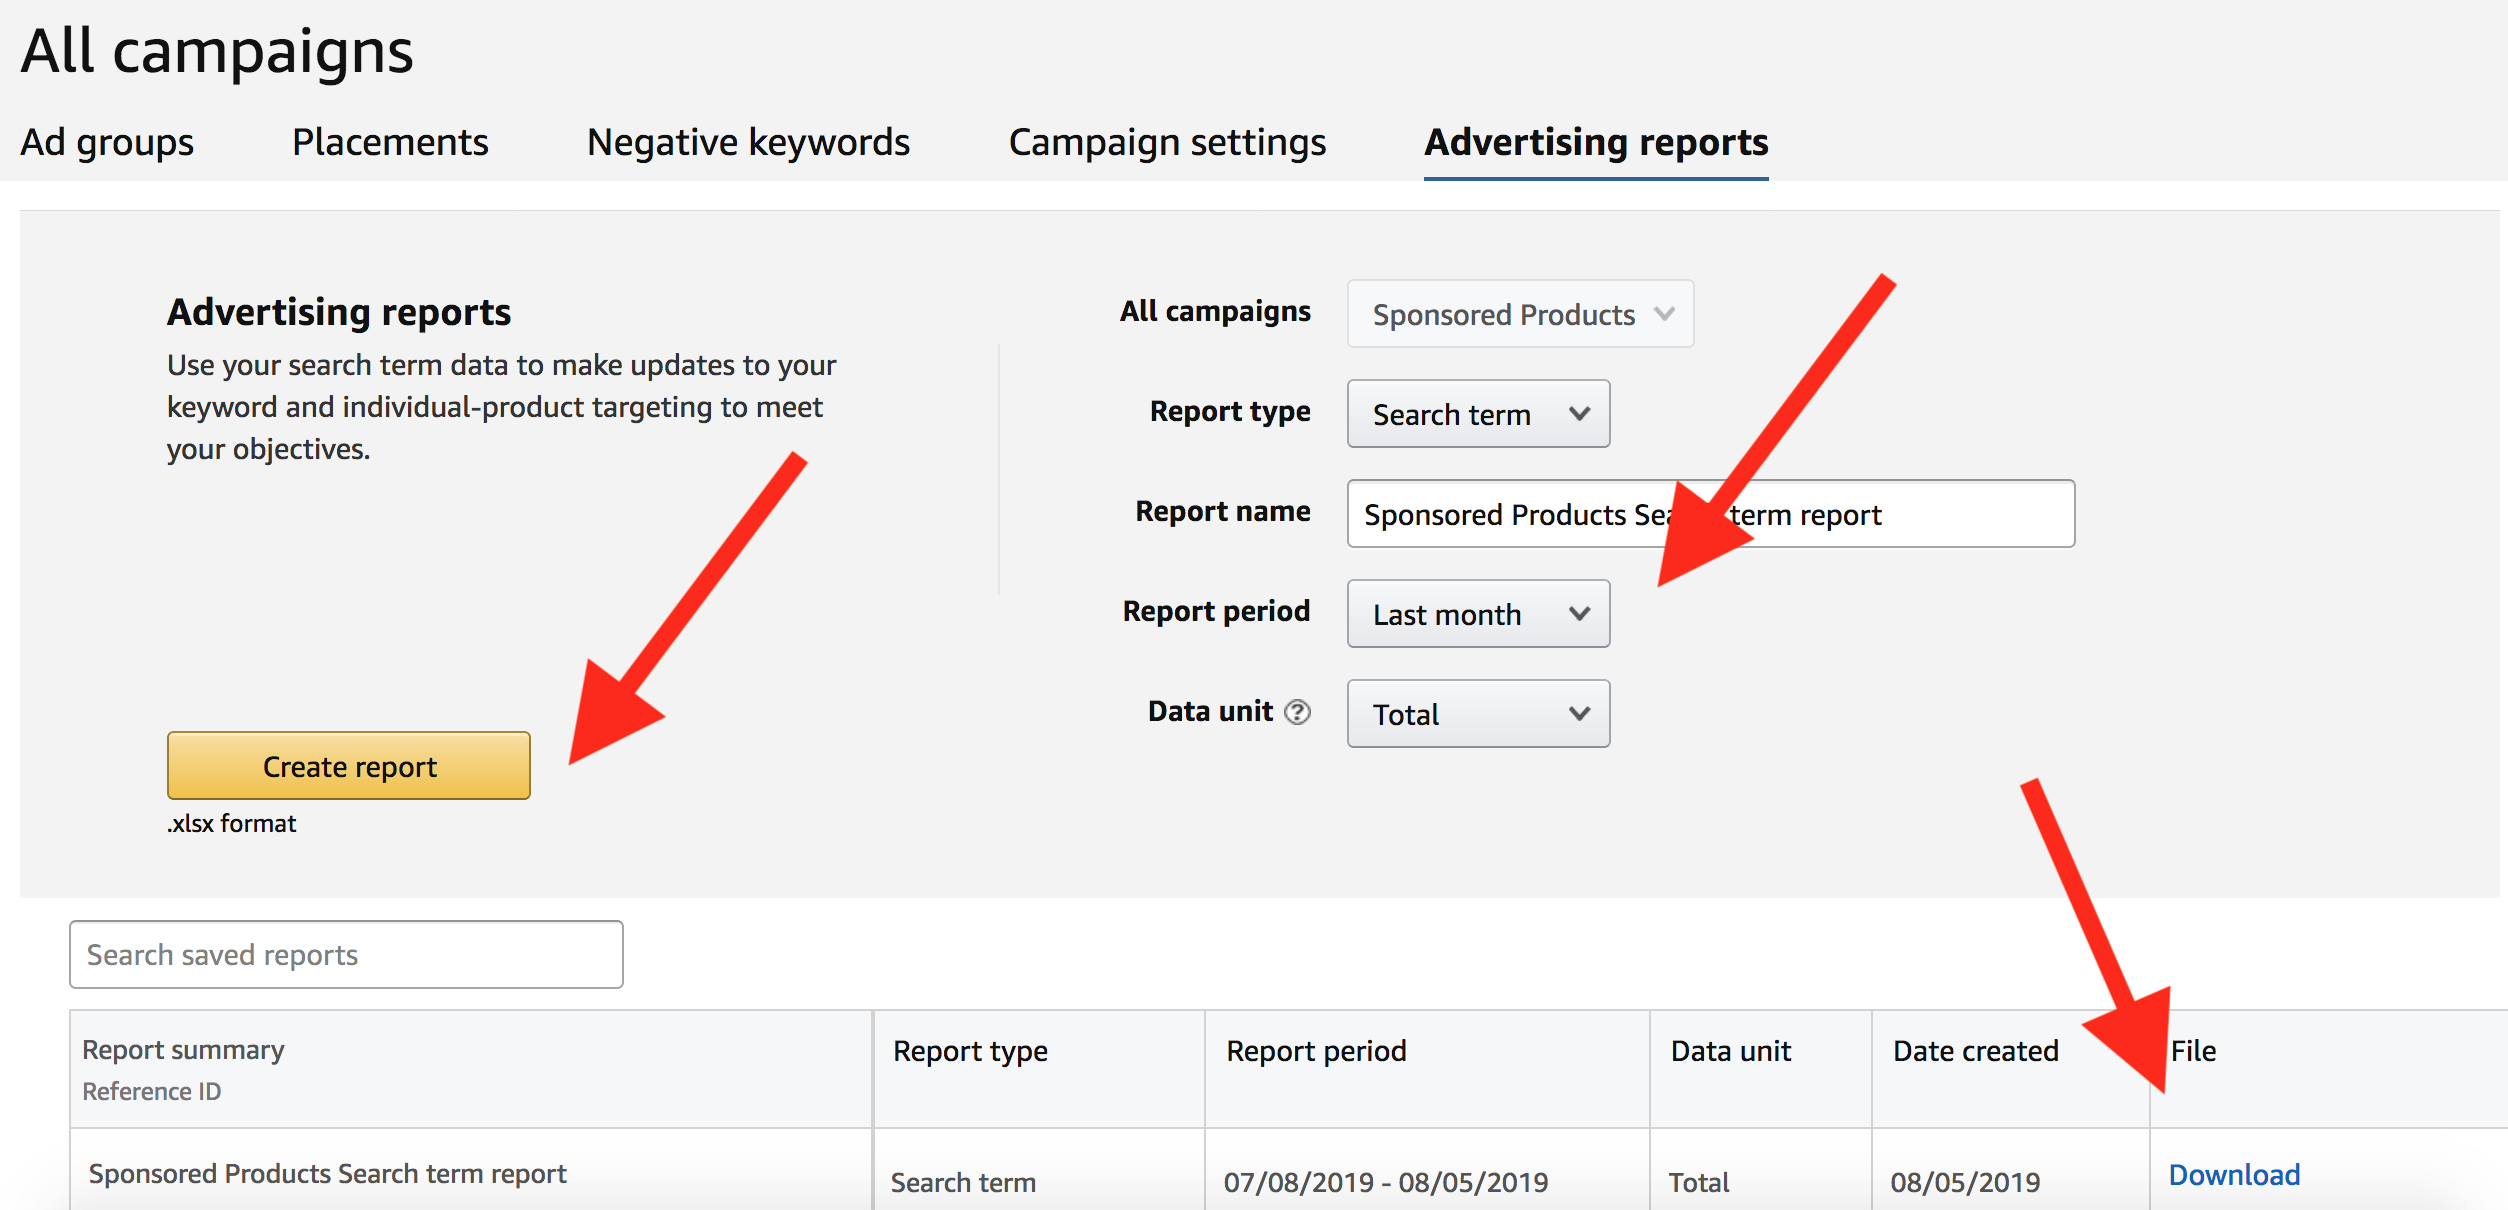 1. Select the report period, and if necessary the type of report that you need. For optimizing AUTO campaigns the “search term” report type is suitable.
2. Click on “Create report”
3. Download the report created
Open the report, make sure you filter/order data according to the right campaigns you are going to optimize, and add as negative targeting each search term that is increasing your budget spent with no sales or has a high ACoS% and you do not want to rank for.
NOTE: By default, most sellers remove a search term after 10 clicks with no sale, but this might NOT be the best strategy in some cases. If after 10 clicks your budget spent is way below your target ACoS%, you shouldn’t worry too much about adding that as a negative targeting. On the other side, for some very competitive categories, you might need as little as 5 or 7 clicks to get over the target ACoS%. Remember to take actions following carefully your strategy.
[mkd_button size=”” type=”gradient” hover_type=”gradient” target=”_self” icon_pack=”” font_weight=”” text=”See our full list of services for Amazon FBA Sellers” link=”https://wearegrowthhack.com/services-digital-marketing-fba”]8. Repeat All
Once you have created your campaigns and started to understand bidding and optimization, you will be ready to expand again and again your campaigns/groups/targetings and generate more sales while decreasing ACoS%. Repeating optimization and creating new campaigns is one of the best ways to boost your sales and decrease your costs. This happens because once you find what works and what doesn’t, you will have better chances to remove unnecessary targetings, run more tests and expand your targeting groups that actually deliver a good performance. Make sure to add new campaigns every month or every few months. One good idea is to expand your campaigns by using terms that work and new terms. Below is a list of some of the most common/useful keyword sources for your reference: – Amazon suggested keywords on campaign creation – Google Adwords keyword planning tools – Suggested keywords from search box – Pay keywords tools (e.g: merchantwords.com and similar) – Extract from Automatic Ads Reports – Reviews on your listings or on competitors listings – Related keywords and names from competitors – Online content search and related – Different uses and purposes of the product – Different ways of calling the same product (culture, age, languages, local differences) Not only you have these (and many other) keywords available, but you also have three matches type: BROAD, PHRASE, EXACT. We suggest to make use of each match type in your campaigns (might depend on your strategy once again). We will talk more in depth about how to use the 3 match type in a future post, but for now you can consider the general rule to start with Broad and work your way to Exact targeting after few weeks of tests.9. Common Q&A
Before closing this guide, we would like to add some common questions we often have from new sellers: – How many reviews should I get before starting PPC ads? This 1 million dollar question is a chicken-and-egg scenario: if you don’t have reviews, you would probably spend much more in order to get sales, while if you don’t start your PPC ads you won’t get enough sales to have reviews. While there’s not a perfect answer to this question, we definitely suggest to evaluate on the case-by-case. If you have a quick way to get organic reviews, then waiting a little before starting the PPC might be a good idea – ideally at least 5 reviews -, but if on the other side you know that your product will require longer to get organic reviews, then boosting your clicks and sales with PPC might be a better choice. – What are the display ads with text placed below the add to cart of a product page and why I can’t find a way to create them? These are display ads, available to vendors only from vendor central (or advertising.amazon.com). These ads are great for retargeting users who have viewed your product or similar or related items. These ads are not available on Seller Central at the moment. – What is the Buy Box, and why is it essential for my ads? “The Buy Box is the box on a product detail page where customers begin the purchase process by adding items to their shopping carts. A key feature of the Amazon website is that multiple sellers can offer the same product, so you may compete with other merchants to appear in the Buy Box. Amazon uses performance-based criteria to determine your Buy Box eligibility and placement status.” – Source: Amazon Advertising Services. If your product is not in the Buy Box, then your ad will not be eligible and won’t be shown on product search. In the case your ad won’t be shown, you won’t be charged. – Where do the targetings from the automatic campaigns come from? Amazon will associate targetings (keywords and products) to your ads based on your listing content, category, search terms and attributes on the back-end, bought together products, etc. For this reason you might understand that operating the right listing optimization is fundamental also for a good PPC performance. – Why my campaigns run out of budget too soon? Each campaign’s daily budget will set the spent limit of that campaign on any day. If the daily budget is relatively low while bids are high, you might run out of budget just within the first hours of the morning. For example in a campaign with a $20 daily budget and a few groups with hundreds of keywords each with a $1 or higher bid it might be very easy to run out of budget, especially if the targetings are very hot or you are in a high sale season. – Why my campaigns are not getting impressions? If your campaigns are not getting impressions, they won’t get clicks and won’t deliver any sales. Always make sure that your ads are eligible – in most of the cases, eligibility issues are related to the Buy Box -, make sure to have enough stock and to bid the correct amount of $ for each targeting. If your product is eligible for ads but still not getting impressions at all, you might contact the seller support team. In the rare case that your product has been flagged as an adult product, thus not eligible for ads, you might need to contact the seller support team as well. – Why my campaigns are not getting clicks? If you’re not getting any clicks, make sure first that you’re getting impressions. If impressions are coming but clicks aren’t, then it’s not a matter of ad eligibility but probably it’s a matter of CTR (click through rate) and bidding. Make sure your bid is high enough (at least as the level suggested by amazon) and make sure the following elements are optimized: title, main image, price. To quickly check impressions in any group, click on “Columns” > “Customize columns” and you will see this tab below: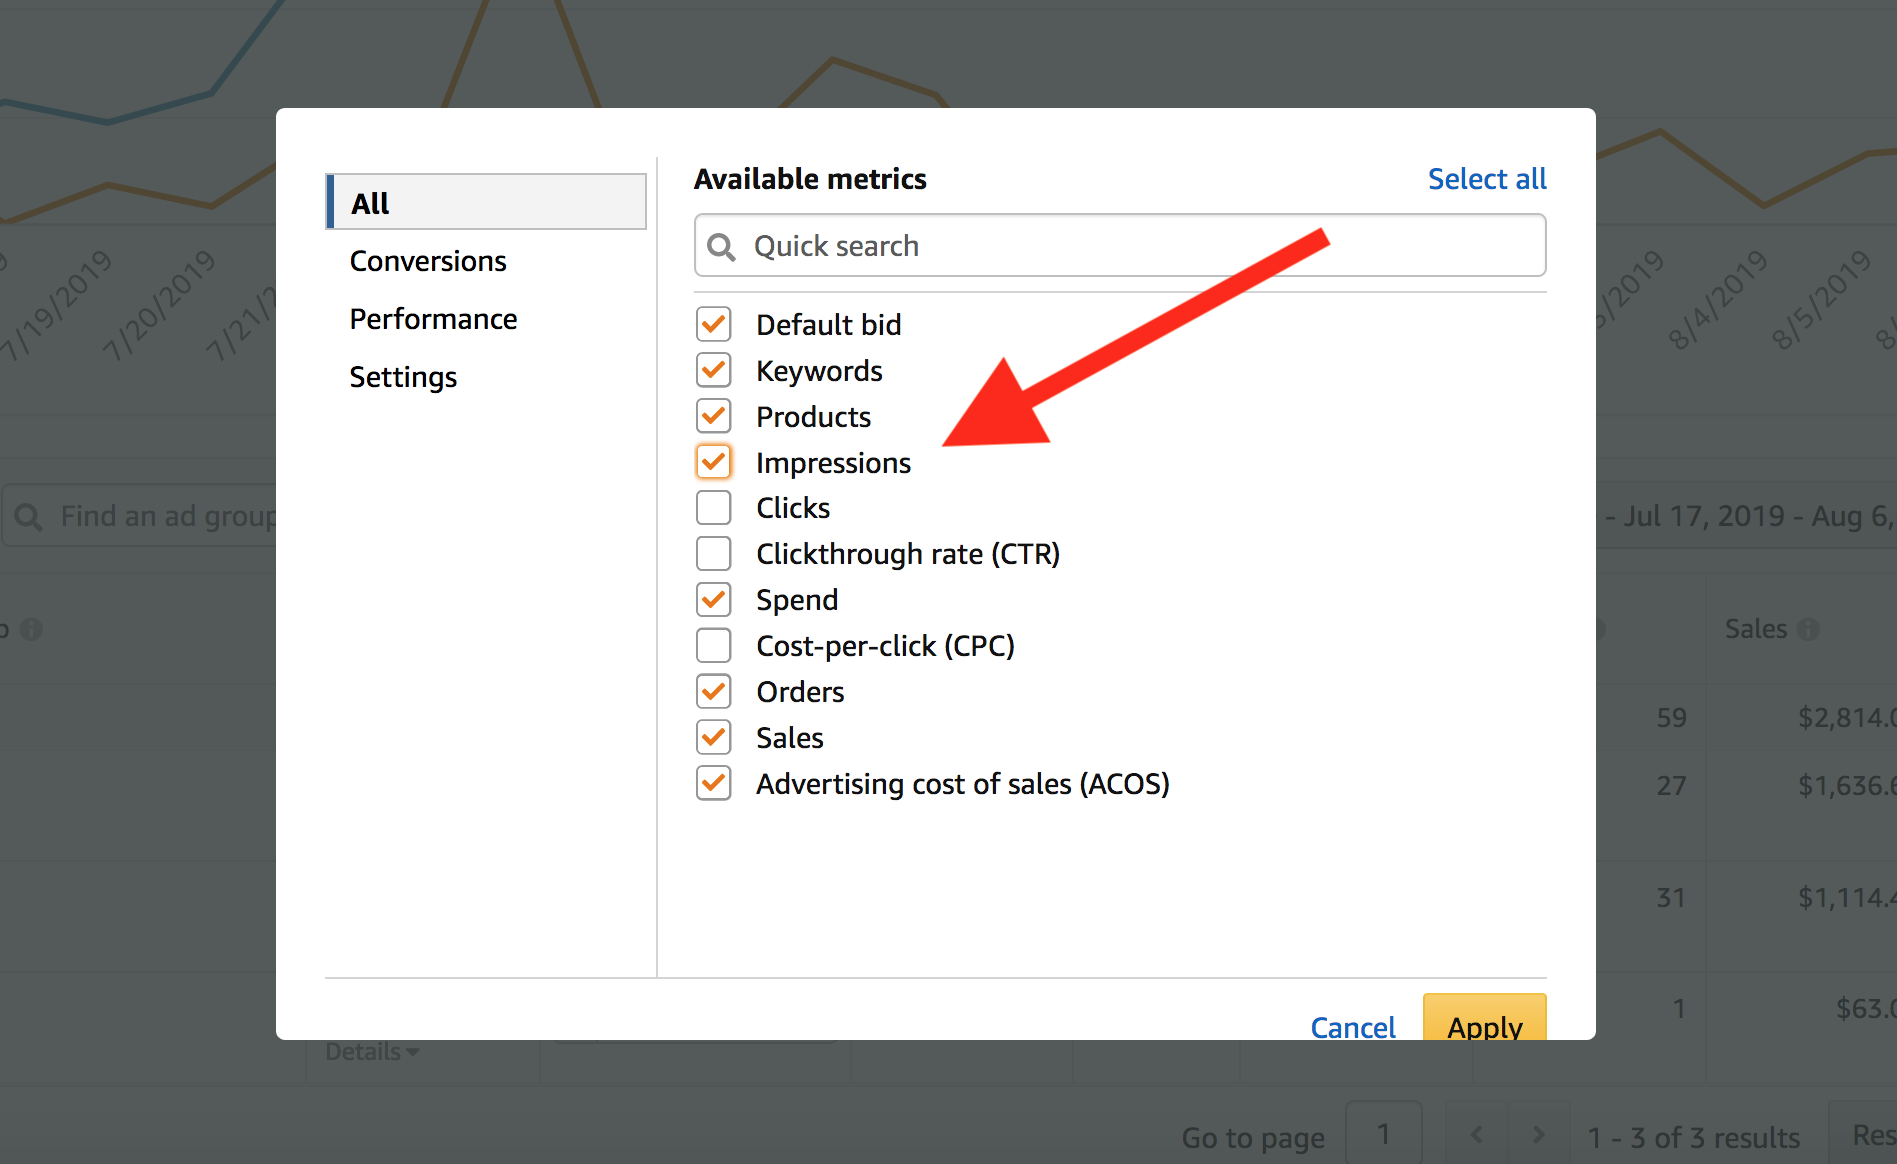


James
Nice article, David.
Why would you pause Loose Match after only $8 in spend?
Davide Nicolucci
Hi James, that one is just an example, probably the actual budget spent was more than $8 in the previous days. Also with that bid it reached probably 10 clicks or 9.
James
it says lifetime spend in the screenshot though
Aylin
Thanks for the article, David. I haven’t started selling on Amazon yet and the info in this article is a lot to take and I guess I won’t know exactly what you mean until I start my own journey with PPC. I am new, as I said, but I do want to know your thoughts on the following: what do you think of starting a 2-3 week ‘test’ phase, using ‘exact’ match type (in manual campaign) with aggressive bidding, then filtering out the ‘winner’ keywords, killing the listing and starting fresh again with a new listing (i.e. using the same product) with the keywords you now know are doing well? The whole purpose of the ‘test phase’, they say, is to collect data on ‘impressions’ and ‘cost per click’ to get an understanding of how many people are searching for your product and how competitive it is, together with how much it cost for bidding. Because the emphasis is on collecting ‘data’, quality of the product and having the best listing is not as important at this stage. Following from this, the second and third phase becomes more strategic, based on the results from the ‘test’ phase. I’d love to know what your thoughts are on this. Its complete opposite to what you were saying (i.e. start with auto and then move to manual campaign).
Thanks in advance.
Davide Nicolucci
Hi Aylin, I’ve never read about starting a test phase with exact matches, especially on a brand new listing for which don’t know already which keywords will work for sure on PPC. I’d start with a BROAD match instead to be able to get more matched terms by Amazon and to appear on more search results. If you want to start with EXACT though, you can do it and if you’re already sure of what keywords you want to rank for just go ahead. I’m not getting completely the part of killing the first listing and opening a new one, not sure that’s a good strategy. Thanks for the comment!
Aylin Ayta
Thanks, Davide. Chris has a podcast with Tim Jordan regarding the strategy I was referring to. Regarding the bit about ‘killing’ your listing – you’re doing this after you’ve tested your product, you’ve done an aggressive exact match campaign and now you have the data to decide whether or not to go ahead with this product. I think the reason why Tim says to ‘kill’ the listing after the test phase is because you want to get back the ‘honeymoon’ period with the real launch. It’s a great podcast. If you do end up listening to it, let me know what you think. I’d love to hear your thoughts.
Thanks again for your response.
Aylin
Davide Nicolucci
I guess we are talking more about testing the product itself or the product listing itself here, not just about PPC strategy. Would make sense I suppose… I’ll look into it, thanks for the tip!
Aylin Ayta
Thanks, Davide. Yes, that’s what I was trying to say – if, whether or not, there’s a market for the product under the keywords you are testing. Love to hear your thoughts.
jason
Well done! Very detailed! Thanks so much for this masterpiece
Davide Nicolucci
Thanks Jason!
Pat Taylor
Hi Davide,
I really appreciate this tutorial guide and your time and effort to offer this for free ! 🙂 It is very helpful and I
i am very grateful for this Davide. Many many thanks and look forward to reading more in the future.
All the best
Pat
Davide Nicolucci
My pleasure to help! I’ll be publishing more advanced topics for PPC as well, so stay tuned.
seoindiarank
Thank you for taking the time to provide us with your valuable information. We strive to provide our candidates with excellent care.As always, we appreciate you confidence and trust in us. If you searching for seo company in india. Visit us seoindiarank.com Best SEO Company in Chennai
enablerspk
Dear Davide Nicolucci it always be good to see your blog,you have knowlwdgw of amazon ppc.If you want more knowledge and information about amazon ppc read
Kbizsoft Seo
Wonderful article. I just went through the article. It’s an ultimate guide for beginners to learn about amazon ppc sponsored product ads.